Average Grades
Bonjour, quel sont les frais de livraison ? Merci
1 Answer
Show answers
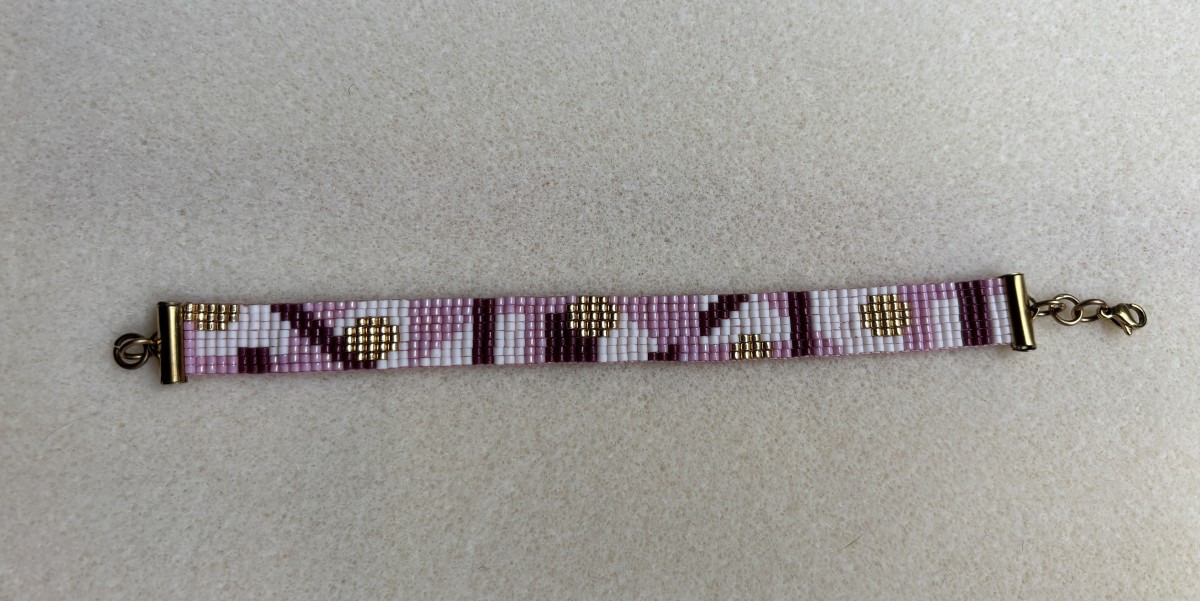
For a start in bead weaving, choose Miyuki Delica beads, which are distinguished by their regularity and optimum compatibility for geometric patterns. You can choose between loom weaving, which aligns the beads vertically and horizontally, and needle weaving, which is ideal for varied but time-consuming creations. Depending on your needs, choose Miyuki for harmonious, aesthetic results.
If you'd like to get started with Miyuki weaving, here's an article to help you choose the materials you'll need to get started. Follow it to design your basket. At the end of the page, you'll find a link to our bead weaving datasheets and a selection of tutorials for beginners.
The most widely used beads today are Miyuki Delica beads, which are cylindrical in shape and interlock perfectly with one another. They are also very regular, unlike the seed beads of our childhood, which were all different sizes and thicknesses.
Miyuki Delica are available in several sizes: 15/0, 11/0, 10/0, 8/0. 15/0 being the smallest and 8/0 the largest. Most weavers use Miyuki Delica 11/0.
Another brand offering cylindrical beads is Toho Treasure. However, they are not exactly the same size as Miyuki, so it's difficult to use them in a weave with other Delica Miyuki beads, as this will make the weave a little less regular. It's better to use Miyuki Delica only or Toho Treasure only. You can also use classic seed beads.
It all depends on the look you want to achieve, but the regularity of the beads is very important for a pretty result, especially when the motif is geometric.
Of course, you can also use other pearls as long as they are well calibrated. For example, it's quite common to use classic seed beads.

The next step is to choose between loom weaving and needle weaving. Needle weaving can be used for Peyote and Brick Stitchweaving and many other types of weaving too. These techniques are very different.
Loom weaving produces weaves where the beads are aligned both vertically and horizontally, whereas Peyote and Brick Stitch produce weaves with the beads aligned in one direction and staggered in the other. Weaving grids are not the same, and finishing methods are often very different too.
It is impossible to use a loom grid for Peyote and Brick Stitch, and vice versa. Nor is it possible to convert a loom grid to the other two techniques. However, it is possible to make a loom grid using the Square Stitch needle weaving technique.
Here are a few examples of how these different techniques have been used: from left to right:

Loom: There are many different kinds, depending on what you want to make. Our low-cost loom is great for testing pearl weaving, but if you'd like one with better hold, you can check out this video on how to choose your loom, where we show you the different looms.
Needle: You can use size 10 to 12 needles for size 11/0 beads, and 12 to 13 for size 15/0 beads. If you're making creations over 2 cm wide, long needles are preferable. The Miyuki needle pack is best, as it contains needles of two different lengths.
Thread: Many threads are compatible. To keep things simple, start with Miyuki Beading Thread, KO or Fireline 0.12 mm. Don't hesitate to test them out to find the one that suits you best once you're comfortable with the technique.
Clasps: There are many different clasps to choose from, depending on the finish you require. But be careful! Remember to check that the width of your bracelet corresponds to the width of one of our clasps before weaving it, as you could end up weaving without a suitable clasp. We sell end pieces for slip-on weaving to which you'll need to add a clasp (lobster clasp, spring clasp, T-clasp) with rings, or Beadslide slip-on clasps with a very good finish. You can also choose to make a bracelet with a sliding knot, as in this tutorial: Miyuki woven bracelet with sliding knot. Start with a simple clasp for your first bracelet. To help you choose, we've made another datasheet specifically on how to finish a loom bracelet.

Needle weaving requires less equipment, but takes longer to weave than loom weaving. However, you can make many more different creations than with a loom, which is reserved for weaving bracelets (and other jewelry made from strips of woven beads).
Needle: Choose size 12 needles for 11/0 and size 13 for 15/0. You need very fine needles, flexible but not too flexible, to slip between the beads.
Thread: To start with, you can use Miyuki Beading Thread, KO or One-G. These are mid-range threads. These are mid-range threads. You can also try with 0.10 mm fireline nylon thread.
Primers : For badges, you can glue your weavings onto brooches and pins. For bracelets, you can either finish your bracelet with a point on each side and attach a closed ring to each point, then add the clasp, or you can use slip-on end caps or clasps using this technique: How to adapt Peyote weaving to a weaving end cap?

Beading mat: This accessory improves weaving comfort. The beads hardly roll on it, and are placed with the hole facing upwards, so it's easier to thread them. It also makes it easier to weave while traveling. Some beadmakers keep themselves busy in the car or on the bus! There are beading mats that you can re-cut and place in a small tray, or beading trays with edges.
Quick Start Peyote: Peyote can be difficult to get started with. There's a little card with holes to help you get started.
Embroidery scissors: You'll need to cut the thread very close to the weave. Small, sharp scissors are ideal.
You can find all our bead-weaving data sheets here: Learn bead weaving.
Some beginner tutorials:


Credits
Perles & Co, Internet & E-Commerce company [28/08/2024] Any reproduction, representation, adaptation, in any form whatsoever, even partial, is prohibited, except for reproduction for private use not intended for collective use, representation in the family circle (art. L 122-5 CPI) and online publishing on condition that the source is mentioned and a link is included to the corresponding page of our site www.perlesandco.com.