Free shipping on orders over 50€ up to 500g
French Online shop for beads and accessories for the creation of DIY jewellery and other creative hobbies

Log-in

Learn to weave Brick Stitch

Made by :Tiffanie Perles Co
Published on the :26/09/2024

How to make Brick Stitch?

Brick Stitch is a technique for weaving beads with a needle. You don't need a loom to weave your beads. All you need is weaving thread and a weaving needle. Brick Stitch is a needle weaving technique in which beads are joined together to create a brick wall effect. This stitch is often used to make jewelry, such as earrings, bracelets or pendants, but also for decorative motifs to make brooches.

General view of a Brick Stitch weave, showing the beads arranged like a brick wall:

Vue générale d'un tissage en Brick Stitch

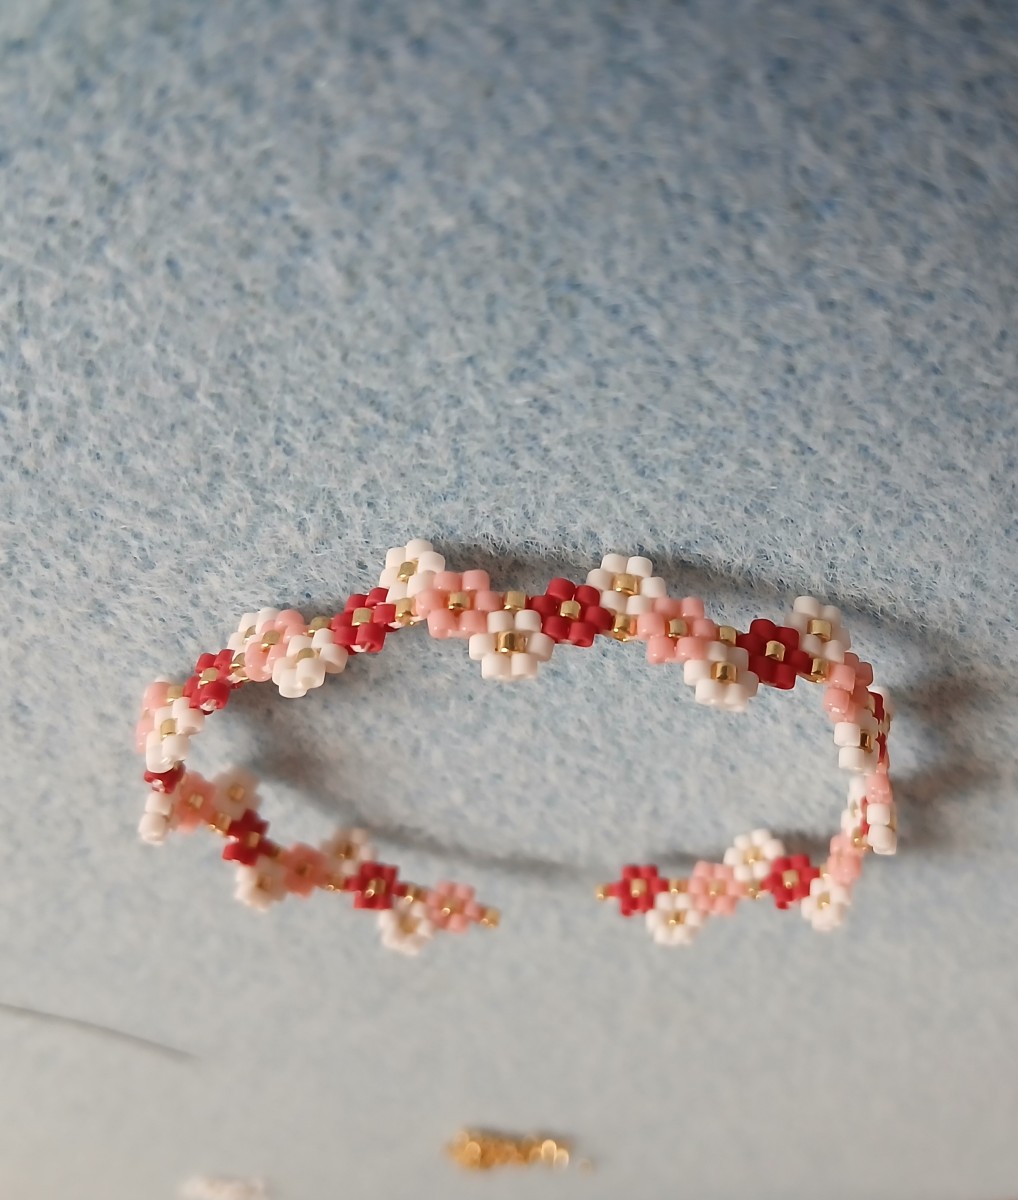
Find the materials and diagram for the Brick Stitch Flower Bracelet in the video at the bottom of the page.

Materials needed for Brick Stitch weaving

The first episode of our beginner's weaving course was devoted to equipment and general information on needle bead weaving. If you haven't already done so, go here to watch the video and read the article: Basic materials for bead weaving. To sum up, here are the materials you'll need to complete a Brick Stitch project:

  • Beads (preferably regular seed beads or Miyuki Delica beads for regular weaving)
  • A strong weaving thread, such as Miyuki or Fireline thread
  • A fine needle suitable for beads
  • A pair of embroidery scissors or thread cutters
  • A work surface (bead mat recommended)

You can adapt these tools to suit your preferences or the type of project you wish to carry out. To make a jewel or brooch, you'll need to add accessories, also known as "jewelry primers", such as rings or jewelry fasteners.

Learn the basics of Brick Stitch

Starting Brick Stitch

Brick Stitch weaving always begins with weaving the longest row of beads in the pattern.

ou commencer le brick stitch

The first row of a Brick Stitch weave is done differently from the others. It's done using a technique called Ladder Stitch. Thread two beads onto your needle and pass through the first bead again to align them side by side. Pass through the beads a second time to solidify the weave.

Brick stitch étape 1

Continue weaving the next beads one by one. To do this, thread a new bead and then pass the needle through the previous bead. If the thread was coming out of the bottom of the previous bead, pass through the top into this bead, if the thread was coming out of the top, pass through the bottom. The two beads are placed side by side. Pass back through both beads to solidify the weave. Continue like this until you reach the end of the main weaving line.

tisser des perles en ladder stitch

Weaving a new row

Once you've completed the first row, you can start Brick Stitch. Thread two beads, then pass the needle under the thread that connects two beads from the previous row. Then pass the needle back through the second bead you've just threaded to secure it in place. The first bead is automatically secured. Subsequent beads are attached one by one. For each new row, weave the first two beads in the row at the same time.

tisser une nouvelle rangée en brick stitch

faire du tissage brick stitch

Differences between Decreasing and Increasing in Brick Stitch

When you start a new row, you do either a decrease or an increase in Brick Stitch. An increase occurs when the second bead is attached next to the bead in the previous row from which the thread exits. It's a decrease if, on the other hand, the second bead is attached further away, i.e. if there's another bead between the second bead's attachment point and the bead of the previous row from which the thread exits.

Increase in Brick Stitch :

augmentation en brick stitch

Decrease in Brick Stitch:

diminution en brick stitch

In the case of a decrease, the two newly woven beads need to be ironed so that they lie side by side.

diminution étape 2

Changing thread in a bead weave

Change the thread as soon as it begins to show signs of wear and/or as soon as it is less than 10 cm long. To change the thread, you'll need to go back through the beads in the weave so as to wedge the thread. Pass through the beads adjacent to the bead from which your thread is coming, and through the beads diagonally to it, so that you can't see the thread above the beads. Pull on the last bead you've threaded to check that the first thread is trapped. Cut the thread flush. Take a new thread and clamp it in the same way. Keep the end of the thread in your hand to prevent it from slipping off when you pull.

coincer le fil

Tips for successful Brick Stitch projects

  1. Thread tension: Make sure you control the tension of your thread to avoid beads being too tight or too loose.
  2. Choosing the right beads: Good quality rocailles or Delica beads are perfect for Brick Stitch, thanks to their regular shape, which makes for more even weaving.
  3. Tick the woven beads on the diagram to help you find your way around.

Simple Brick Stitch projects

You can start by exploring simple patterns such as lozenges, chevrons or triangles. These basic shapes are perfect for creating colorful earrings or pendants. As you progress, you can try your hand at more complex designs, such as animal figures or nature-inspired motifs.

Brick Stitch Beginner Tutorials

boucles losangesbroche tipiboucles chevrons

Result
Schema  Learn to weave Brick Stitch
Tiffanie Perles Co
 Tiffanie Perles Co - Les tutos de Tiffanie
Bonjour, moi c'est Tiffanie. J'étais créatrice et designer produit chez Perles & Co. J'adore tester de nouveaux DIY et vous faire profiter de mes expériences. Vous pouvez toujours consulter les tutoriels que je vous avais concocté sur le site !
Share with my friends
Which material to use ?
Supplies
Miyuki Delica Duracoat 11/0 DB1832 - Galvanized Gold
4,80€
Miyuki Delica 11/0 DB0795 - Dyed Semi Mat Opaque Cinnabar x8g
2,90€
Miyuki Delica 11/0 DB2317 - Opaque Glazed Bayberry Mat AB x8g
4,30€
Miyuki Delica 11/0 DB1906 - Opaque Rosewater x8g
4,40€
Fireline Thread - Fused Braid 0.10 mm (4LB) Crystal x50 m
7,50€
80mm 304L stainless steel adjustable chain clasp - gold x1
1,40€
Subtotal : 28,70€
Tools
Miyuki Beading needles x6
OAC-162
Qty : 1
6980 in stock
1,50€
Worked embroidery scissors 9 cm by Perles& Co - Gold x1
4,20€
Subtotal : 26,70€
Your questions (3)
You have a question about this sheet? Ask our team and the people who have already tested it. The Perles & Co community is here to help!
By Sonia (25/07/2025 17:41:47)
Bonjour,
J'ai réalisé ce bracelet et je vous remercie beaucoup pour cette super vidéo !
Je me demandais si j'allais pas essayer de faire ce même bracelet mais en version collier à ras le cou ? Qu'en pensez vous ? Auriez vous un conseil de fermoir si la version collier est possible ?
Translate the question
Please log in to use this feature
Our Lucie expert answers you (29/07/2025 09:22:15)

Bonjour, nous avons effectivement réalisé des colliers en brick stitch, mais dans un style plutôt plastron ou sous forme d'intercalaires, jamais en ras de cou. Cela dit, un montage ras de cou est tout à fait possible. Pour le fermoir, vous pouvez procéder comme pour un bracelet : intégrer un anneau à chaque extrémité, puis ajouter un fermoir et une chaînette d’extension pour ajuster la longueur.
On adore voir vos créations, n’hésitez pas à les partager avec nous. Belle création.
Translate the answer
By ELODIE (09/03/2025 11:54:45)
Bonjour,
Comment faut il bloquer le fil du départ lorsque l'on commence le tissage ? Sur la vidéo on comprend très bien comment coincer le fil à la fin mais pas pour le fil du départ.
Merci d'avance !
Translate the question
Please log in to use this feature
Our Tiffanie expert answers you (10/03/2025 09:24:37)
Bonjour, vous le tenez en main et lorsque vous avez fini votre tissage, vous le coincez de la même manière que le fil de fin. Bonne création !
Translate the answer
By Caroline (28/09/2024 13:47:56)
Bonjour,
Peut-on utiliser du fil fireline 0,12mm au lieu du 0,10mm est-ce que ça change quelque chose ou est-ce gênant ?
Merci
Translate the question
Please log in to use this feature
Our Tiffanie J. expert answers you (02/10/2024 09:26:41)
Bonjour, oui, vous pouvez du moment qu'il passe dans votre aiguille.
Translate the answer
Your reviews (2)
Notices subject to control
5/5
Average Grades
Please log in to use this feature
By Caroline (posted on : 21/02/2025 )
Bonjour, je l'ai réalisé. super explications, Merci
Translate the notice
Our Tiffanie expert answers you (22/02/2025 10:22:38)
Merci ! :)
Translate the answer
By Marie-anne (posted on : 16/10/2024 )
Bonsoir, je n'ai pas encore essayé mais j'avoue qu'une vidéo me rend les choses bien plus claires que toutes les fiches que j'ai pu lire ! J'ai donc vraiment envie d'essayer même si je vois que la patience est le maître mot !!! En tout cas les vidéos c'est l'idéal Merci beaucoup !
Marie Anne
Translate the notice
Our Tiffanie J. expert answers you (17/10/2024 15:46:31)
Merci bonne création ! :)
Translate the answer

Credits

Perles & Co, Internet & E-Commerce company [26/09/2024] Any reproduction, representation, adaptation, in any form whatsoever, even partial, is prohibited, except for reproduction for private use not intended for collective use, representation in the family circle (art. L 122-5 CPI) and online publishing on condition that the source is mentioned and a link is included to the corresponding page of our site www.perlesandco.com.