What's a literate chart or a literate bead-weaving frame?
1- What's a lettered chart in Miyuki weaving?
On some weaving charts, you'll sometimes see letters. These letters correspond to a bead color reference in the pattern. For example, A corresponds to Miyuki Delica DB-0352. They help to avoid confusing colors on the grid. This is very useful when bead colors are very similar, when you can't differentiate between colors, or when you can't print your pattern in color.
Below is the Peyote Pair weave we're going to use as an example. This weave comes from the tutorial Miyuki Ring in Peyote Pair with panther and leopard motif.
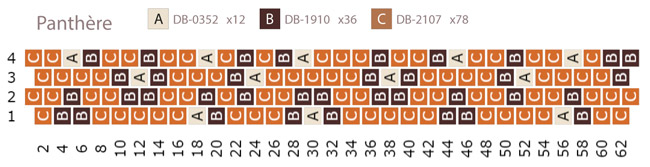
The numbers on the left indicate the number of beads wide, and the numbers at the bottom indicate the row number. Here, only the even rows are shown, but the odd rows could have been shown too.
Sometimes, there's no diagram with colored boxes representing the beads, just text. This is known as a lettered pattern. The lettered pattern gives the number of beads of a given color per weaving row. For example, for row 4, we'll have 1B, 1C, so one DB-1910 bead and one DB-2107 bead.
2- How to read a lettered weft in pearl weaving?
Lettered wefts are not always identical and depend on the type of weave. It is therefore more complex to understand them when you haven't mastered the weaving technique used. For example, a row lettered with 2B beads will not mean the same thing in Brick Stitch or Peyote, because in Peyote we fill in the holes formed by the previous rows, whereas in Brick Stitch we weave the beads over the previous row.
Once you've mastered the technique, follow the instructions in the text. Let's take the example of our Peyote Pair ring:
Rows 1 and 2: ← 4C
In peyote, the first two rows are strung in a row, which is why they are on the same line. Here, 4 C beads need to be threaded, so 4 DB-2107 beads.
The arrow indicates a change in weaving direction. Whether it goes this way or the other, what counts is the change from one row to the next. Sometimes, on certain wefts, there is no arrow to indicate the direction. So you have to guess. In other cases, the direction is indicated by (L) and (R), i.e. "Left" and "Right".
Rank 3: → 2C
Row 3 is used to create the slots specific to Peyote weaving. As you can see, the arrow changes direction. You have to string 2 C beads again, except that this is a Peyote weave. So you need to thread 1 single C bead and weave it to bead 3 of row 2, then thread 1 other C bead and weave it to bead 1 of row 2.
In some cases, you'll see "*" appear. This means it's an empty space and there are no beads to weave. You'll either have to go back to the previous rows to skip the beads, or, if these stars appear at the end of the row, you'll have to decrease the number of beads.
3- When should I use a lettered chart?
As you can see, using a lettered weft without a pattern will be a little more complicated when you're not a master weaver, or when you're dealing with a complex technique or a pattern with its own specificities. So why use a lettered weft?
- To weave faster. For people who have mastered the weaving techniques used and are used to lettered wefts, it will be quicker to look at a sheet with text only than to try and find your way around the pattern.
- Complement the pattern to visualize the rows more clearly.
- In the case of mystery diagrams. These are diagrams in which the final result is not shared. The weaver follows only the lettered weft, and a pattern appears as the weaving progresses.
- For circular and volume weaving techniques where the flat pattern is visually difficult to read. This grid will help to understand the weaving and make it easier to visualize the different rows. As shown here: Miyuki 3D star in circular Peyote.
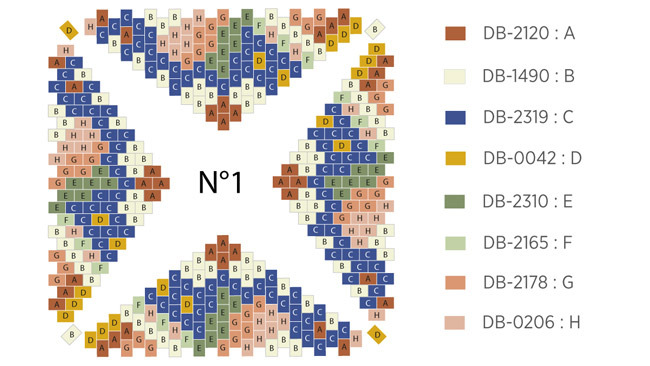
Lettered pattern for this part of a 3D star in circular Peyote weave:
Round 1: 4 A
Round 2: 2 A between each A of round 1.
Round 3: 2 B, A, 2 B, A, 2 B, A, 2 B, A.
Round 4: 2 B, B, B, 2 B, B, B, 2 B, B, B, 2 B, B, B.
Round 5: 2 C, B, C, B, 2 C, B, C, B, 2 C, B, C, B, 2 C, B, C, B.
Round 6: 2 D, C, C, C, C, 2 B, C, C, C, C, 2 D, C, C, C, C, 2 B, C, C, C, C.
Round 7: 2 C, C, C, E, C, C, 2 C, C, C, E, C, C, 2 C, C, C, E, C, C, 2 C, C, C, E, C, C.
Round 8: 2 F, C, D, C, E, G, C, 2 B, C, G, E, C, D, C, 2 F, C, D, C, E, G, C, 2 B, C, G, E, C, D, C.
Round 9: 2 B, H, C, C, E, G, H, C, 2 C, C, H, G, E, C, C, H, 2 B, H, C, C, E, G, H, C, 2 C, C, H, G, E, C, C, H.
Round 10: 2 D, B, F, C, E, G, H, H, C, 2 B, C, H, H, G, E, C, F, B, 2 D, B, F, C, E, G, H, H, C, 2 B, C, H, H, G, E, C, F, B.
Round 11: 2 D, A, B, H, C, E, G, H, C, A, 2 C, A, C, H, G, E, C, H, B, A, 2 D, A, B, H, C, E, G, H, C, A, 2 C, A, C, H, G, E, C, H, B, A.
Round 12: 2 D, A, G, B, F, E, G, H, B, C, C, 2 H, C, C, B, H, G, E, F, B, G, A, 2 D, A, G, B, F, E, G, H, B, C, C, 2 H, C, C, B, H, G, E, F, B, G, A.
Round 13: B, A, G, G, B, E, G, H, B, B, C, A, D, A, C, B, B, H, G, E, B, G, G, A, B, A, G, G, B, E, G, H, B, B, C, A, D, A, C, B, B, H, G, E, B, G, G, A.
4- Lettered chart trays
These are trays with lettered squares, not numbered. The bead reference corresponding to the letter is placed in the compartments of the beading mat. You can also pin a piece of paper with the letter of the color where you place the beads. Discover our beading trays and mats in the beading accessories category.


