String 42 beads on about 60 cm of thread (without detaching it from the spool), repeating the following sequence: 1 brown rock - 5 black rocks.
Pass through the first brown roc to form a circle.

We propose you today a custom tuto to continue the series. Discover in this tutorial how to customize or personalize a lighter with a beaded case. This everyday object of very simple appearance, can, thanks to this tutorial, become a real small decorative object to leave next to a candle. It can also be an excellent gift idea. Keep the same lighter and change its case according to your desires.
As for the colours, discover without delay the two versions of lighter proposed by Sylvie alias @Du fil et des perles. You are free to decline this diagram with other patterns, other colors. To do so, go to our Miyuki 11/0 Rockets category to discover all the available references.
Technically, this lighter case is made using the peyote weaving technique with Miyuki 11/0 seed beads. If you are a beginner or if you need a little reminder on the technique, you can consult our pearl weaving technical sheets :
And to go further in the customization of objects, you can find our latest bead weaving tutorials :
Now it's your turn to be creative! And don't forget to show us your creations onour Facebook page, in thePerles & Co customer super club or onInstagram by tagging us with @perlesandco or with the #perlesandco.
String 42 beads on about 60 cm of thread (without detaching it from the spool), repeating the following sequence: 1 brown rock - 5 black rocks.
Pass through the first brown roc to form a circle.

Start the peyote weaving by repeating the following sequence: 1 brown rock - 1 bronze rock - 1 brown rock.
Close the row by passing through the first brown roc put in step 1 (the one from which the thread comes off the bobbin), and then through the first brown roc put in at the beginning of this step.
You now have 3 rows. Here is a picture of the result.
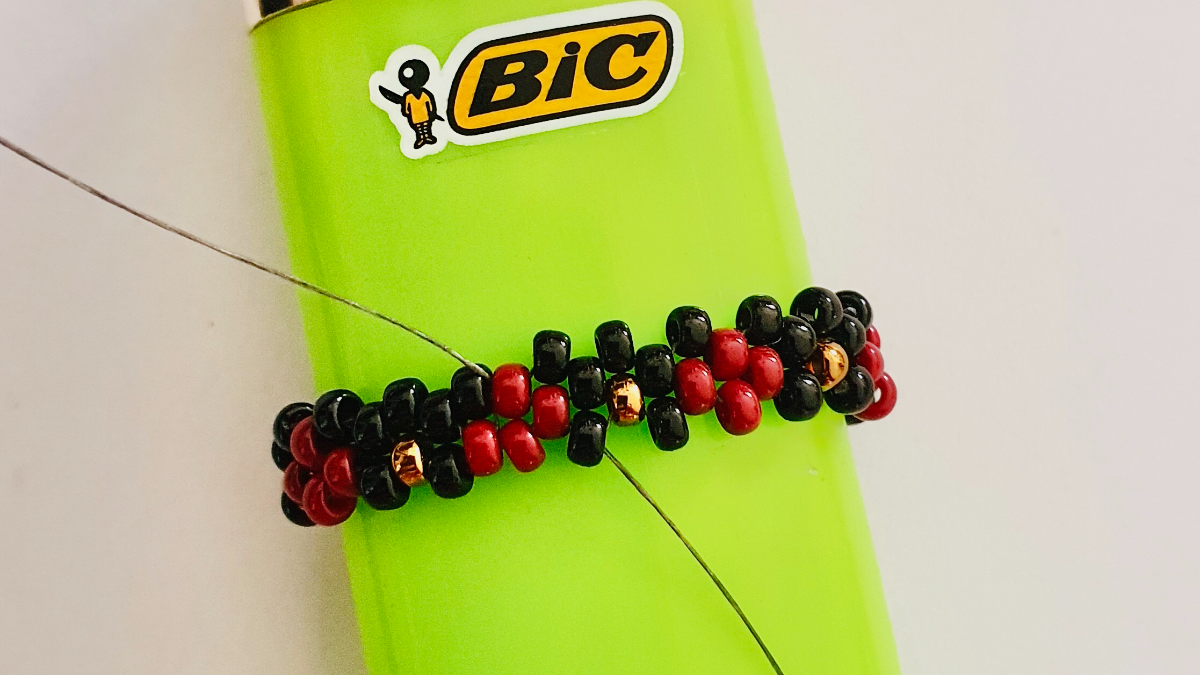
Start the 4th row by repeating the following sequence: 2 black roc - 1 brown roc. Tighten the thread as you go along so that a ring forms.
Close the row as before: pass through the first brown roc put in step 2 and through the first black roc put in at the beginning of this step.
Thread the ring that has formed on the lighter. Tighten the wires on both sides and cut the one attached to the spool leaving about 20 cm of length.
You should get the result in the picture.

5th row: repeat 1 dark red rock - 2 black rocks. Tighten the weave as you go along. The pattern is starting to form.

6th row: repeat 1 dark red rock - 1 bronze rock - 1 dark red rock.
You get the result in the picture.
Continue weaving around the lighter, row after row, following the diagram for the colour changes.
Tighten the work as you go along to get a regular weave that fits tightly around the lighter.
Change yarns as often as necessary (lock the old and new yarns together by zigzagging through the weave before continuing. Cut the threads on the reverse side of the work)
Finishing the top:
The beginning of the peyote weave is usually a bit loose, so the patterns can be uneven. To remedy this, unravel the first three rows at the beginning and reweave them tightly. Use the 20 cm of yarn saved at the beginning to iron in the whole edge of the lighter, and then in the body for more solidity.

Bottom finish :
In order for the lighter not to slip when used, it is necessary to make a bottom.
Place the lighter upside down and slide the weave to make the beads of the last row stick out.
Take a new thread (about 60 cm), fix it so that it comes out of a rockery on the side.

Before you start weaving the background, you must locate the position of the beads on the oval of the lighter for the decreases that will be made at the ends.
The example in the photo does not reflect the actual colors. On a black base, I have woven the last row in turquoise and bronze just to show you the position of the 21 beads of the last row on the oval of the lighter.
The first decrease will be at the top, where the thread will have to pass between the two bronze beads without inserting any seed beads.

Back to actual colors:
Begin weaving the background by inserting 1 bronze roc 15 between each roc 11 in the last row, EXCEPT between the top two.

In the next row, you will again insert 1 bronze roc 15 between each roc 15 of the previous row EXCEPT between the two marked with an arrow.

You get this

Weave the last row of the bottom of the lighter by inserting 1 black 15 roc between each bronze roc of the previous row

Pass the thread through the last row of 15 black rocks, go all the way around and tighten to close the oval that has formed. Then stop the thread by zigzagging as much as possible in all the beads on the bottom and then in the beads on the body of the lighter.
Your case is finished!
I advise you to choose a lighter of the same colour as the upper edge of the case so that there is no demarcation between the weaving and the edge of the lighter.




You have a question about this tutorial? Ask it to our team and the people who have already tested it. The Perles & Co community is here to help you!
Credits
Perles & Co, Internet & E-Commerce company [16/09/2021] Any reproduction, representation, adaptation, in any form whatsoever, even partial, is prohibited, except for reproduction for private use not intended for collective use, representation in the family circle (art. L 122-5 CPI) and online publishing on condition that the source is mentioned and a link is included to the corresponding page of our site www.perlesandco.com.