Which thread for the Miyuki?
Today, we're going to look at which wire to choose to make a simple Miyuki bracelet. We'll also present two methods for making an adjustable pearl bracelet. This is the fifth and final episode of our beginner jewelry training - summer season. Please have a look at the previous 4 episodes of the beginner's jewelry course. The aim of this course is to offer you 5 lessons to learn the basics of costume jewelry making. Each lesson is accompanied by a piece of jewelry to make at a low cost, so you can buy the tools to make jewelry and accessories step by step. By the end of this lesson, you'll be equipped and ready to make thousands of different pieces of jewelry. Go to our tutorials section to find over 2000 free jewelry tutorials.
1 - Which wire to choose for a Miyuki beaded bracelet?
Choosing wire size
To choose your wire, you first need to know the hole size of the beads you'll be using. Check each product page for the hole size indicated and note it down on a sheet of paper. Once you've noted all the hole sizes of your beads, locate the smallest size. If your beads are Miyuki delica 11/0, the hole size for these beads is 0.8 mm. Let's assume that the smallest size on your bracelet is 0.8 mm. In this case, you won't be able to use a wire larger than 0.8 mm. If you want to thread the beads easily, you'll need a wire smaller than this size.
If you're making a bracelet with wire as in the example, prefer small beads with no rough edges inside. Indeed, asperities or defects inside the bead risk eating away at the wire and damaging it. For these beads, use wire or wire rope. If the pearls are too big, say 8 mm, don't use 0.5 mm wire either, as it won't be proportionally pretty. Use a thicker wire.
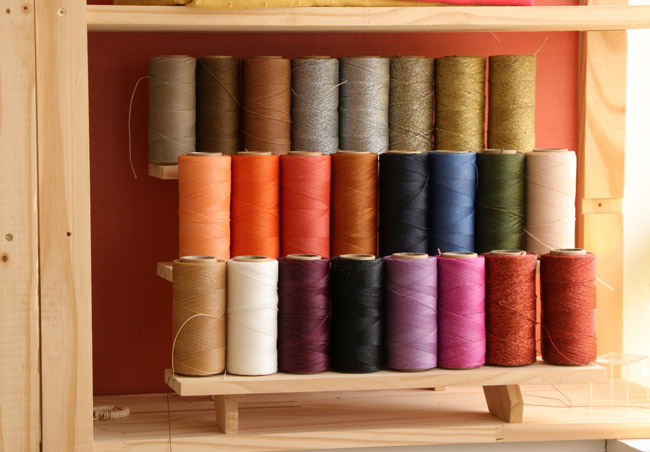
The finer the thread, the easier it will be to thread. Normally, to be able to use a needle with your thread, the thread has to be able to pass through the bead hole twice. So usually, you'd need a 0.4 mm thread. As it happens, we tested passing Linhasita 0.5 mm thread through the beads with a needle and it worked, but just barely. As you can't test before ordering your thread, if you use another thread, stick to one that's 0.4 mm maximum to avoid unpleasant surprises.
As you won't be able to test the needles to see if your thread goes through, the ideal is to use a split needle to thread your beads. This is a flexible needle that opens fully. It's a very practical needle, but fragile, so don't force it too much through the beads, or at least keep it in mind. These needles are also not suitable for bead weaving, as they are too long and soft.
Choosing thread material
If you want to make a sliding knot, it's best to use synthetic thread that will melt with the flame of a lighter. This technique eliminates the need for glue and is very strong, as long as it's done correctly. In fact, the heat will melt the wire at the knot, but for the knot to hold, the wires at the end of the knot must be fused together, without melting the wires that run under the knot and need to slide. You can still use glue, but it may come off after a while. But that's still an option.
The simplest, and easiest for a beginner, is to use a stopper bead as a sliding clasp. A stopper bead is a metal bead with a stretchable silicone interior. This interior will prevent the wire from slipping too easily. If the hole in the bead is 0.5 mm, you can use a 0.5 mm wire, as the hole needs to be slightly smaller than the wire that passes twice through the bead. You may need to test several stopper beads to find the right one. If you're using a stopper bead as a clasp, a wire made of natural material can be used. It must be sufficiently strong and resistant all the same, which is rather rare. Synthetic wires are preferable.
We recommend Linhasita and Slamcord for micro macramé.
2 - How do I tie a slip knot?
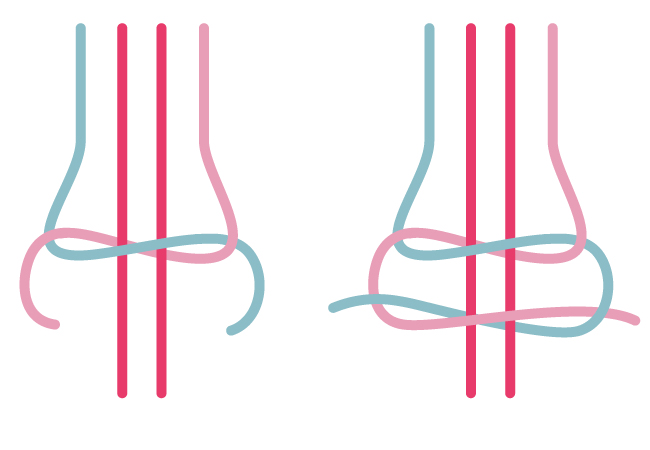
If you're wondering how to close a Miyuki bracelet without a clasp, we suggest you make a slip knot. There are several ways of making a slip knot. Here's just one of them. We're going to make a twisted slip knot:
- Cross the bracelet wires.
- Cut a new 30 cm piece of wire.
- Tie the new wire to the two bracelet wires with a simple knot. Keep the same length on each side of the knot, i.e. 15 cm.
- Lay the bracelet wires vertically and the two knot wires horizontally, flat on the table.
- Pass the right-hand thread of the sliding knot under the two bracelet wires. Pass the left-hand thread under the right-hand thread, above the two bracelet threads and through the loop formed by the right-hand thread.
- Tighten.
- Repeat step 5 and tighten several times until you have a 1 cm knot tube.
- Cut the knot wires 4 mm from the last knot.
- Melt them with a lighter, making sure the wires have fused with the knot.
To find out more about Miyuki beads, the different sizes, working techniques, types of beads, etc., discover our Miyuki guide!


