Free shipping on orders over 50€ up to 500g
French Online shop for beads and accessories for the creation of DIY jewellery and other creative hobbies

Log-in

How to ensure proper polymer clay firing?

Made by :Pauline Perles Co
Published on the :13/04/2026
How to ensure proper polymer clay firing?
In summary

Polymer clay, ideal for creating decorative objects, requires a 130-degree firing for most brands, with the exception of Kato Polyclay, which fires at 150 degrees. Among the popular brands, Fimo, Sculpey and Cernit offer a variety of options, but Fimo remains the most recognized for its quality. For optimum firing, use a dedicated oven, avoid microwaves and prefer surfaces such as tiles or glass to avoid unwanted marks.

Polymer clay firing: the complete guide to prevent your creations from going wrong

Polymer clay is a modeling paste used to make small decorative objects (beads, pendants, figurines, etc.). To do so, it needs to be baked to obtain hard or more or less flexible pieces, depending on the range used. Many brands produce this paste. The best-known is certainly Fimo clay, but there are also brands such as Cernit, Pardo, Kato Polyclay and Sculpey.

Cooking temperatures and times by brand

Most of these doughs cook at 130 degrees, but there are exceptions. Here's a summary of temperatures for Fimo, Cernit, Sculpey, Kato Polyclay and Pardo:

Fimo

Cernit

Sculpey

Kato Polyclay

Pardo

Firing temperature

120°/130°

120°/130°

120°/130°

150°

120°

Cooking time

30 min minimum

30 min minimum

min. 30 min

30 min minimum

30 min minimum

Remarks

Translucent pasta and opaque white pasta cook at 120°, otherwise they change color.

Translucent and opaque white pasta cook at 120° otherwise they change color.

Translucent pasta and opaque white cook at 120° otherwise they change color.

Good to know: Kato Polyclay is the only brand that requires 150°C. If you mix different brands in the same batch, choose the lowest temperature to avoid burning the most sensitive parts.

Do you work exclusively with Fimo? Find out more in our dedicated guide: How to bake Fimo clay: time, temperature and tips.

Which oven to bake in?

Firing polymer clay is called polymerization and takes place in a conventional oven.
A few golden rules:

  • A dedicated oven is best. During polymerization, gases and vapors are released. They leave residues in the oven and must not come into contact with your food. Investing in a small oven reserved for your polymer is the safest solution.
  • Microwaves are forbidden. It does not provide even heat and can irreparably damage your parts.
  • An oven thermometer is highly recommended. The temperature displayed on the dial is not always the true inside temperature, sometimes the difference is 10 to 20°C. A thermometer protects you from unpleasant surprises.
  • Work in a well-ventilated room, with the window ajar, to avoid the build-up of fumes.

Please note: the dough, which has just polymerized, comes out of the oven still soft and fragile. As it cools, the dough hardens and remains stable.

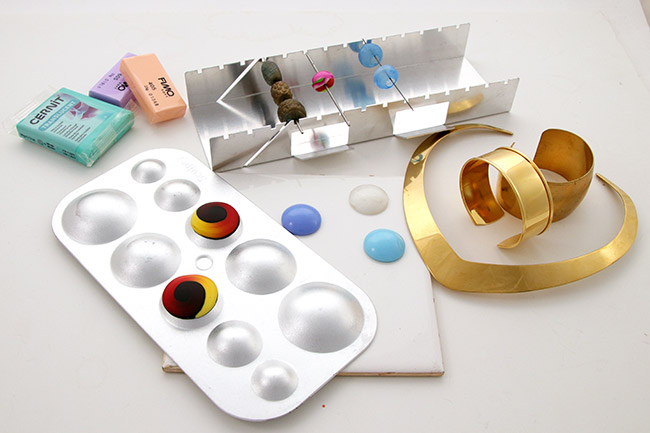
What surface should I bake my polymer clay on?

The firing support directly influences the final appearance of your piece. Here are your options:

  • Smooth tile or glass plate: ideal for flat surfaces, but the side in contact with the support will come out shiny and marked.
  • Metal brackets: ideal for curved shapes such as bracelets or rings. Metal can be easily baked with polymer.
  • Silicone molds: for cabochons or precise molded shapes.
  • Baking soda in a bowl: the anti-marking solution par excellence for undrilled parts. The ultra-fine grains leave no trace - simply blow or brush off after firing.
  • Rack for beads: your beads stay suspended on needles, no flat sides, no marks.

Tip: you can re-fire your pieces as many times as necessary to add elements, correct a defect or apply a layer of textured paste over an unwanted mark.

Les supports de cuisson

Pro tips for perfect Fimo, Sculpey, Cernit, Pardo and Kato firing:

  • For beads, there's a suitable holder where you place the beads on needles that are placed on a firing rack.
  • For non-beaded shapes, you can use a bowl made from one of the materials mentioned above as a support, and place baking soda inside. These very fine grains will ensure that the dough deposited on it will not be marked, and all you have to do is blow it off after baking or rub it with a brush to remove all those little grains.
  • For a special cabochon or moldedshape, you can also bake your pieces in silicone molds or a hollow or domed bead holder.

5 classic mistakes to avoid

Most failures in polymer baking come from the same mistakes. Here are the ones to avoid first and foremost:

  1. Don't preheat the oven: always bake in an oven that's already at temperature.
  2. Rely solely on the thermostat: use a thermometer to check the true temperature.
  3. Bake for too short a time: 30 minutes is a minimum, not an estimate. A thick piece may require 40 to 45 minutes.
  4. Remove the pieces too soon: when the dough comes out of the oven, it's still soft. This is normal! It hardens as it cools, not before.
  5. Overlapping pieces: space your creations to ensure even heat.

Result
Schema  How to ensure proper polymer clay firing?
Pauline Perles Co
 Pauline Perles Co - Pauline Perles&Co
Moi, c'est Pauline, je suis assistante SEO chez Perles & Co et depuis mon arrivée, je me découvre une passion pour les bijoux DIY ! Quel plaisir de dénicher la nouveauté qui nous fait craquer et de confectionner des pièces personnalisées..! J'en apprends davantage chaque jour et je partage ça avec vous.

At what temperature should polymer clay be baked?

Most polymer pastes (Fimo, Cernit, Sculpey, Pardo) bake at between 110°C and 130°C. Kato Polyclay is an exception, firing at 150°C. Always check the instructions on your brand's packaging, and use an oven thermometer to be sure of the actual temperature.

My polymer clay is still soft when it comes out of the oven. Is this normal?

Yes, that's quite normal! Polymer clay hardens as it cools, not immediately on removal from the oven. Allow your pieces to cool completely before handling them. If they remain soft after cooling, the firing was insufficient (temperature too low or time too short).

Share with my friends
To go further
How to cook the Fimo paste?
Howto
Jesmonite for beginners
Howto
Polymer clay curved beads bracelet
Inspiration
How to cook the Fimo paste?
Howto
Jesmonite for beginners
Howto
Polymer clay curved beads bracelet
Inspiration
How to cook the Fimo paste?
Howto
Jesmonite for beginners
Howto
Polymer clay curved beads bracelet
Inspiration
How to cook the Fimo paste?
Howto
Jesmonite for beginners
Howto
Polymer clay curved beads bracelet
Inspiration
How to cook the Fimo paste?
Howto
Jesmonite for beginners
Howto
Polymer clay curved beads bracelet
Inspiration
How to cook the Fimo paste?
Howto
Jesmonite for beginners
Howto
Polymer clay curved beads bracelet
Inspiration
How to cook the Fimo paste?
Howto
Jesmonite for beginners
Howto
Polymer clay curved beads bracelet
Inspiration
How to cook the Fimo paste?
Howto
Jesmonite for beginners
Howto
Polymer clay curved beads bracelet
Inspiration
How to cook the Fimo paste?
Howto
Jesmonite for beginners
Howto
Polymer clay curved beads bracelet
Inspiration
How to cook the Fimo paste?
Howto
Jesmonite for beginners
Howto
Polymer clay curved beads bracelet
Inspiration
Which material to use ?
Modelling clay
Modelling clay
Fimo Polymer clay
Fimo Polymer clay
Sculpey Polymer Clay
Cernit
Cernit
Kato Polyclay
Kato Polyclay
List of useful products
Fimo Thermometer in silicone
OUT-847
Qty : 1
18 in stock
19,70€
Your questions (10)
You have a question about this sheet? Ask our team and the people who have already tested it. The Perles & Co community is here to help!
By Géraldine (22/04/2026 03:01:02)
Bonjour, doit-on les boucles d’oreilles en pâte fimo ou cernit les mettre à cuire dans le four deja chaud ou commencer la cuisson dans le four froid. Un petit four style grill pain à l’intérieur est-il suffisant ou bien risque de cramé mes boucles. Merci de votre retour
Translate the question
Please log in to use this feature
Our Lucie expert answers you (27/04/2026 11:13:35)
Bonjour je vous conseille d'utiliser un four déjà préchauffé (entre 110° et 130°). Un petit four type grill-pain peut fonctionner si la température est bien maîtrisée, sinon il y a un vrai risque de surchauffe.
Translate the answer
By Rincon (10/01/2026 20:35:32)
Que manera es la más adecuada y que herramientas puedo usar para hacer los orificios en pendientes hechos con arcilla polimerica? Gracias
Translate the question
Please log in to use this feature
Our Lucie expert answers you (12/01/2026 09:00:46)
Hola, puede utilizar este cortador ATT-760
Translate the answer
By Sanz Gonzalez (09/10/2025 11:31:11)
Quisiera saber si a los cabuchones se puede hacer una incisión ( agujero para poder coser( antes o después de hornear
Translate the question
Please log in to use this feature
Our Lucie expert answers you (14/10/2025 13:38:13)
Hola, debes hacer los agujeros antes de hornear. Ten en cuenta que, según el tipo de pasta polimérica, puede producirse una contracción durante el horneado.
Translate the answer
By Fer47Boutch77 (17/07/2025 14:33:35)
J'ai d'anciennes pièces qui redeviennent collantes et molles ?
Translate the question
Please log in to use this feature
Our Lucie expert answers you (05/08/2025 09:09:34)
Bonjour, si vos anciennes pièces en pâte polymère deviennent collantes ou molles, cela peut venir d’une cuisson insuffisante ou d’un excès de plastifiants qui remontent à la surface avec le temps. Vous pouvez essayer de les nettoyer avec de l’alcool ou du savon doux, puis bien les laisser sécher. Si le problème persiste, placez-les entre deux feuilles de papier absorbant pour retirer l’excédent. 
Translate the answer
By Cabo (13/07/2025 10:50:00)
Hola, quiero empezar a trabajar con este material y he visto muchos vídeos donde dicen que una vez horneada debe quedar flexible, mi duda es cómo alcanza después el pendiente dureza ?? Quiero empezar a hacer pendientes y los que he visto es rígido! Muchas gracias
Translate the question
Please log in to use this feature
Our Laurence expert answers you (18/08/2025 09:58:09)
Hola,
Si quieres que quede más rígido, necesitas hacer piezas más gruesas.
Translate the answer
Your reviews (0)
Notices subject to control
Please log in to use this feature

Credits

Perles & Co, Internet & E-Commerce company [13/04/2026] Any reproduction, representation, adaptation, in any form whatsoever, even partial, is prohibited, except for reproduction for private use not intended for collective use, representation in the family circle (art. L 122-5 CPI) and online publishing on condition that the source is mentioned and a link is included to the corresponding page of our site www.perlesandco.com.