Free shipping on orders over 50€ up to 500g
French Online shop for beads and accessories for the creation of DIY jewellery and other creative hobbies

Log-in

How to make a Miyuki pearl T clasp?

Made by :Tiffanie Perles Co
Published on the :01/05/2020

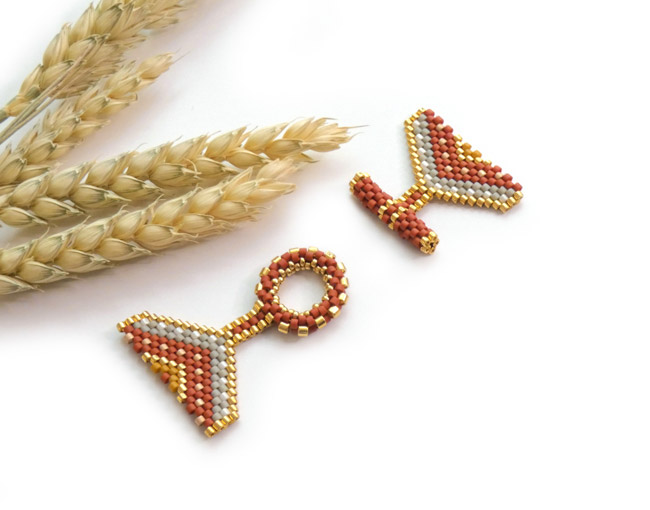
There are many ways to make clasps with pearls. We present to you in this video a solid Miyuki pearl clasp which we call "T" clasp. This clasp has already been presented in one of our old weaving kits called ?dream catcher? kit, in a limited edition, and which is no longer on sale today. Many of you have asked us how to make the kit's bracelet and its pearl clasp. Here is how we achieve this finish. The diagram for the rest of the bracelet will come soon. Stay connected and subscribe to our Facebook page to be informed of its release as it will initially be visible on Facebook Live!

Below are some written indications to support the video. Note that to make this clasp, it is highly preferable to master the Brick Stitch , OddPeyote and Circular Peyoteweaving .

Bracelet preparation:

Finish it at a point. Add strips of 3 rows of pearls minimum on the desired length with the odd Peyote weaving technique. The clasp when closed is 1.7 cm.

Realization of the bar:

1. Weave 5 golden 11/0 delicas beads on a ladder stitch. This is the stitch which is used to make the base of a Brick Stitch weaving. Join the first and the last pearl with a loop so as to make a ring with the pearls. The technique used to create this bar is tubular Brick Stitch and it is also used in the video tutorial " Long necklace and earrings woven in tubular brick stitch ".

beginning of the pearl clasp bar


2. Then weave over with the Brick Stitch technique and tie together at each end of the row, the last and the first bead in the row. You must weave in all 11/0 delicas: 1 golden row, 5 Sienna rows, 1 golden row, 1 Sienna row, 1 golden row, 5 Sienna rows, 1 golden row.
3. Wedge and cut the ends of the wires.
4. Attach the bar to one of the pearl tabs on the bracelet.

Ring creation:

1. Put on 30 15/0 golden seed beads. Form a loop by passing the wire through the first bead.
2. Make circular peyote weaving to add a third row of pearls, therefore 15 additional 15/0 seed beads.

early ring of pearl clasp in circular peyote weaving


3. Then add a row of 11/0 Sienna delicacies on both sides.

beginning of the pearl clasp ring in circular peyote weaving 2

early pearl clasp ring in circular peyote weaving 3


4. Add a second, then iron on the other side to add a second row of 11/0 Sienna pearls as well.
5. Then add a last row of 10/0 beads this time and connect the two parts of the ring.

early pearl clasp ring in circular peyote weaving 4


6. Connect the ring to the tab on the second part of the bracelet.

final pearl clasp


Do not hesitate to show your creations on our Facebook page, in the Super club group of Perles & Co customers or on Instagram by quoting us with @perlesandco or with #perlesandco.

Result
Schema  How to make a Miyuki pearl T clasp?
Tiffanie Perles Co
 Tiffanie Perles Co - Les tutos de Tiffanie
Bonjour, moi c'est Tiffanie. J'étais créatrice et designer produit chez Perles & Co. J'adore tester de nouveaux DIY et vous faire profiter de mes expériences. Vous pouvez toujours consulter les tutoriels que je vous avais concocté sur le site !
Share with my friends
Which material to use ?
List of useful products
Miyuki Delica 11/0 DB0203 - Cream Ceylon
2,40€
Ko Thread 0.25mm Apricot x50 m
UFC-730
Qty : 1
36 in stock
2,90€
Miyuki Delica Duracoat 11/0 DB1832 - Galvanized Gold
4,80€
Miyuki Seed beads Duracoat 15/0 4202 - Galvanized Gold x8g
2,70€
Miyuki Delica Duracoat 10/0 DBM1832 - Galvanized Gold x8g
5,40€
Miyuki Delica 11/0 DB2106 - Duracoat Opaque Hawthorne
3,30€
Miyuki Delica 11/0 DB2288 - Opaque Glazed Sienna Mat x8g
4,80€
Miyuki Delica 11/0 DB2282 - Opaque Glazed Cactus Mat x8g
4,80€
Weaving needles - Pony - Size 12 - 0.31x51 mm x25
1,90€
Your questions (1)
You have a question about this sheet? Ask our team and the people who have already tested it. The Perles & Co community is here to help!
By lorene (05/04/2022 14:23:18)
J'ai regardé le tuto avec un grand intérêt et je voulais savoir s'il était possible de réaliser le même système d'attache sans varier la taille des perles pour la partie en tissage peyote circulaire?
Translate the question
Please log in to use this feature
Our Tiffanie J. expert answers you (25/04/2022 16:39:08)
Bonjour, non c'est la différence de taille des perles qui permettent de créer cet anneau. Il est possible de faire des bracelets tubes avec d'autres techniques, mais pour un si petit anneau ça ne fonctionnera pas ou mal. ex de bracelet : https://www.perlesandco.com/tutoriels/t15311-bracelet-jonc-en-brick-stitch-tubulaire-perles-miyuki-vertes.html
Translate the answer
Your reviews (1)
Notices subject to control
4/5
Average Grades
Please log in to use this feature
By Marion (posted on : 04/05/2024 )
Après avoir repris trois fois le tissage de l'anneau (et à devenir folle à faire des schémas pour savoir ce qui ne fonctionne pas), je me suis intéressée aux explications écrites : ce n'est pas une base de 15 mais de 30 perles pour démarrer l'anneau. Sinon le tuto est clair et le résultat est très sympa. Merci Perles&co !
Translate the notice

Credits

Perles & Co, Internet & E-Commerce company [01/05/2020] Any reproduction, representation, adaptation, in any form whatsoever, even partial, is prohibited, except for reproduction for private use not intended for collective use, representation in the family circle (art. L 122-5 CPI) and online publishing on condition that the source is mentioned and a link is included to the corresponding page of our site www.perlesandco.com.