Free shipping on orders over 50€ up to 500g
French Online shop for beads and accessories for the creation of DIY jewellery and other creative hobbies

Log-in

Tuto Rings with Natural Stones twisted wire gold filled

Made by :Tiffanie Perles Co
Published on the :19/10/2022
Time :5 minutes
Level :Easy
Prices :51,00€
Tuto Rings with Natural Stones twisted wire gold filled

How to make a ring with wire and stone beads?

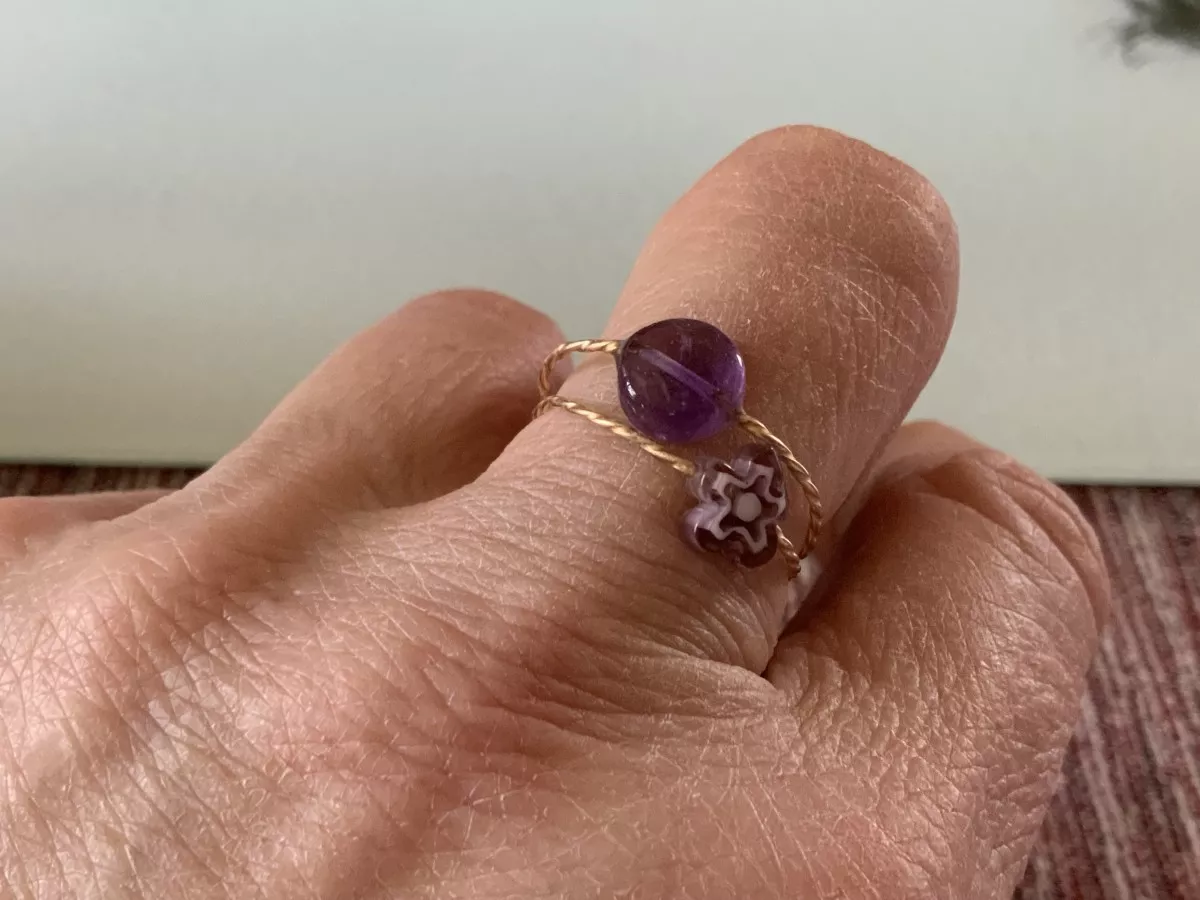
Would you like to create gemstone rings, but don't want to invest in professional jeweler's equipment? Here's an easy jewelry tutorial you might enjoy. To make the wire rings, we used hard-twisted Gold Filled wire. This wire is the most expensive product on this tutorial's list of materials, but it's essential for a high-quality, long-lasting finish. It is sold in 1.5 m lengths, allowing you to make between 25 and 28 rings. You can also make a few rings and use the rest for bracelets like these:

This wire should be strong enough not to deform easily, and thin enough to pass through the hole in the 8 mm diameter stone pucks. You'll need to recut the wire with precision cutters, as the hole on one side is smaller. You can also use a bead reamer, if you have one, to enlarge the hole if necessary.

The other essential element is glue. Hasulith glue will be too weak for this purpose. Use two-component glue, which involves mixing two pastes together. After 24 hours drying time, the glue will hold the wire in the bead. The glue should protrude a little from the hole and be distributed over the wire and the entrance to the hole. Once dry, it will shrink a little and be less visible.

Have fun creating all kinds of natural stone rings with this technique. You can also use freshwater beads or other small pearls.

The metal triboulet is not essential. You can replace it with a tubular object about the size of your finger.

Small carnelian and rose quartz beads have been withdrawn from the material list, as the hole is smaller and irregular, creating incompatibilities with the wire.

Tutorial steps

Step 1
Tuto Rings with Natural Stones twisted wire gold filled : Step 1

Wrap and form the thread around a tube that is about the size of your finger. You can do this by hand easily.

Step 2
Tuto Rings with Natural Stones twisted wire gold filled : Step 2

Cut the wire to obtain your ring. With round pliers, fold the last few millimeters of each end to form a straight line at the opening. The ends should be aligned in a line. As you can see in the transparency, the bead hole is a straight line. It will be easier to put the wire in the hole if it is straight rather than curved.

Prepare the glue in the cup provided with it. You need to mix the same amount of paste in it. You don't need to mix a large amount.

Step 3
Tuto Rings with Natural Stones twisted wire gold filled : Step 3

Open the opening by twisting the two ends. To do this, grasp one end with your fingers and the other end with the pliers and pull the ends apart without twisting them. This will make it easier to place the bead on one end, then the other.

Step 4
Tuto Rings with Natural Stones twisted wire gold filled : Step 4

Apply glue to 2 or 3 mm of each side of the wire, spreading it well. Tuck the bead into the first piece of wire. Glue should stick out slightly on the wire and bead. Then place the second end. Wait 24 hours before wearing your ring.

Step 5
Tuto Rings with Natural Stones twisted wire gold filled : Step 5

For the 6 mm pucks, you will have to cut the end of the wire at the point because the hole is smaller. The wire may not go through the whole bead.

Result
Schema  Tuto Rings with Natural Stones twisted wire gold filled
Tiffanie Perles Co
 Tiffanie Perles Co - Les tutos de Tiffanie
Bonjour, moi c'est Tiffanie. J'étais créatrice et designer produit chez Perles & Co. J'adore tester de nouveaux DIY et vous faire profiter de mes expériences. Vous pouvez toujours consulter les tutoriels que je vous avais concocté sur le site !
Associated keywords
Evènements
Couleurs / Effets
Niveau de réalisation
Pour qui ?
Share with my friends
Which material to use ?
Supplies
Twisted hard wire 0.85 mm x1.5m
GLD-499
Qty : 1
10 in stock
46,50€
8mm Round flat gemstone bead - Aventurine x1
1,30€
8mm Round flat gemstone bead - Amethyst x1
1,40€
8mm Round flat gemstone bead - Lapis lazuli x1
1,80€
Subtotal : 51,00€
Tools
Epoxy-based 2-component UHU Plus Endfest 300 - 90 min adhesive
18,00€
Ring Stick Plastic size 0-13
OUTIL-547
Qty : 1
21 in stock
4,00€
Pince ronde manche pailleté
OUTIL-134
Qty : 1
99 in stock
5,60€
Cutting pliers Flush cutter eco x1
OUT-019
Qty : 1
44 in stock
9,50€
Subtotal : 37,10€
Please note that the quantities of the suggested equivalents are not necessarily exact. You can adjust them in your basket.
Equivalent product
Your questions (2)

You have a question about this tutorial? Ask it to our team and the people who have already tested it. The Perles & Co community is here to help you!

By PATRICIA (14/10/2024 14:57:11)
Bonjour, puis-je utiliser de la colle à bijoux Hasulith ?
Translate the question
Please log in to use this feature
Our Tiffanie J. expert answers you (16/10/2024 09:15:40)
Bonjour, oui mais ce sera un peu plus fragile. Il faudra faire un peu plus attention et bien attendre 24h avant de porter les bagues.
Translate the answer
By Emma (12/06/2023 14:46:33)
Quelle est la référence de l'outil sur la photo de l'étape 1 ?
Translate the question
Please log in to use this feature
Our Bénédicte R. expert answers you (21/06/2023 10:21:39)
Bonjour,

Il s'agit d'un triboulet, idéal pour mesurer très précisément le tour de doigt à partir d'une bague, ou ici pour former la bague.
Le plus abordable que nous proposons sur notre site est celui- ci : https://www.perlesandco.com/Triboulet-metrique-plastique-noir-p-13474.html
Bonne journée
Translate the answer
Your reviews (2)
Notices subject to control
5/5
Average Grades
Please log in to use this feature
By Béatrice (posted on : 08/01/2025 )
Bonjour,
Je viens de recevoir de quoi faire cette bague, j’ai pris plusieurs perles et malheureusement, le fil ne rentre dans aucune…🤔
Et avec la colle recommandée ça ne tiens pas. Au bout de 3h la perle que j’avais mise s’est enlevée toute seule, aucune résistance.
Je ré essaierai.
Belle fin de semaine à vous.
Béa
Translate the notice
Our Tiffanie expert answers you (21/01/2025 16:17:40)
Bonjour, j'ai testé les produits. Effectivement, certaines perles ont un trou irrégulier, notamment les plus petites perles, ce qui fait que le fil passe d'un côté, mais pas de l'autre. Je vais retirer les petites perles de la liste de matériel. Si vous le souhaitez, nous pouvons essayer de tester les références de perles que vous n'avez pas réussi à utiliser pour vous envoyer des perles compatibles. Si cette option vous convient, vous pouvez contacter Julie du service client. 
Par contre, pour ce qui est de la colle, il faut bien réaliser le mélange, appliquer un peu de colle sur la jonction du fil et du trou de la perle en plus de la colle à l'intérieur et attendre 24 à 48h avant d'y toucher. Je viens de tester mes bagues réalisées il y a deux ans, j'ai essayé de tourner les perles et ça n'a pas bougé.
Translate the answer
Our Tiffanie expert answers you (09/01/2025 10:58:20)
Bonjour, même en coupant le fil de biais ? Vous avez bien laissé la colle durcir 24h ? Je vais recommander les produits pour re-tester.
Translate the answer
By Béatrice (posted on : 21/01/2025 )
Coucou
Ben finalement j’ai réussi en coupant le fils en biais comme vous m’avez conseillé 🙏. En tout je vous remercie pour vos réponses.
Belle semaine à vous.
Translate the notice

Credits

Perles & Co, Internet & E-Commerce company [19/10/2022] Any reproduction, representation, adaptation, in any form whatsoever, even partial, is prohibited, except for reproduction for private use not intended for collective use, representation in the family circle (art. L 122-5 CPI) and online publishing on condition that the source is mentioned and a link is included to the corresponding page of our site www.perlesandco.com.