Average Grades

Cut about 50 cm of wire.

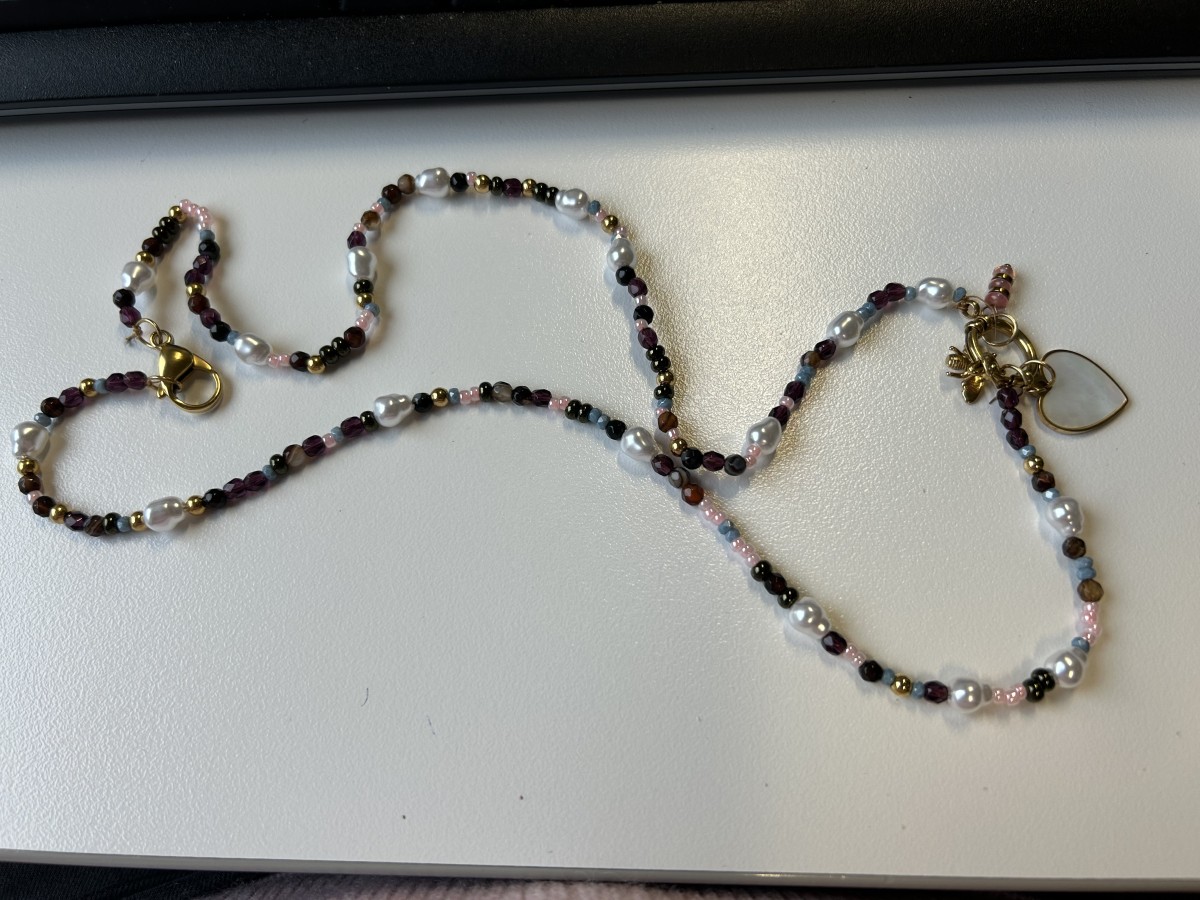
This tutorial guides you through the creation of a trendy necklace with a variety of beads and stainless steel elements, ideal for beginners. Personalize it as you wish, and explore a wide choice of pendants in our catalog. This project is part of the February 2026 "Côté cœur" collection, which features six pieces of jewelry you can create yourself.
In this tutorial, you'll learn how to make a trendy DIY necklace featuring different types of beads, a buoy clasp and stainless steel pendants / charms. Easy to wear on an everyday basis, this necklace will match a multitude of outfits, from casual to dressy. This project is part of the February 2026 jewelry tutorial collection entitled "Côté cœur": a series around the theme of hearts, featuring 6 DIY jewelry pieces.
This tutorial is perfect for beginners, as it's based on simple gestures: opening and closing a ring, crushing a Crimp bead and using a wire protector. The links (in pink) take you directly to our technical sheets, to learn these basics step by step and achieve a clean, durable mount.
You can customizeit as you wish by changing the beads and stainless steel components. Be sure to keep the size of the beads consistent. We've opted for beads in diameters of 3mm and 7mm. On this necklace, you'll find Miyuki Seed beads 8/0, Czech glass beads, imitation freshwater pearls and gemstone beads. We've also added stainless steel beads to recall the golden elements of the creation.
To finalize your necklace, explore our wide selection of gold-plated stainless steel pendants and charms: eye, star, bird... there's something for every style and inspiration, to create a truly unique piece of jewelry.
If you reproduce this tutorial, share your creations with us on Facebook or Instagram by tagging us - we'd love to see your versions of this jewel!
Cut about 50 cm of wire.

Thread one end of the wire through a wire protector. Then slip a Crimp bead into both wires.

Flatten the bead to be crushed with special crushing bead pliers or flat-nose pliers.

Add a bead cover and close it gently around the bead to be crushed, using pliers.

String your beads in random order, alternating bead types for a harmonious result.

Then add rings to the wire protectors and attach to the buoy clasp.
Use pliers and rings to attach your charms to the clasp.
Your necklace is finished!

Here's how to open a ring efficiently:
Open the ring by rotating the two ends with two jewelry pliers. Close it by rotating the ends again. Turn back and forth at the end to reposition the ends.


You have a question about this tutorial? Ask it to our team and the people who have already tested it. The Perles & Co community is here to help you!
Credits
Perles & Co, Internet & E-Commerce company [02/02/2026] Any reproduction, representation, adaptation, in any form whatsoever, even partial, is prohibited, except for reproduction for private use not intended for collective use, representation in the family circle (art. L 122-5 CPI) and online publishing on condition that the source is mentioned and a link is included to the corresponding page of our site www.perlesandco.com.