
Average Grades
Bonjour, Serait-il possible de remettre en ligne la grille de tissage ? En cliquant sur le lien, je tombe sur la page d'accueil. Merci beaucoup
1 Answer
Show answers

What to do when you don't have a green thumb?
Pearl weaving of course! No need for watering and maintenance and we keep the pride of having made and collecting them, logical! Well, if you have a green thumb, nothing prevents you from weaving plants into Miyuki beads either. You can decorate your flower pots with as for this weaving grid parrot beak in delicas rockeries 11/0 , or hang them on the wall.
In this month of April 2020, we challenge you:
From April 10 to 30, create your ideal potted plant, with your own motif or using the suggested grid. Adapt it to your taste and customize the pot, then post the photo on Instagram, quoting us @perlesandcoand with the#defiplantemiyuki . We will select the three winners according to the following criteria:
The winners will have a dedicated Instagram post and will be featured in our trend newsletter. Those who wish can also have their weaving published on the site. To your pearls!
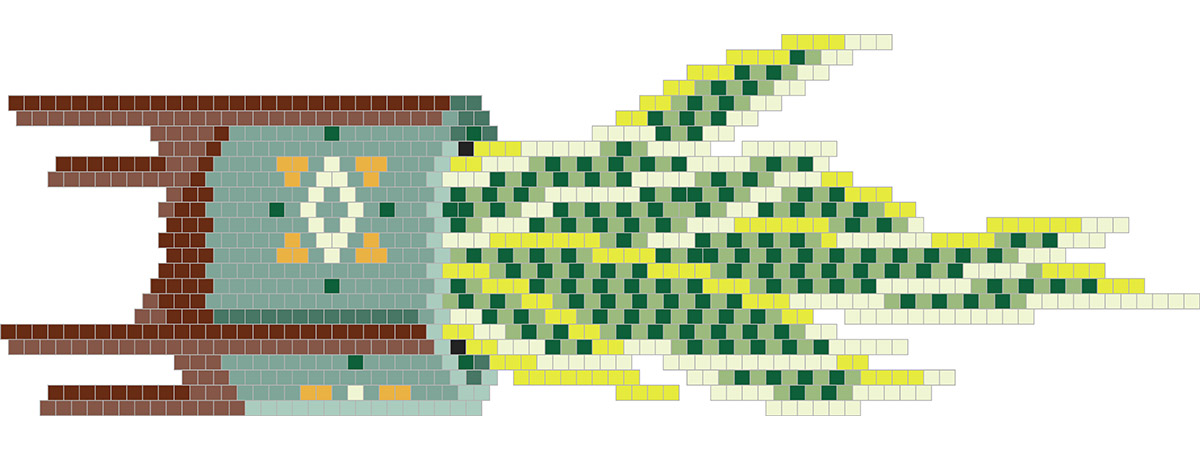
Important note: The model was woven with the Peyote technique, because faster in this case but you can choose to do it in Brick Stitch. If you do it in Peyote, you will have an easier time finding your bearings by turning the grid 90 °. Check the woven beads as you go because you get lost very quickly! Download it in A4 format to print it: Free pearl weaving grid Sansevieria green plant .
If you do not know the needle weaving technique, here are technical sheets to help you:
Needle weaving uses different weaving grids than on a loom. You will therefore not be able to make this plant motif on a loom. Another peculiarity here too, the pearls used are delicate seed beads from the Miyuki brand, they are cylindrical and very regular pearls which fit perfectly in a weaving. If you try with classic rockeries that are not regular you will not be able to get a nice result.

On this tutorial I made a background and a frame to present the weaving. Here's how I did it.
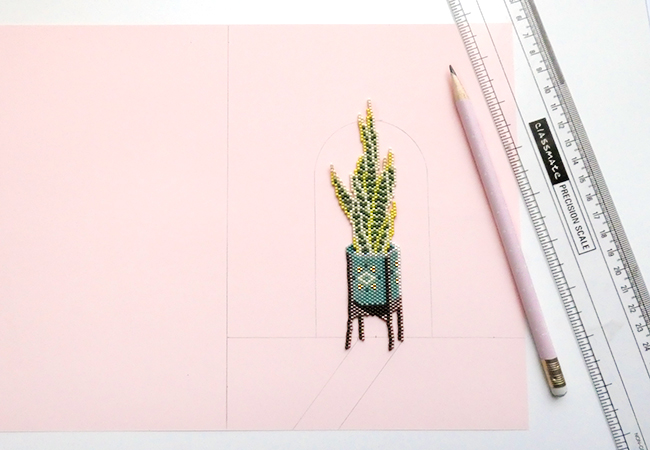
Trace the following dimensions on a sheet of card stock. For rounding you can use a circular object like a roll of scotch tape. If the size of the alcove is not the same it does not matter. If you do not have colored paper you can also take a cereal or other cardboard and paint this cardboard with acrylic paint. Sometimes you can also come across cardboard packaging boxes with very nice colored backgrounds and patterns!

Finally I used blue paper as the main background and cut the alcove twice. Once in pink paper and once in white paper for the printer. I then glued the pink alcove on the blue paper and the white alcove on top by shifting it by 5 mm on the side to give an impression of perspective. I created a shadow by coloring the blue background with a gray alcohol felt. I then glued the weaving on the bottom.
To solidify everything, I glued the blue background to a thicker carton and cut a frame 1 cm wide and 0.5 cm larger than the blue background. I painted it black with acrylic paint and glued.


Do not hesitate to show your creations on our Facebook page, in the Super club group of Perles & Co customers or on Instagram by quoting us with @perlesandco or with #perlesandco.


You have a question about this tutorial? Ask it to our team and the people who have already tested it. The Perles & Co community is here to help you!
Credits
Perles & Co, Internet & E-Commerce company [10/04/2020] Any reproduction, representation, adaptation, in any form whatsoever, even partial, is prohibited, except for reproduction for private use not intended for collective use, representation in the family circle (art. L 122-5 CPI) and online publishing on condition that the source is mentioned and a link is included to the corresponding page of our site www.perlesandco.com.

