Average Grades
Bonjour, quelle est l’épaisseur des cordons svp
1 Answer
Show answers
Install Perles & Co on your home screen: tap the Share button in Safari, then "Add to Home Screen".
Install Perles & Co on your home screen for quick access and real-time updates.
Enable notifications to track your orders and never miss our highlights.

How to make a macrame shade?
Today, Miss Miao in Saigon offers to make a bohemian lampshade in macramé. Do not hesitate to check out his Instagram to discover his pretty creations.
With this tutorial, this is what decorate your living room cooconning mode .
Debutante? Do not worry, there is nothing complicated. This tutorial requires only very little material (comb, scissors ), and a little patience ... so it's up to you.
The steps :
Step 1 : Cut 30 white and light gray threads of 60cm each, fold in half in the middle. Make a knot by passing the loop formed under the lampshade and the 2 free strands inside. Repeat this 60x operation alternating colors. 
Step 2 : Cut 2 strands of 1m50 white wire, fold them: 120 cm outside and 30 cm inside. Make a knot (as shown in step 1). Make flat knots only on the left side, make 36.
Step 3 : Cut 2 gray strands of 1m, fold them in two 30 cm inner side and 70 cm outer side. Make a knot (step1)
Make a flat knot, tight at the top, then a flat knot 4 cm from the first and pull on the strands to form a loop (2cm between each flat knot), repeat this operation 5 times to get 6. 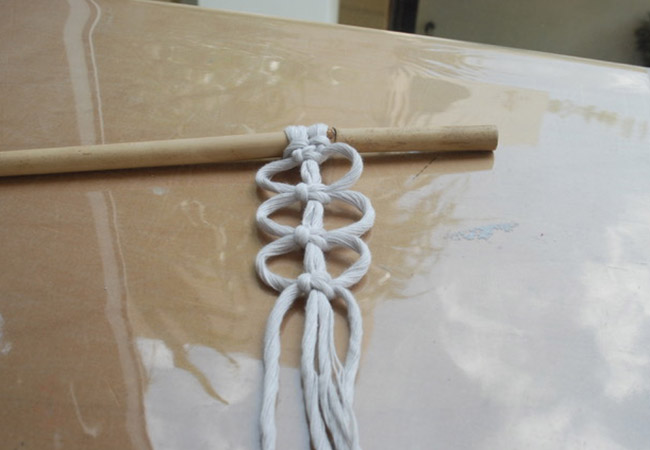
Step 4 : Cut 2 strands (light gray and white) of 1.5m. Bend them 1m20 outside, 30cm inside. Make 19 flat knots (step1).
Step 5 : Cut 2 strands of 1m10 and fold them 30 cm inside and 80 cm outside. Comb, cut the ends of the strands to obtain a leaf.
Make a knot (step1). Make a flat knot and then a second 3 cm below and push the knot to the top of the lampshade to form a loop on each side. Repeat to get 8 flat knots.
Step 6 : Make sheets of different sizes and colors. Cut 1 strand 36 cm and 24 strands of 12 cm in the yellow cotton. Cut 1 strand of 30cm and 18 strands of 15cm in white cotton. Cut 1 strand of 34cm and 24 strands of 15cm in dark gray cotton. For each color, fold the longest strands in 2 and make 12 flat knots around, leaving a loop on the top to hang it. Paint, and cut the ends to obtain a leaf. 
Step 7 : Paint the strands to separate the wires. Cut the threads 2 to 3 cm below the support and attach the leaves to the shade. Adapt the lamp to the foot of your choice.
Your lamp is ready! So, what do you think ? 
Feel free to show us the result of your creation by sharing it with us on social networks: our Facebook page and our Instagram page


You have a question about this tutorial? Ask it to our team and the people who have already tested it. The Perles & Co community is here to help you!
Credits
Perles & Co, Internet & E-Commerce company [13/11/2019] Any reproduction, representation, adaptation, in any form whatsoever, even partial, is prohibited, except for reproduction for private use not intended for collective use, representation in the family circle (art. L 122-5 CPI) and online publishing on condition that the source is mentioned and a link is included to the corresponding page of our site www.perlesandco.com.

