Average Grades

Twist the right thread three times on the left thread (or vice versa) to intertwine them. Make sure it is always the same thread that turns around the other.

Install Perles & Co on your home screen: tap the Share button in Safari, then "Add to Home Screen".
Install Perles & Co on your home screen for quick access and real-time updates.
Enable notifications to track your orders and never miss our highlights.
Elastic bracelets are ideal for quickly creating clasp-free jewelry, accessible even to beginners. Choose the right thread for your beads, then string them, checking the size for a perfect fit. Finish with a surgeon's knot to finalize your creation with ease.
If you want to make bracelets quickly and without using a clasp, you've come to the right place - elastic bracelets are for you! Elastic bracelets are an affordable way for beginners to start making jewelry. All you need are beads, elastic thread and glue.
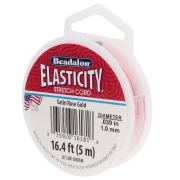
The first step in making an elastic bracelet is to choose the right thread for your project and the beads you'll be using. You'll find all the information you need to choose the right thread in this data sheet: " Which elastic thread should I choose to make jewelry? "
Once you've chosen the right wire, thread the beads onto it, starting with a bead with a large hole if you want to hide the knot afterwards. Otherwise, you'll need to use a knot cover or leave the knot visible. You can thread the beads directly onto the spool to avoid losing them. Check the size of the bracelet on your wrist. The bracelet shouldn't be too tight on your wrist, but it shouldn't be too wide either, otherwise you risk snagging it regularly and breaking it.

Once you've strung the beads, loosen the wire. In other words, pull on the thread (without breaking it) to loosen it slightly. This will prevent the thread from loosening once the bracelet is finished. Elastic wires are bound to relax a little at first, especially silicone or nylon elastic wires.
To finish your creation, tie a surgeon's knot following the steps detailed below.
Twist the right thread three times on the left thread (or vice versa) to intertwine them. Make sure it is always the same thread that turns around the other.

Repeat the previous step to form a second loop over the first row.


Make a third loop as before, then tighten it.
Cut the wires 1 mm from the knot and place a large hole bead over it to hide it or put a knot cover over it.
Tip: You can add a dot of jewellery glue or clear varnish to solidify your bow.


Credits
Perles & Co, Internet & E-Commerce company [03/12/2025] Any reproduction, representation, adaptation, in any form whatsoever, even partial, is prohibited, except for reproduction for private use not intended for collective use, representation in the family circle (art. L 122-5 CPI) and online publishing on condition that the source is mentioned and a link is included to the corresponding page of our site www.perlesandco.com.

