Average Grades
Free shipping on orders over 50€ up to 500g
French Online shop for beads and accessories for the creation of DIY jewellery and other creative hobbiesLog-in
0
Shopping cart
Shopping cart

How to make a circular weave?
How to weave in the round?
If you're looking for a great circular weaving tutorial, Kesi'art brings you this ultra-trendy dIY! Adopt it immediately to redecorate any room in your home. Customize your weaving with your favorite yarn, wool and ribbon colors! A multitude of possibilities for redecorating your home!
STEP 1: Prepare your materials:
Prepare your material, the aim being to have as many different wool sizes and textures as possible to vary the patterns and create an original weave. Vary the colors too, for a more dynamic result (tip: avoid choosing more than 3 different colors). Remove the fabric from a Hula Hoop hoop and keep the central circle, or use a metal hoop.

STEP 2: Weft thread installation
To install the weft thread on which you'll be weaving, start by tying a knot with the cotton thread at the top of the hoop. Secure the knot to prevent the thread from moving.

STEP 3: Weft construction 1
Pass the thread across from back to front.

STEP 4: Weft construction 2
Move up to the beginning of the weft thread, shifting 0.5 cm to the right, from the front.

STEP 5: Weft construction 3
Cross this thread back over, again shifting 0.5 cm, this time to the left of the bottom thread. Always cross the top and bottom threads.

STEP 6: Building weft 4
Continue upwards, always 0.5 cm from the previous thread.

ETAPE 7 : Construction of weft 5
Continue in the same way, taking care to tighten the cotton thread to ensure a strong weft.

ETAPE 8 : Construction of weft 6
Finish installing the weft thread by passing the last thread through the center to create an odd number of threads, which will allow the threads to be repositioned towards the center.

STEP 9: Finishing the weft thread
Finish installing the weft thread by tying a final knot.

STEP 10: Basic stitch
The basic weaving stitch consists in always passing the thread under and then over the wires, alternating systematically between over and under (hence the importance of having an odd number of wires). You can go clockwise or anti-clockwise.

ETAPE 11 : Start weaving
Thread the white Odette thread through your wool-passing needle, then pass it from the back to the front of the weave, leaving a small piece of wool at the back. Make a few rows of weaving, tightening the thread each time and pulling gently.

ETAPE 12 : Finish the center of the weave
Weave 8 rows with your white Odette wool.

ETAPE 13 : Knot!
Iron the thread at the back, then tie a solid knot with the starting thread, to prevent it coming out later.

ETAPE 14 : Add a little softness
Using the Mariette thread, go back and forth a few times, not all the way around the weave, on half the circle. This creates a "crescent" effect. You can continue this pattern for longer if you like.

ETAPE 15 : Play with different threads of the same color.
To make the link with the beginning of the weaving, add some natural white Suzette wool and continue for 2 small turns.

ETAPE 16 : Add a little thickness
Cut 3 strands of Odette natural white wool 1m50 long and knot a braid.

ETAPE 17 : Weaving the braid
Again in classic stitch, as before with classic yarn, weave the braid.

ETAPE 18 : A different relief
Make 5 rows with this braid.

ETAPE 19 : Create thickness
To create further layers of wool, use a knitting machine to create a yarn with a different pattern and volume.

STEP 20: Add even more substance
Using the braid obtained with the automatic knitting machine, make 3 round trips on half of your circle.

ETAPE 21 : Even out
To fill in the gaps and recreate a uniform circle, use Colette yarn for a few new rows, joining the edges created in the previous step with the knitting machine. You can also combine Odette and Mariette yarns. The gray Mariette thread is barely visible, but it adds a fine detail and a reminder of the crescent in step 14.

ETAPE 22 : Add a little light with the ribbon.
Choose a silver thread or a bit of ribbon to play with light or shine in your weave.

ETAPE 23 : Weave the ribbon
Make 2 turns with the ribbon to bring light to the whole.

ETAPE 24 : Add a touch of color.
Using the thicker Paulette thread.

ETAPE 25 : Volume!
Play with Yvette yarn now: this chunky wicking yarn will complete the circle. Split Yvette in 2 to start with and choose a color that stands out from the rest. Here, the color is Basalt.

STEP 26: New stitch
For this new stitch, you will weave not 1 row in 2, but 1 row in 4, because this wool is very thick. Pass the yarn in front, then pass it through the 4th yarn to the right, winding it from right to left. Weave Yvette by hand for ease of use.

STEP 27: Continue around the circle
Do the same for the rest of the circle. Pass the end of your yarn underneath the first strand of the beginning to keep the same movement and make it impossible to spot the beginning of the row. As always at the back, tie the beginning and end of the thread together at the back of the weave.

ETAPE 28 : Finish with the natural white thread.
Finish the weave with Yvette wool at the end of the circle, making 4 rounds of weaving, 1 thread in 2.

ETAPE 29 : Hide the weft thread
Feel free to add a little volume between each wool "bead" to hide the weft thread through the wicking wool.

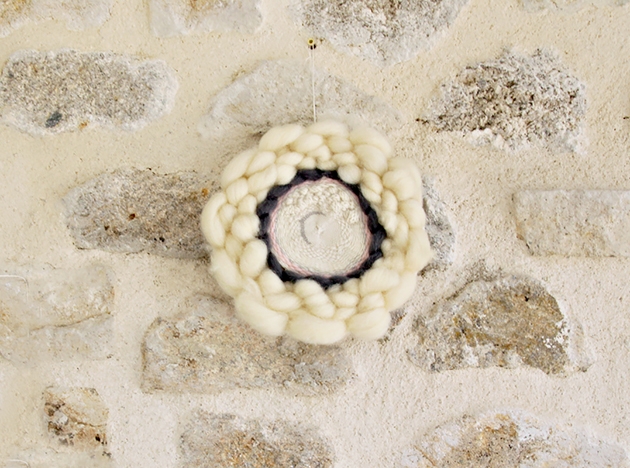
ETAPE 30 : Admire the result!
Even out all this and cut off any threads protruding from the back of your work. Tie a thread on the back of your weaving so you can hang it up.
STEP 31: Other XXS and colorful versions
Here's another model in the same colors, with a 10 cm circle.


And that's it! Your circular wall weaving is finished! Feel free to send us photos on our Facebook page or tag us on Instagram !


/im-DIY-Tutorial-Knitting-a-basket-for-cat-or-rabbit-with-hands.jpg "DIY Tutorial Knitting a basket for cat or rabbit with hands")

You have a question about this tutorial? Ask it to our team and the people who have already tested it. The Perles & Co community is here to help you!
Credits
Perles & Co, Internet & E-Commerce company [29/09/2017] Any reproduction, representation, adaptation, in any form whatsoever, even partial, is prohibited, except for reproduction for private use not intended for collective use, representation in the family circle (art. L 122-5 CPI) and online publishing on condition that the source is mentioned and a link is included to the corresponding page of our site www.perlesandco.com.
