Average Grades
Free shipping on orders over 50€ up to 500g
French Online shop for beads and accessories for the creation of DIY jewellery and other creative hobbiesLog-in
0
Shopping cart
Shopping cart

How to make a crochet snack?
How to make crochet dinette elements?
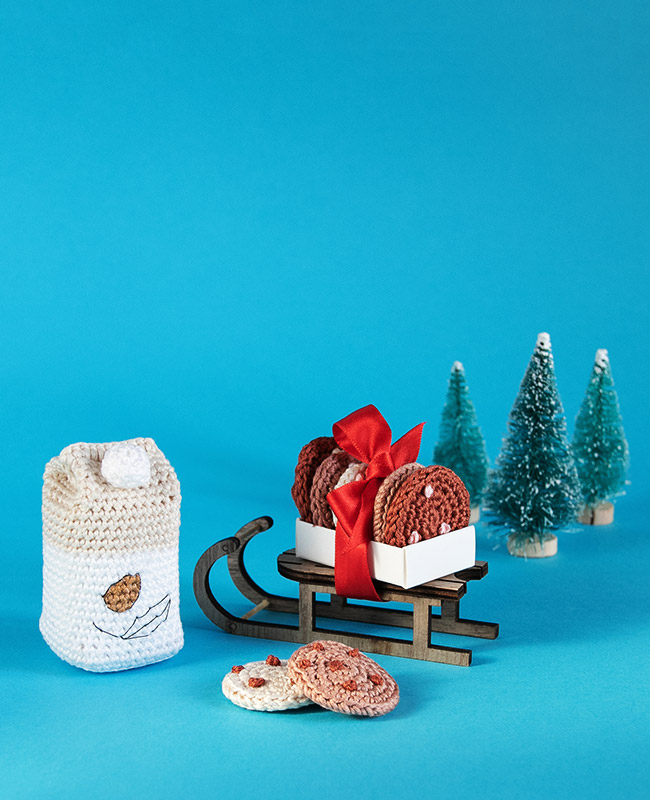
Wondering what you are going to be able to leave under the tree for Santa Claus? We have what you need !
Today, Happy Crochet Etc offers you an ultra cute tutorial to make a brick of almond milk and crochet cookies. Here is one who will be happy with this good vegan snack!
Do not hesitate to take a look at the Happy Crochet Etc Instagram page , but also its blog and believe us you will take a lot of eyes ... In any case at Perles & Co we adooooore these cute things.
You can obviously use these small crochet elements to make a decoration of children's room, or simply to create an assortment of handmade dinette. Nothing could be more cute.
Find the list of material necessary for the realization of this tutorial at the bottom of the page. Do not forget to bring a pair of scissors, a sewing needle and a wool needle.
For information, the list of abbreviations designating the different points used:
m = mesh
ml = linear mesh
ms = tight stitch
mc = slip mesh
b. arr = back strand
b. avt = front strand
aug = increase
dbl.aug = double increase (3 ms in the same st)
dim = decrease
T = turn
Steps :
Making the milk carton
Step 1: The almond milk carton
The linear stitch at the start of each round does not count as one stitch.
With the white wire:
T1: Do 8 sc in the magic circle, finish with 1 sl st in the first st of T (8)
T2: 1 ml, (1 dbl aug, 1 sc) x 4, 1 sl st in the 1st st of T (16)
T3: 1 ml, (1 dbl aug, 3 sc) x 4, 1 sl st in the 1st st of T (24)
T4: 1 ml, (1 dbl aug, 5 ms) x 4, 1 sl st in the 1st st of T (32)
T5: 1 ml, (1 dbl aug, 7 ms) x 4, 1 sl st in the 1st st of T (40)

T6: 1 ml, then 40 sc in the back strand, 1 sl st in the 1st st of the T (40)

T7: 1 ml, then 40 ms, 1 sl st in the first st of T (40)
T8: 1 ml, (8 ms, 1 dim) x 4, 1 sl st in the 1st st of T (36)
T9 to T19: 1 ml, 36 ms, 1 sl st in the 1st st of T (36)
- Change color
With the beige thread:
T20 to T24: 1 ml, 36 ms, 1 sl st in the first st of T (36)
T25: 1 ml, 6 ms, 1 aug, (8 ms, 1 aug) x 3, 2 ms, 1 sl st in 1st st of T (40)
T26 and 27: 5 ms, 1 ms in b.avt, (9 ms, 1 ms in b.avt) x 3, 4 ms (40)
T28 to 30: 3 ms, 1 ms in b.avt, (9 ms, 1 ms in b.avt) x 3, 4 ms (40)

- Fill with cotton wool without filling completely.
- Fold the top of the brick edge to edge so that the future upper corners * of the front and rear of the brick are juxtaposed (*: at the level of the T25 troughs).
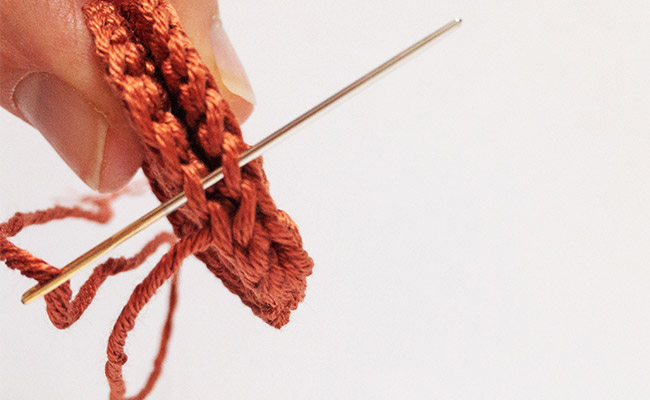
- Close this opening by assembling the two sides edge to edge by threading the wool needle under the outer strands of the stitches


- Stop and hide the wire inside.
- Then insert the hook in the 4th or 5th st from one of the edges, make a loop and crochet 10 or 11 sc to form the top of the brick.
- Fold the outer edges of the top of the brick and fold them inward. Adjust using the top corners *

Note : on rounds 26 to 30 it may be that the locations of the sc in the front strands need to be shifted a bit or two.
Tip : insert a small square of thick cardboard into the bottom of the brick to prevent it from deforming on the padding.
Step 2: The cap
T1: Make 6 ms in the magic circle (6)
T2: 1 aug in each st, 1 sl st in the 1st st of T (12)
T3: 1 ml, 12 ms in b. arr. (12)
T4: (4 ms, 1 dim) x 2 (10)
T 5: 10 sqm (10)
Stop and cut the wire leaving enough length, then assemble the cap on the top of the bottle by making a few stitches with the wool needle.
Step 3: Almond and leaf embroidery
With the sewing needle and the black thread, embroider the contours of an almond and a leaf on the side of the brick where the cap is located. Hide the wires inside


With the Posca felt tip, color the inside of the almond as delicately as possible to avoid overshooting.
Tip : to facilitate coloring, take Posca paint with a very fine brush and paint the inside of the almond with the brush.
Making cookies
Step 1 : Top of the cookie (with beige or brown thread of your choice)
T1: Make 6 ms in the magic circle (6)
T2: 1 aug in each m (12)

T3: (1 sc, 1 aug) 6 times (18)
T4: 1 ms, 1 aug, (2 ms, 1 aug) x 5, then 1 ms (24)
T5: (1 aug, 3 ms) 6 times (30)
Stop and cut the wire, leaving enough length for assembly.
Step 2: Below the cookie
Repeat the operation from T1 to T5

Then assemble the 2 discs with the wool needle, basting it between the stitches. Stop and take in the thread

Step 3: Chocolate chips
Then embroider the chocolate chips or small pieces of chamallows with the thread of the desired color

Repeat the operation for each cookie, varying the colors as desired.
Note : the increases at T4 and 5 are offset, this allows you to obtain a disc without mark of angles at the aug of the last T.
Do not hesitate to show us the snack you left to Santa Claus at the foot of the tree by sharing a photo on our social networks: our Facebook page and our Instagram page


You have a question about this tutorial? Ask it to our team and the people who have already tested it. The Perles & Co community is here to help you!
Credits
Perles & Co, Internet & E-Commerce company [10/12/2019] Any reproduction, representation, adaptation, in any form whatsoever, even partial, is prohibited, except for reproduction for private use not intended for collective use, representation in the family circle (art. L 122-5 CPI) and online publishing on condition that the source is mentioned and a link is included to the corresponding page of our site www.perlesandco.com.
