Average Grades
Free shipping on orders over 50€ up to 500g
French Online shop for beads and accessories for the creation of DIY jewellery and other creative hobbiesLog-in
0
Shopping cart
Shopping cart

We like the hook because it allows us to make everyday objects easily. We propose you here to pick Potholders with Cotton Natura XL from DMC which is a voluminous cotton thread but very light and which is nice to crochet.
Through this tutorial you will learn the star point to make potholders in autumn colors. Both useful and decorative, it will be the perfect accessory for your kitchen this fall.
A big thank you to Estelle from the blog Petit bout de cabou for this tutorial.
Before you start
In this tutorial, several points will be used: mesh in the air, tight mesh, half-flange. The following abbreviations will be used throughout the stages:
Rg: rank
Ml: mesh in the air
Ms: tight mesh
Db: half-flange
Find our video, to see and review the basic crochet points by clicking here .
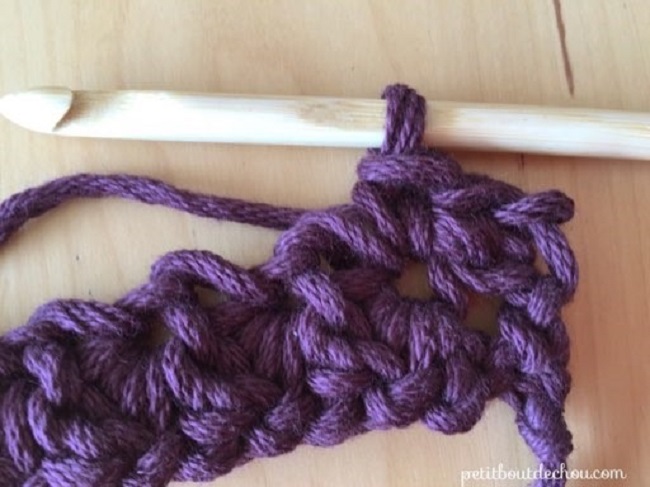
How to make a half bridle?
Make a throw, prick the hook in the stitch and bring back the thread, then make another throw and pull the thread through the 3 loops on the hook.
How to crochet a star point?
The star point is formed in two ranks: the first will create the bottom of the star and the second the top. The photos of steps below will allow you to easily achieve this point.
STEP 1 - Achieving Rank 1
Start by making a foundation chain by hooking a chain of 28 meshes.

RANK 1
We will create the bottom of the first star by pulling 5 threads that will form the branches of the star. Stitch the hook in the second ch from the hook (see the drop marker), make a throw and pull the buckle.

Repeat for the next 4 stitches (you should have 6 loops on the hook). You will now close the first part of the star.

Make a throw and pull the thread through the 6 loops on the hook.

Then make a ml to close the bottom part of the star.

STEP 2 - Formation of the half stars of rank 1 (low parts)
You will now form the other low parts of the stars of this rank. As before, you will fetch the thread 5 times to form a second half-star.
* Stitch the hook in the center of the star (# 1), make a throw and pull the thread.

Insert hook in the final part of the e cloth (2) try and pull the laid wire.

Stitch the hook at the base of the last branch (3), make a throw and pull the thread .

Stitch the hook in the next ml (4), make a throw and pull the thread . Stitch the hook in the next ml (5), make a throw and pull the thread (you should have 6 loops on the hook).

You will now close the first part of the star. To do this, make a throw and pull the thread through the 6 loops on the hook. Then make a ml to close the bottom of the star * .
We obtain a second half-star.

Repeat the instructions between the two pink asterisks * until only one ml of the starting chain remains.

Then, make a db in this last ml.

The first row forming the lower part of the stars is finished. You will now return the book to pick the second part of each star by making ms.
STEP 3 - Formation of the half stars of rank 2 (high parts)
When returning the book, you should get the following arrangement:

RANK 2
Crochet 1 ml and then 1 sc in the half-flange.


Then make 1 ms in the eye of the first star.
Then, continue with 2 ms in the eye of each of the stars of the rank (the drop marker gives you a reference of the eye of the stars).

Finish with 1 sc in the top of the back (see drop marker). Your first full stars are over!


STEP 4 - Realization of the lower part of the second row of stars (rank 3)
RANK 3
Turn the book to return to the place.

Start by making 2ml.

For the first half-star of the row, skip the first ml from the hook and then fetch the thread 5 times to form the first part of the star:
* start by stitching the hook into the front strand of the second ch from the hook (1), make a throw and pull the thread.

Continue stitching the hook in the back of this same stitch (2), make a throw and pull the thread.

You have 3 loops on the hook.

Then, stitch the hook in the stitch at the base of the 3 ml (3), make a throw and pull the thread.
Then, prick the hook in the next stitch (4), make a throw and pull the thread.
Stitch the hook in the next stitch (5), make a throw and pull the thread (you should have 6 loops on the hook).

You will now close the first part of the star. Make a throw and pull the thread through the 6 loops on the hook. Then make a ml to close the bottom of the star * .

The lower part of the first star of the rank is finished.
STEP 5 - Realization of the upper part of the second row of stars
The rest continues as for rank 1:
* Stitch the hook in the center of the star (# 1), make a throw and pull the thread.
Stitch the hook in the last branch of the star (2), make a throw and pull the thread.
Stitch the hook at the base of the last branch (3), make a throw and pull the thread.
Stitch the hook in the next ml (4), make a throw and pull the thread.
Stitch the hook in the next ml (5), make a throw and pull the thread (you should have 6 loops on the hook).
You will now close the first part of the star: make a throw and pull the thread through the 6 loops on the hook. Then make a ml to close the bottom part of the star. *
You get a second half-star.
Repeat the different instructions between * until only one ml of the starting chain remains.
Make a db in this last ml.
Repeat rows 2 and 3 until you get 7/8 rows of stars (the number depends on the applied voltage => stop when you get a square).

Crochet 10 stitches in the air to form a chain.

Make a slip stitch in the first knit in the air of this chain to close the loop (you thus create a loop to hang the potholder).

Make a tight knit around the work, then tie a knot and tuck the thread into the work so that it is no longer apparent by using a needle.
Your potholder is over and you now master the point star crochet. Find all the colors available with DMC's Natura XL cotton yarn and it's up to you to choose this potholder in several colors to decorate your kitchen according to your desires.


We like to see what you do with the tutorials on Perles & Co. So do not hesitate to send us photos of your creations on our Facebook page or to tag us on Instagram .


You have a question about this tutorial? Ask it to our team and the people who have already tested it. The Perles & Co community is here to help you!
Credits
Perles & Co, Internet & E-Commerce company [21/10/2016] Any reproduction, representation, adaptation, in any form whatsoever, even partial, is prohibited, except for reproduction for private use not intended for collective use, representation in the family circle (art. L 122-5 CPI) and online publishing on condition that the source is mentioned and a link is included to the corresponding page of our site www.perlesandco.com.
