Average Grades
Free shipping on orders over 50€ up to 500g
French Online shop for beads and accessories for the creation of DIY jewellery and other creative hobbiesLog-in
0
Shopping cart
Shopping cart
Install Perles & Co on your home screen: tap the Share button in Safari, then "Add to Home Screen".
Install Perles & Co on your home screen for quick access and real-time updates.
Enable notifications to track your orders and never miss our highlights.

The first cold days of autumn have arrived... perfect weather for weaving beads!
Emmanuelle offers us a superb necklace in Miyuki Delicas 11/0 in autumn colors: red, green, gold... in short, the colors of the moment!
For beginners, check out our data sheet "How to make a brick stitch weave with augmentation and reduction?".

STEP 1
The arrow on the sketch indicates the beginning of the weaving. We'll start by stringing a gold bead on a fairly long thread (take a length you're comfortable with, knowing that you'll need to add thread as you go along). Place a needle at each end of the thread: you'll thread the beads in the first row one by one "ladder-style", crossing the needles in the bead.

STEP 2
When the first row is finished, remove one of the needles and we'll start by weaving BLOCK 1. This is a reduction: thread a single golden bead, pass the needle between the first two beads of the first row, then pass the needle back through the golden bead. Repeat for the entire second row, bead by bead. Continue in this way for all subsequent rows.


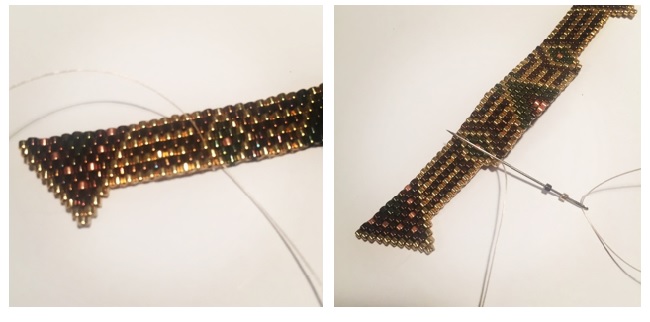
STEP 3
We're going to weave the two small triangles. To do this, we use the same row-by-row reduction technique. Once our thread is at the tip of Triangle 1, we pass it back inside the weave to bring it out at the other end to weave Triangle 2. When you've finished Triangle 2, you pass the thread back inside the weave and cut off any excess.


STEP 4
We're going to weave BLOCK 2, passing the new thread inside the weave through several beads to bring it out, ready to weave the first row. As the second row is wider than the first, we'll perform an "augmentation": thread a gold bead and a Burgundy bead, then pass the needle between the first two beads of the previous row, and pass the needle back through the Burgundy bead. We then continue weaving the whole row, bead by bead, as before.

STEP 5
For BLOCK 3, we again reduce the weave row by row. Finally, we'll weave the two ends as we wove the triangles previously.

STEP 6
The lower part of the weave is complete. BLOCK 4 corresponds to the upper part and comprises only reductions.

STEP 7
Well done, the hard part's over! All that's left is to make the bangs: it's very simple. We take a new thread and thread it through several beads inside the weave, bringing it out at the chosen end. We then thread the beads that make up the fringe, and we'll make a loop by passing through the charm and then back through the fringe beads. Finally, we tuck the thread inside the weave to bring it out at the next end. For bangs without charms, we make a loop at the end thanks to the last golden bead.

The bangs, starting from the end towards the center:
At the ends: 12 khaki + 2 gold + 8 Burgundy + 1 charm.
Next:
- 5 khaki + 2 gold + 8 Burgundy + 1 gold
- 7 khaki + 2 gold + 8 Burgundy + 1 gold
- 10 khaki + 2 gold + 8 Burgundy + 1 gold
- 12 khaki + 2 gold + 8 Burgundy + 1 gold
- 15 khaki + 2 gold + 8 Burgundy + 1 gold
- 17 khaki + 2 gold + 8 Burgundy + 1 gold
Center: 24 kaki + 2 gold + 8 Burgundy + 1 charm
STEP 8
Attach a ring at each end of the necklace to insert the chain of your choice.

Your autumn-colored bib necklace is ready: you can wear it with pride!
We love to see what you can do with the tutorials on Perles & Co, so don't hesitate to send us photos of your creations on our Facebook page.
Please note: in the list below, the chain reference has been changed, as the one used in the tutorial is a discontinued product.


You have a question about this tutorial? Ask it to our team and the people who have already tested it. The Perles & Co community is here to help you!
Credits
Perles & Co, Internet & E-Commerce company [03/11/2016] Any reproduction, representation, adaptation, in any form whatsoever, even partial, is prohibited, except for reproduction for private use not intended for collective use, representation in the family circle (art. L 122-5 CPI) and online publishing on condition that the source is mentioned and a link is included to the corresponding page of our site www.perlesandco.com.
