Average Grades

You can make this tutorial with a 0.8mm (20ga) or 1mm (18ga) diameter base wire. Cut a length of 30 cm (12 inches) from your wire.
Place the center of your base wire under the stone, as shown in the photo.
Install Perles & Co on your home screen: tap the Share button in Safari, then "Add to Home Screen".
Install Perles & Co on your home screen for quick access and real-time updates.
Enable notifications to track your orders and never miss our highlights.

How to crimp a cabochon with the wire wrapping technique?
Do you know the wire wrapping technique?
Whether you are a beginner or an expert in jewellery creation, come and test this increasingly trendy technique!
Close to lettering, it consists in creating with the help of metal wires supports and primers adapted to each of your pearls, cabochons, stones and many other elements. It's up to you to let your imagination run wild while playing with your wires!
Today @wirearttutorials explains you step by step how to set a labradorite cabochon with the wire wrapping technique. You can of course adapt the size and the type of cabochon according to your desires !
To reproduce this tutorial exactly, find the list of necessary material at the bottom of the page.
You can make this tutorial with a 0.8mm (20ga) or 1mm (18ga) diameter base wire. Cut a length of 30 cm (12 inches) from your wire.
Place the center of your base wire under the stone, as shown in the photo.

Bend both ends of the base wire around the stone as shown here. Make sure that the two wires cross each other 1 cm at the top of the stone.

At the crossover point, hold the wire firmly in the flat-nose pliers and then bend it completely upwards, as shown in the following image.

Here is the result we must get.

Repeat exactly the same step with the other wire end.

For the weaving wire we can use 0.4 mm (26ga) or 0.3 mm (28ga) wire. Cut a 30cm (12 inches) long weaving wire.
Place the initial end of the weaving wire behind the recently bent point of the base wires, as shown with the arrow.

Wrap the weaving wire 3 times around the two base wires , and tight as you can.

Continue to wrap your weaving wire around the base wires, until you arrive at the end of your weaving wire. Make sure that the wrapped part is extremely tight, otherwise compress the weave, pushing it downwards as much as you can.

Behind the base wires, cut off the extra end of your weaving wire. Compress the weaving wire end with your flat nose pliers, until it is completely closed.

Flatten the woven part with the flat-nose pliers.

Hold the center of the woven part tightly within the flat nose pliers.

Bend the upper end of the woven wires backwards and then downwards. This rounded woven part will allow you to thread your pendant on any cord.

Hold the part where the weave ends firmly in your flat nose pliers. Bend the wire ends slightly backwards as shown on the next picture.

Here is the result we need to achieve.

Now push the ends of the wires close to the front of the pendant as indicated by the arrow.

Switch to front view. Bend both ends of the wire to the sides by making a small curved part.
Make sure that the wires are positioned near the center of the pendant on both sides.

On the right side of the pendant, where the wire meets the structure, hold it very tightly in the flat-nose pliers and bend it inwards as shown in the picture.

Cut a 15 cm (6 inches ) long weaving wire. Near the bending point, wrap the weaving wire 3 times around the wire structure.

Now wrap the weaving wire twice around the bent base wire and the wire structure to connect them, as shown here.

Cut another weaving wire of the same length and repeat the same steps on the left side.

Make sure that the 2 wire ends cross over each other at 0.5 cm above the bottom of the wire structure.

At the point where the wire ends cross over each other, hold them one by one with the flat nose pliers, then bend them completely downwards.

Cut a 10cm (4 inches) long weaving wire . Wrap it 5 times around both wire ends, close to the recently bent part. Cut off the extra end of this weaving wire.

Place your labradorite cabochon inside the wire structure.

Take the two ends of the base wire, bend them completely upwards, folding them tightly over the stone.

Fold the wire ends to the sides, bending them slightly and positioning them over the woven parts of the sides.

On the right side, using the round-niose pliers, bend the end of the wire inwards, making a loop close to the woven part. Wrap the weaving wire 3 times around the bent wire and the wire structure to connect them. Now wrap the weaving wire 3 times around the wire structure and cut the end of the weaving wire.

Repeat exactly the same steps on the left side.
Make sure that both ends of the wire are the same length, otherwise cut off the longest end of the wire.

On the right side, as on the left side, bend the end of the wire with the round-nose pliers to make a very small loop. Press this small loop with the flat nose pliers until it is completely closed.

On the sides of the pendant, about 0.5cm above the woven part, hold the base wire firmly and bend it slightly inwards. Repeat the operation on the other side so that the stone is well set inside the structure.

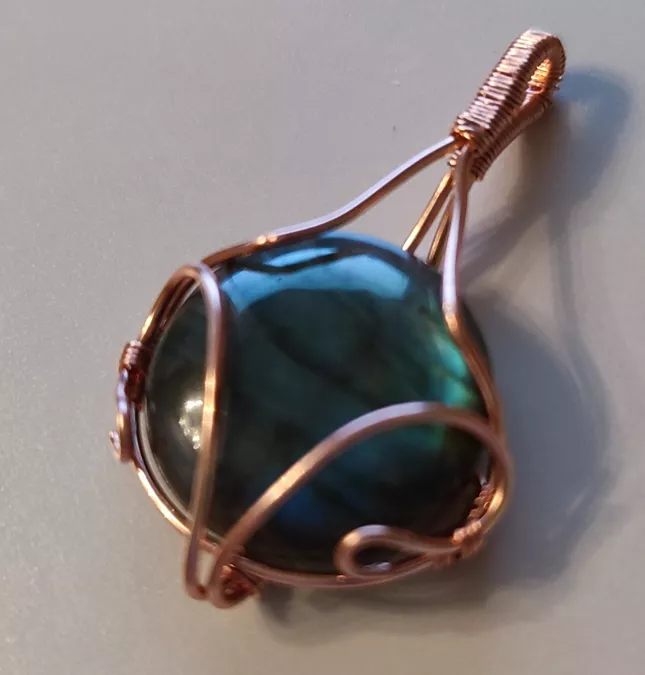
Here is your wire wrapped cabochon pendant! You can adapt this design using any kind of round, flat back cabochon between the size 20-25 mm.


You have a question about this tutorial? Ask it to our team and the people who have already tested it. The Perles & Co community is here to help you!
Credits
Perles & Co, Internet & E-Commerce company [05/11/2020] Any reproduction, representation, adaptation, in any form whatsoever, even partial, is prohibited, except for reproduction for private use not intended for collective use, representation in the family circle (art. L 122-5 CPI) and online publishing on condition that the source is mentioned and a link is included to the corresponding page of our site www.perlesandco.com.

