Bonjour, je ne trouve comment télécharger ce schéma ?
0 Answer

Tuto : How to make a tassel pompom
Puca ® is always adding new products. And yes, for your pleasure, the collection of glass beads by Puca is growing all the time!
This time, we're not offering you a piece of jewelry, but a trendy accessory to hang anywhere you like: on your handbag, on your bunch of keys, or even on a door - the choice is yours!
It's easy to choose the color of your pompom! Find all our 70 mm silk pompom references on our site. You'll also find all Puca® Samos and Minos beads, as well as seed beads, to choose from among our wide range of references: 15/0, 11/0, 8/0...
This tutorial requires a little patience, but don't worry, all the steps are well detailed! Just grab your needle and go! Find all the materials you need in this selection of articles to make the Alix pompom in its pink version.
The steps:
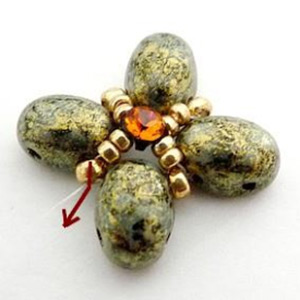
Step 1: Place 4 Samos and 4 R11 (Rocaille Miyuki 11/0) alternately and close. Position as shown in photo.

Step 2: Place 2 R15, 1 Mesh (top hole), 2 R15 in the R11 and come and stand here.

Step 3: Place 2 R15, pass through the rhinestone Mesh (bottom hole).

Step 4: Place 2 R15s in the R11 as shown in the photo.
Step 5: Place 4 R15 in the bottom hole of the Samos

Step 6: Place 4 R15 in the R11. Continue in this way for the 4 Samos

Step 7: This is what you get. Position yourself as shown in the photo

Step 8: Place 2 R15, 1 R11, 2 R15 and stand here. Repeat for all 4 Samos.

Step 9: You get this. Position yourself as shown in the photo

Step 10: Loop 2 R15, 1 Samos, 2 R15 into R11

Step 11: Come here and place 4 R15. Place yourself in the dubas hole of the Samos.

Step 12: Place 4 R11, 3 Samos in alternating loops in the Samos.

Step 13: You get this. Position yourself as shown in the photo below

Step 14: Repeat steps 2 to 14.

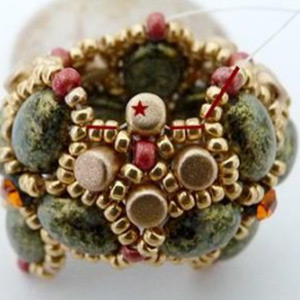
Step 15: You get this

Step 16: Make a new flower without doing step 8

Step 17: Zipper with 2 R15 in the R11, place 2 R15 in the Samos of the first flower.

Step 18: Place yourself here in the fourth R15

Step 19: Place 3 Minos in every other R15, do the whole row

Step 20: Place 1 R15 between the Minos, and complete the row

Step 21: Place here in the R15 between the Minos

Step 22: Place 1 R15, 1 R11, 1 R15 between the R15s

Step 23: Here's how to complete step 22 for the whole row

Step 24: Place yourself here in the 3rd R15

Step 25: Place 3 R15 in the R11 above the Minos

Step 26: Place 3 R15 in the third R15 and cross the Samos. Stand here and do the whole row like this

Step 27: Move to the central R15

Step 28: Place 1 Minos in both R15s and stand in R11 here.
Step 29: Position yourself as shown in the photo and continue with step 28.

Step 30: You get this. Place yourself in the R15

Step 31: Place 2 R15 in the Minos

Step 32: Place 2 R15s in the R11

Step 33: Place 3 R15s in a loop, doing the whole row in this way.

Step 34: You get this. Place yourself in both R15s here

Step 35: Place 3 R15s above each Minos and move into the central R15 above R11.

Step 36 : Prepare your pom-pom. Cut the cord

Step 37: Place your needle here

Step 38: Consolidate

Step 39: Place 1 R8, 1 round bead 6 and a U

Step 40: Consolidate several times!

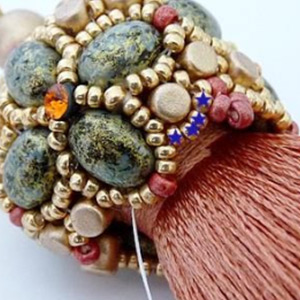
Step 41: Place your pompom

Step 42: Place 1 R15 in all central R15s

Step 43: Place yourself at the bottom of the pompon

Step 44: Complete steps 19 to 22

Step 45: You'll get this

Step 46: Stand in the second R15 under the Samos and place 4 R15s in the R15 and R11.

Step 47: Place 3 R11s in a loop in the R11

Step 48: Place 4 R15s and stand here. Do the whole row this way
Step 49: Place yourself in the R11 under the Samos and loop 3 R11. Do this for all three Samos

Step 50: You've got this. You can close your yarn.
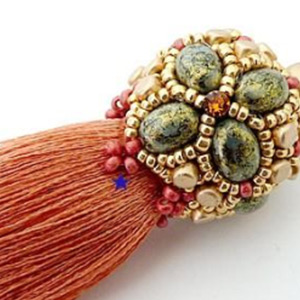
Step 51: Place your charms in the central R11s.
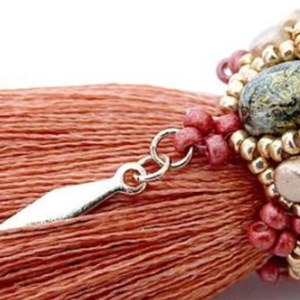
Step 52: You can also embellish your pompom with fine chains.

Step 53: Place your chain, ring and snap hook.

Congratulations! You've reached the end of this tutorial, so you should now have your pretty pom-pom to hang on your handbag, your bunch of keys or a doorknob as you please ;)

We can't wait to see the result of your creation, so don't hesitate to share it by posting a photo on our social networks: our Facebook page and our Instagram page.


You have a question about this tutorial? Ask it to our team and the people who have already tested it. The Perles & Co community is here to help you!
Credits
Perles & Co, Internet & E-Commerce company [22/09/2020] Any reproduction, representation, adaptation, in any form whatsoever, even partial, is prohibited, except for reproduction for private use not intended for collective use, representation in the family circle (art. L 122-5 CPI) and online publishing on condition that the source is mentioned and a link is included to the corresponding page of our site www.perlesandco.com.

