Average Grades
Free shipping on orders over 50€ up to 500g
French Online shop for beads and accessories for the creation of DIY jewellery and other creative hobbiesLog-in
0
Shopping cart
Shopping cart
How to make a Kumihimobraceletin Miyuki delicas 11/0 cotton yarn?
Even if the technique has a complicated name, do not be scared. Kumihimo is a technique of Japanese origin weaving spiral. It can be declined in many ways to create truly unique weavings!
This tutorial is not complicated and can even be done by children. Who says better to occupy them during long car trips for example? Because to admit, we would do without "Mamaaaaan is when we arrive?"
So thank you very much Alice Gerfault for this tutorial! Do not hesitate to go for a walk on his blog you will find lots of DIY just great!
Find this video tutorial too!
The preparation of the material is very fast, especially since you can find everything you need in your child's school kit: a pen, a ruler, a compass, and a pair of scissors.
You can obviously decline this tutorial by varying the colors used. You will find all our embroidery cotton yarncolors and all our Miyuki delicas 11/0 beads colors on our website.
Want to be even faster? We offer in the basket a Kumihimo disk round, so you can zap the first steps with the cardboard.
The steps :
Step 1 : First of all, draw on your piece of cardboard a circle of 5cm radius using your compass. Then draw triangles from the center of the circle at an angle of 45 ° each. You can help the protractor if you have one, otherwise visually cut the circle into 4 equal parts and then again each part into 2 equal parts (see photo).

Step 2: Once the marks are drawn, you can now cut out your circle. Notch the end of each of the spokes of the circle, which will maintain the various threads during the realization of the bracelet. Also, drill the center of the circle with a pencil or your scissors.

Step 3: Now prepare 7 strands of 80 cm length among the colors of cotton threads to embroider. Depending on the thickness of your cotton yarn, divide or not the number of yarns in your strand so that Miyuki pearls can pass. Bundle the 7 strands into one by tying one end. Pass the knotted end inside the hole.
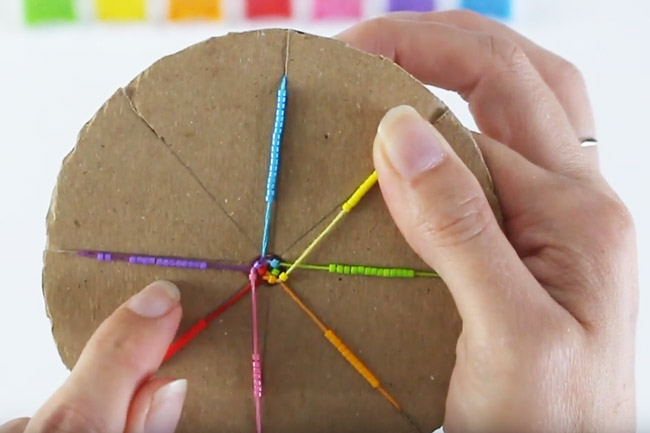
Step 4: Then place each of the strands in the notches provided for this purpose. Warning ! The order of the positioning of the threads is decisive for the appearance of your bracelet. In our case, be sure to respect the order of colors presented below in the photo to make a beautiful rainbow. Thread your Miyuki delicate 11/0 beads on each wire.

Step 5: The heart of the tutorial is happening here! Before starting the weaving, make sure to position your circle well, ie with the notch left empty in front of you (see photo).
From there, always clockwise, take the third wire from the empty notch and bring it back into it.

Step 6 : At each repetition, place a single bead between the other two threads.
For example, in the picture below the pink pearl is blocked between the purple and the red thread (see video if in doubt). Repeat the process until you finish your bracelet with a knot.
And here is your bracelet finally finished! The car trip is faster, right?
Feel free to share the results of your creations on social networks: our Facebook page and our Instagram page .


You have a question about this tutorial? Ask it to our team and the people who have already tested it. The Perles & Co community is here to help you!
Credits
Perles & Co, Internet & E-Commerce company [13/09/2019] Any reproduction, representation, adaptation, in any form whatsoever, even partial, is prohibited, except for reproduction for private use not intended for collective use, representation in the family circle (art. L 122-5 CPI) and online publishing on condition that the source is mentioned and a link is included to the corresponding page of our site www.perlesandco.com.
