Perhaps you've already asked yourself this question: how can I make fabric stiffer to make jewelry? Sometimes we like the pattern of a fabric so much that we'd like to make a piece of jewelry out of it so we can wear it forever.
You can, of course, cut a piece, sew it and tie it to your wrist, with or without a coarse-mesh chain, as in this lovely tutorial from Caticoud.
Or you can stiffen it and prevent it from unravelling, turning it into a cuff, bracelet or dangling earrings.
There are many ways to harden and work with fabric. In this how-to sheet, we'll look at just three. Feel free to share your own tips with us in the comments!

1 - Gluing fabric to create a cuff
To make a rigid cuff from fabric, you'll need a support. You can use a rigid brass cuff bracelet, or choose an openwork cuff that lets the fabric show through, as in the example in the video above. In either case, the method involves gluing the fabric to your jewelry primer.
Be careful, however, not to use just any glue! You'll find that on some fabrics, the glue will leave white marks, especially on fine, dark fabrics. That's why you should always test your fabric first.
In the event of white streaks, don't panic! There's a trick we'll look at later.

If you're using a solid metal bracelet as a support, glue a piece of fabric to it using white vinyl glue (spread the glue well and don't use too much!). Then fold the fabric over 1 cm on each side at the back. Remember to cut the corners a few millimeters from the bracelet to avoid excess thickness.
If the ends of the cuff bracelet are round, it's best to cut multiple tabs on the ends, which you can then lower one on top of the other.
For openwork bracelets, use a cartonette. This is a thin, flexible piece of cardboard that is very useful for hardening your creations. You can even use the cardboard packaging from your cereal or rusks - they'll do just fine! Just make sure it's big enough for your bracelet.
Measure and cut a strip of cardboard to fit inside the bracelet. Cover the cardboard with fabric in the same way as above. Dry to the shape of the bracelet. If the glue leaves white marks, glue only the back flaps.
The final step is to hide the unsightly tabs. To do this, cut a piece of cardboard to cover the inside of the cuff. It should be a little smaller. Cover it with fabric too. Once dry, glue this last part to the first part, securing it/them to the bracelet with small pliers so that it dries while retaining the shape of the bracelet.
Which glue should I use to stick fabric to metal? Mediac fabric glue is very strong and will enable you to glue the cardboard to the metal of the bracelet.
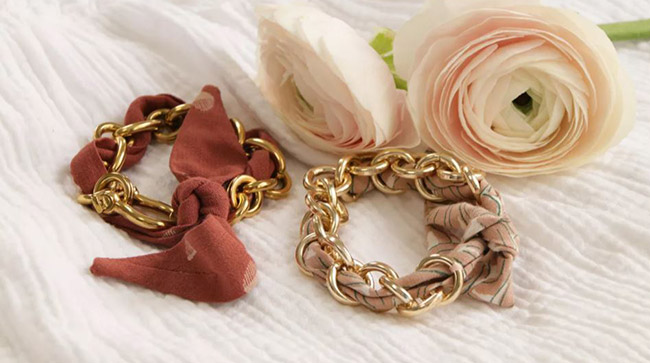
2 - Creating bias fabric for bracelets
Bracelets made with bias fabric are a classic in DIY costume jewelry.
Did you know that you can easily make your own bias fabric? Simply cut a strip of fabric at 45 degrees to the straight edge. Draw a line and make two lines 1 cm either side of this line. Once you've got your strip of fabric, fold it over, bringing both edges down to the center line, and iron to mark the folds.
Make your bias more resistant by gluing the two parts together with a thin strip of double-sided iron-on adhesive, which you need to melt with the iron. This technique is called interfacing, and will ensure that your bracelet retains its shape longer and doesn't get damaged as quickly.
3 - Make fabric feather earrings
To make fabric earrings, your fabric must fall straight. So you need to give it weight and hold by stiffening it.
You can coat your fabric generously with fabric hardener, or use vinyl glue diluted in a little water.
For a prettier result, glue another piece of fabric to the back of the first, so that your earring pattern is on both sides. Once everything is dry, re-cut the earring to the shape you want.


