Average Grades
Free shipping on orders over 50€ up to 500g
French Online shop for beads and accessories for the creation of DIY jewellery and other creative hobbiesLog-in
0
Shopping cart
Shopping cart

How to make a brick stitch weave?
How to create a necklace combining Miyuki beads and feathers?
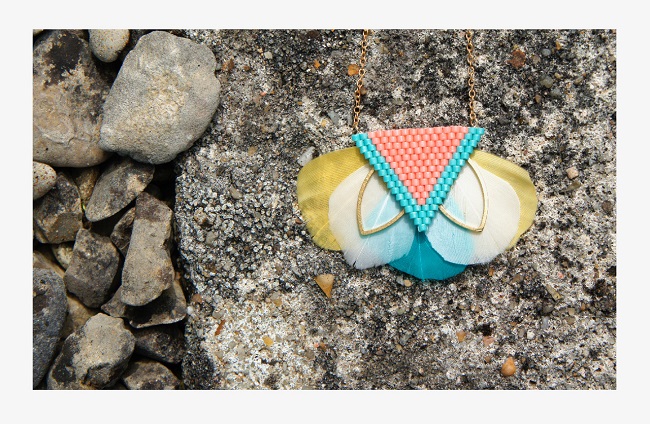
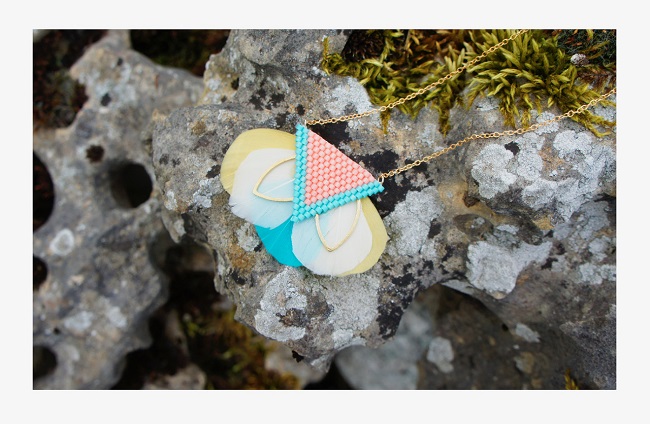
With temperatures soaring and vacations on the horizon, we're craving trendy jewelry in summery colors. In this tutorial, you'll learn how to make a necklace in trendy colors (coral, mint, pastel yellow) with a triangle-shaped brick stitch weave and feathers. Designer Charlotte Souchet has named this piece floral necklace.
Worn on a fine chain and combined with feathers, this weave is fine and delicate, perfect for your summer outfits. Many thanks to Charlotte, for this step-by-step guide and her detailed explanations on how to make the brick stitch weave.
Want to change colors? No problem, just choose your beads from Miyuki Delicas!
Want to know more about bead weaving? Find over 90 bead weaving tutorials in our tutorials section.
Are you a beginner? Take a look at our bead weaving tutorials, and you'll never have to worry about brick stitch weaving with augmentation and reduction again.

STEP 1
To make the weave, you'll use the "Brick Stitch" method.
Tips from the designer:

How do I start a Brick Stitch?
To begin, thread the first two beads. Next, pass the thread through the first bead to create a loop, then thread the third bead and pass the thread through the previous bead. Continue this action for each bead in the first line. The first line is now complete.

How do I make an invisible reduction?
Thread two beads, then pass your needle under the thread connecting the 2nd and 3rd beads of the line below. Then pass your thread back through the two beads in the opposite direction. Your thread is now in the first bead, so pass your needle through the second bead from bottom to top.
For the third bead, pass your needle under the thread connecting the 3rd and 4th beads, then pass it back through the bead in the opposite direction. Repeat until you reach the end of the line.
How to make a simple increase?
Thread two beads, then pass your needle under the thread connecting the 1st and 2nd beads of the line below. Then pass your thread back through the last bead from bottom to top.
For the third bead, pass your needle under the thread connecting the 2nd and 3rd beads, then pass it back through the bead in the opposite direction. Repeat until the end of the line.
To finish the weave, iron the thread inside the beads to create a knot to lock the thread, then cut flush with the weave.
Designer's tip:
To make your work easier and your weaving more solid, be sure to tighten the thread after each action.
STEP 2
Glue the two Spacers on either side of the weave (see diagram).
Designer's tip:
Be sure to hold the spacers horizontally as the glue dries, so that they sit properly, otherwise they may sag.
Now cut 2 cream feathers, 2 yellow feathers and 1 turquoise feather to a height of 3 cm. Cut the bottom of the feather perpendicularly, then remove the excess feathers/thread by hand.
Glue the feathers over the spacers, starting with the cream feathers, then the turquoise feather in the center and finally the two yellow feathers to create a pretty flower.

Designer's tip:
Don't be afraid to be generous with glue, as the spacers are quite thick and you'll need enough glue for the feathers to hold. On the other hand, make sure you don't glue the top of the weave so you can thread the rings through.
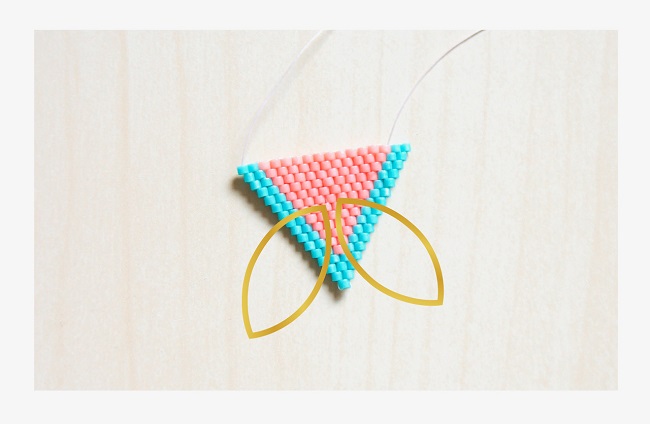
STEP 3
Now attach the rings. To secure them, use thread to fix the ring in the middle of the two beads at each end (see diagram).
Pass the thread through the beads twice to create a knot and secure the ring.
Repeat this action at each end of the weave.

Designer's tip:
Pass the thread through the ring twice to solidify the loops. Don't try to pass the thread through the beads too many times, as this could cause the beads to break; tie no more than two knots.
Designer's tip:
When you slide your ring into the bead, make sure the opening faces outwards to prevent the ring from coming loose from the weave when you manipulate it to put the chain in later.
You can also do this just after you've finished weaving, to save thread!
Cut the warp into two 30cm-long chains, slip them into each ring and close the two rings.
At the other end of each chain, slip a ring to hold a clasp on one side and the extension chain on the other. Then close the rings.

Designer's tip:
Be careful where you put the clasp, depending on whether you're left- or right-handed.
Your necklace is now complete. So, what do you think? Beautiful, isn't it!
We'd love to see your work (alone or worn) and, who knows, share it on our social networks. So send us your photos on Facebook or tag Perles & co and charlotte Souchet on Instagram with #perlesandco and #motifcharlottesouchet.


You have a question about this tutorial? Ask it to our team and the people who have already tested it. The Perles & Co community is here to help you!
Credits
Perles & Co, Internet & E-Commerce company [13/06/2017] Any reproduction, representation, adaptation, in any form whatsoever, even partial, is prohibited, except for reproduction for private use not intended for collective use, representation in the family circle (art. L 122-5 CPI) and online publishing on condition that the source is mentioned and a link is included to the corresponding page of our site www.perlesandco.com.
