Free shipping on orders over 50€ up to 500g
French Online shop for beads and accessories for the creation of DIY jewellery and other creative hobbies

Log-in

Miyuki loom bracelet color Mocha Mousse

Made by :Tiffanie Perles Co
Published on the :29/01/2025
Time :8h
Level :Intermediate
Prices :25,72€

What colors to choose for your Miyuki bracelet?

The color of the year 2025, according to Pantone, is Mocha Mousse: a set of brown shades reminiscent of that delicious coffee and chocolate drink. I had already presented a set of brown Miyuki bead colors that followed this Mocha Mousse trend in this video: What are the Mocha Mousse-colored Miyuki beads?

Today, I'm proposing a Miyuki loom bracelet with two pretty shades of brown inspired by Mocha Mousse. I was inspired by an Art Deco pattern that reminded me of the soft, subtle mood of this color. This Miyuki bead cuff is 35 mm wide. The pattern can be adapted: it's a repeating pattern, so you can lengthen the bracelet, but also widen or narrow it. If you modify the width of the bracelet, remember to check that a weaving tip is compatible. But even if you can't find the exact size, you can make a few decreases on the loom, on either side, to reduce the width of the bracelet and use slightly smaller weaving tips.

To weave this beaded bracelet, I chose Miyuki Beading Thread and the thicker C-LON Fine Weight thread. The C-LON Fine Weight thread is optional. I added it to the edge of the bracelet to give it better hold and resistance over time. It's also an aesthetic choice.

If you're a beginner in bead weaving, this bracelet design is not the easiest to follow. You can choose it as your first project, but I recommend this one instead, perfect for beginners: Miyuki bead bracelet beginner loom.

Tutorial steps

Step 1

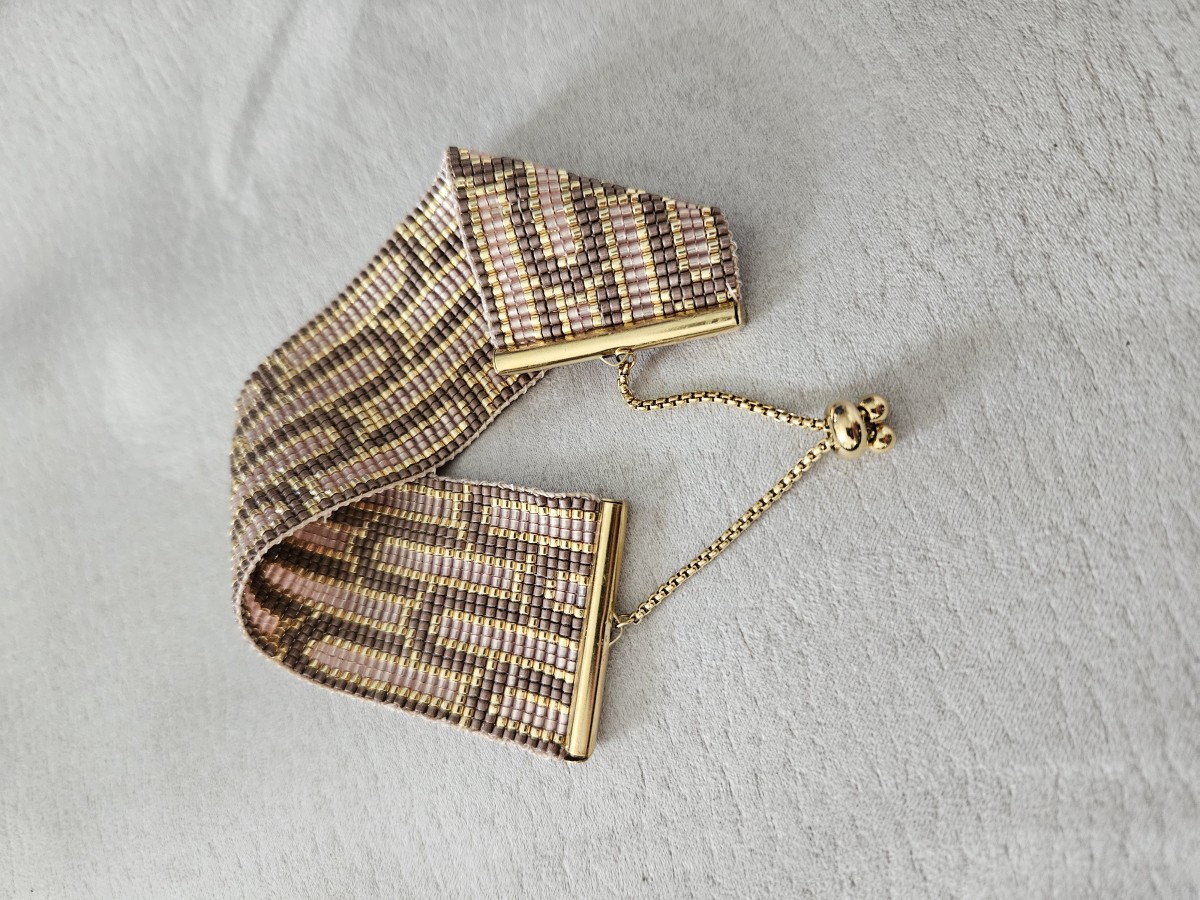
The bracelet is 24 beads wide, so 25 threads are required. Attach the 25 wires to the loom: 23 wires in Miyuki Beading Thread and 2 wires in C-LON Fine Weight cord. Don't cut the threads until they're all attached. Simply wrap the thread, still connected to the spool, around the loom stud.

Step 2

Cut a piece of Miyuki wire about 2 m long, or even longer, as the bracelet is very wide and the wire will shorten very quickly. By taking on a little more length, you'll need to replace it less often. Thread it onto a needle. Tie the end of the thread in a double knot on the edge of the loom. Keep 35 cm of the thread end for trimming in a few steps.

Step 3

Pass the thread under the loom. Thread the beads corresponding to row 1. Place each bead between two threads. Push the beads up into the air with your free hand and work back through the beads with the needle, passing over the loom threads. Repeat this step to weave a few more rows.

Step 4

Remove the needle from the thread and place the 35 cm thread end in the needle. We're going to make the reduction that will enable us to make a pretty finish with the 35 mm weaving tips. Thread 1 bead less on each side, so 22 beads. These beads will be hidden in the tube, so the design doesn't matter. Place the beads in the center of the threads, leaving a gap at the beginning and end of the row. Iron through the beads with the needle, taking care to catch the edge thread with the weaving thread to bring it closer to the beads. Iron the beads a third time in the opposite direction. Tighten and adjust the beads, then lock the thread in the weave.

Step 5

Put the needle back on the long piece of yarn and continue weaving. Change thread when it's only 15 to 20 cm long. Weave the size of your wrist -0.5 cm to -1 cm. Make a decrease at the end and block your thread, then cut it.

Step 6

Cut the wires to maximum length, then knot the ends in pairs, loosely. Make double knots. Trim wires to within 2 mm of the knot. Open the tip a little more. Generously apply glue to the knots and beads of the last row, then slide the last row of beads into the end cap. Close the end cap. Do the same on the other side.

Step 7

Open the clasp rings and slide the ferrules into them. Close them again. It's important to let the glue set for 24 hours without touching the bracelet.

Result
Schema  Miyuki loom bracelet color Mocha Mousse
Tiffanie Perles Co
 Tiffanie Perles Co - Les tutos de Tiffanie
Bonjour, moi c'est Tiffanie. J'étais créatrice et designer produit chez Perles & Co. J'adore tester de nouveaux DIY et vous faire profiter de mes expériences. Vous pouvez toujours consulter les tutoriels que je vous avais concocté sur le site !
Associated keywords
Share with my friends
Which material to use ?
Supplies
Miyuki Nylon Beading thread B 0.25 mm Blush x50 m
3,30€
Miyuki Delica Duracoat 11/0 DB1832 - Galvanized Gold
4,80€
0.4mm C-LON Fine Weight Bead Cord - Latte x45m
2,90€
80mm 304L stainless steel adjustable chain clasp - gold x1
1,40€
Subtotal : 25,70€
Tools
Jewel Glue Hasulith 30ml
OUTIL-007
Qty : 1
5159 in stock
2,40€
Metal Beading Loom large x1
OUT-445
Qty : 1
401 in stock
8,50€
55x0.4mm Miyuki Beading needles - Steel x6
2,00€
Worked embroidery scissors 9 cm by Perles& Co - Gold x1
4,20€
Subtotal : 25,60€
Equivalent product
Miyuki Nylon Beading thread B 0.25 mm Brown x50 m
3,30€
Miyuki Delica Duracoat 11/0 DB1831 - Galvanized Silver
3,60€
Metal Beading Loom extendable and largex1
14,80€
Miyuki Delica 11/0 DB0735 - Opaque Dark Mauve x8g
2,50€
Inclined beading loom for DIY jewels creation x1
34,00€
0.4mm C-LON Fine Weight Bead Cord - Sable x124m
7,00€
0.4mm C-LON Fine Weight Bead Cord - Nutmeg x45m
2,90€
80mm 304L stainless steel adjustable chain clasp x1
1,20€
0.4mm C-LON Fine Weight Bead Cord - Sea Shell x45m
2,90€
Your questions (8)

You have a question about this tutorial? Ask it to our team and the people who have already tested it. The Perles & Co community is here to help you!

By Linda (24/10/2025 16:24:55)
Quel tailles de perle pour faire se bracelet
Translate the question
Please log in to use this feature
Our Laurence expert answers you (27/10/2025 09:58:06)
Bonjour,
Ce bracelet est réalisé avec des Delica Miyuki 11/0. Vous trouverez le détail du matériel utilisé en bas de la page du tutoriel.
Translate the answer
By Bouchy (27/05/2025 14:27:56)
Bonjour,
Quel est la référence du métier à tisser que vous utilisez pour la réalisation de ce bracelet. Merci
Bonne journée
Odile
Translate the question
Please log in to use this feature
Our Laurence expert answers you (27/05/2025 14:48:20)
Bonjour,
Il s'agit de la référence OUT-445.
Translate the answer
By Florence (02/05/2025 15:52:02)
Bonjour,
Je voudrais réaliser ce bracelet mais de moitié ou sur une seule bande.
Aussi, quel embout de fin de bracelet dois-je choisir ?
Merci beaucoup pour votre retour !
Translate the question
Please log in to use this feature
Our Laurence expert answers you (06/05/2025 08:34:12)
Bonjour,
Nous vous conseillons d'utiliser un embout de 16 mm qui sera la taille la plus proche de la moitié de ce bracelet.
Cette référence sera bientôt de retour en stock.

Translate the answer
By Anne-Marie (04/03/2025 19:07:19)
Bonjour, c'est mon 1er ouvrage et cela fait 2 fois que je le recommence car lorsque je le détache du métier à tisser il gondole. Problème de tension des fils? Si vous avez une piste merci
Translate the question
Please log in to use this feature
Our Tiffanie expert answers you (07/03/2025 16:53:35)
Bonjour, est-ce que vous pouvez m'envoyer une photo du bracelet à [email protected]. Je pourrais mieux m'en rendre compte. Merci.
Translate the answer
By Anne-Marie (04/03/2025 17:48:14)
Bonjour, C'est mon 1er modèle, pourriez-vous me dire pourquoi mon bracelet gondole lorsque je le détache du métier à tisser. De plus je constate que par endroit je suis passée sous le fil alors qu'il me semblait bien positionner les perles en avant. Peut-être une tension de fil ? Merci
Translate the question
Please log in to use this feature
Our Tiffanie expert answers you (07/03/2025 16:52:21)
Bonjour, le fait de ne pas repasser correctement l'aiguille au-dessus des fils du métier à tisser peut faire gondoler les lignes de perles. Si le bracelet gondole une fois retiré du métier à tisser. C'est probablement un problème de tension effectivement.
Translate the answer
Your reviews (3)
Notices subject to control
5/5
Average Grades
Please log in to use this feature
By Evelyne (posted on : 10/09/2025 )
C'est un superbe bracelet, mon premier "grand" projet et une réalisation facilité par un tuto détaillé. Dommage qu'on ne trouve pas un tuto pour faire des boucles d'oreilles correspondantes. Il me reste à essayer de les réaliser moi-même. Merci pour ce magnifique bijou
Translate the notice
By Christine-Sophie (posted on : 22/02/2025 )
Hello !
Ce bracelet est juste superbe !
J'ai hâte de le réaliser !
Merci merci pour cette magnifique proposition !
Sofee
Translate the notice
Our Tiffanie expert answers you (24/02/2025 07:54:30)
Merci beaucoup ! :)
Translate the answer
By Stéphanie (posted on : 08/02/2025 )
Bonjour, ce motif est absolument magnifique, toutes mes félicitations ! Merci de nous proposer ce beau projet.
Translate the notice
Our Tiffanie expert answers you (10/02/2025 10:32:27)
Bonjour et merci beaucoup ! :)
Translate the answer

Credits

Perles & Co, Internet & E-Commerce company [29/01/2025] Any reproduction, representation, adaptation, in any form whatsoever, even partial, is prohibited, except for reproduction for private use not intended for collective use, representation in the family circle (art. L 122-5 CPI) and online publishing on condition that the source is mentioned and a link is included to the corresponding page of our site www.perlesandco.com.