Free shipping on orders over 50€ up to 500g
French Online shop for beads and accessories for the creation of DIY jewellery and other creative hobbies

Log-in

Miyuki Delicas 10 Loom Weaving Grid with Rhinestone Inlay

Made by :Tiffanie Perles Co
Published on the :15/06/2021
Time :6h
Level :Intermediate
Prices :44,38€
Miyuki Delicas 10 Loom Weaving Grid with Rhinestone Inlay

What to do with Miyuki delicas 10/0?

If most of the time we use delicas size 11/0 for our beaded jewellery weaving, you should know that other sizes of Miyuki beads can also be used to make bracelets. By the way, some of you use 10/0 exclusively and convert the tutorials to 11/0 by replacing them with 10/0. Today, a special dedication to these beaders!

10/0, 11/0 ? What is it? It is the indicator of the size of the seed beads. The larger the number in front of the 0, the smaller the bead. So 10/0's are larger than 11/0's and 11/0's are larger than 15/0's. It also depends on the manufacturer/brand. So the 11/0 size will not be the same between Miyuki and TOHO, or between a round rocaille and a delicas, keep this in mind!

The advantage of using 10/0 beads in this bracelet is that the rhinestones we will be incorporating into the bracelet will fit proportionally better with this size of bead. If your wrist is over 16cm, add a full design, so buy one more rhinestone.

If you don't use rhinestones, you can of course redo this bracelet in 11/0, replacing each rhinestone with 3 beads on 3 rows and not doing a point finish. Why not? Well, at the end you will have to put all the chain threads in the weave through the end bead. This works with the 10/0 hole, but the 11/0 hole is smaller and you won't be able to get all the threads through. So in this case finish the bracelet without decreasing, just repeat the pattern, then add weaving tips, a beadslide clasp or Hiilos.

Tutorial steps

Step 1
Miyuki Delicas 10 Loom Weaving Grid with Rhinestone Inlay : Step 1

Cut 2 pieces 50 cm of golden thread and tie them on the two nails on both sides of the loom making sure to have the same length on both sides. Do not tighten the knot because you will have to untie them at the end and do not cut them. This thread will be used as a border for the bracelet and it is on this thread that you will make the slip knot later.

Next, move on to the finer weaving threads. Tie the end of the thread to a nail, without cutting it off the spool. Place the 11 threads on the loom, still without cutting the thread. Now cut the thread by adding 15 cm to the total length.

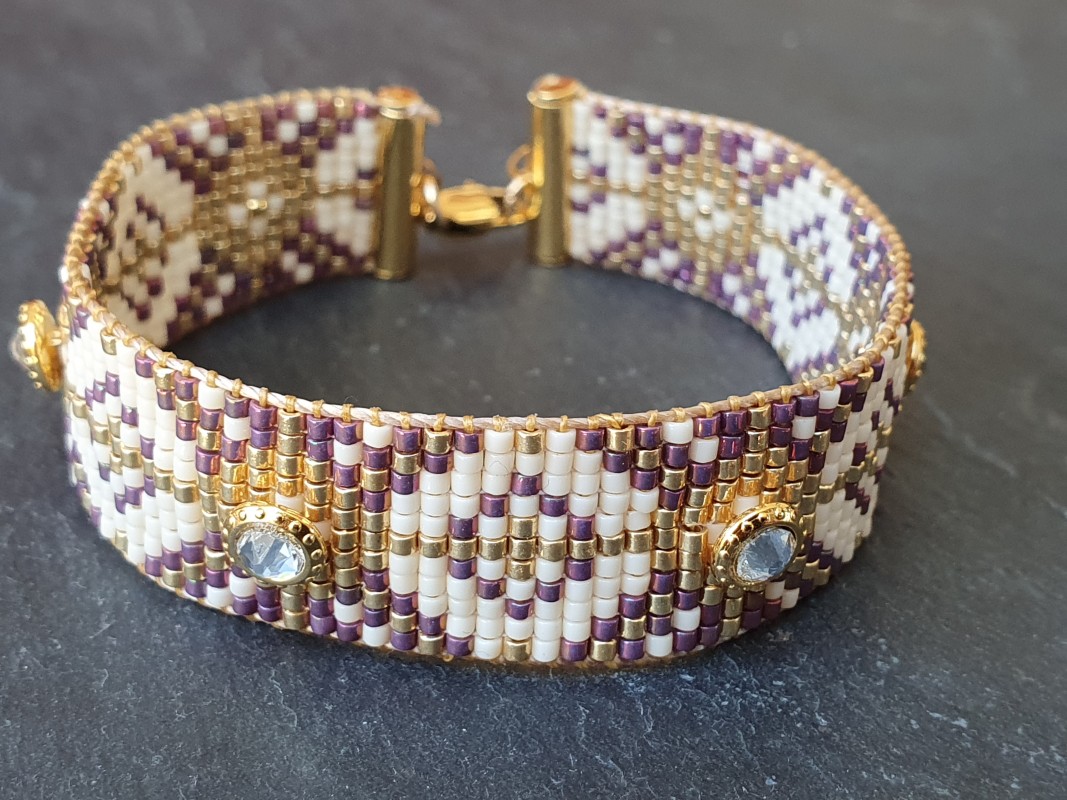
Untie it from the loom except for the first knot, you will now attach the rhinestones. On the first thread in the middle, thread the 3 or 4 rhinestones depending on the length of the bracelet you want. Surround the nail on the other side to attach the second thread. Pass again in the rhinestones and so on. You must pass 4 wires in the rhinestones. Be careful not to miss any of the rhinestones.

Step 2
Miyuki Delicas 10 Loom Weaving Grid with Rhinestone Inlay : Step 2

Here is what you need to get. 4 threads in the center go through the rhinestones, 3 loose weave threads on each side and 1 gold border thread on each side. So there are 13 threads in all.

Step 3
Miyuki Delicas 10 Loom Weaving Grid with Rhinestone Inlay : Step 3

Cut a piece of weaving thread 1.5 m long and knot it on one of the golden threads, keeping 25 cm of thread end. String the first row of 11 weaving beads (different from the photo because the turquoise border at the tip on the diagram was added afterwards).

Thread the beads under the threads of the loom and place one bead between each thread. Then pass the needle back through the beads in the other direction, being careful to pass over the loom threads or the bead will not hold well.

Step 4
Miyuki Delicas 10 Loom Weaving Grid with Rhinestone Inlay : Step 4

Repeat step 3 following the pattern to add the other lines of beads. When you reach the rhinestone, string the beads in two steps. First the first 4 beads and then go through the rhinestone.

Step 5
Miyuki Delicas 10 Loom Weaving Grid with Rhinestone Inlay : Step 5

Then thread the last 4 and weave them by ironing in with the needle. Also iron in the rhinestone.

Step 6
Miyuki Delicas 10 Loom Weaving Grid with Rhinestone Inlay : Step 6

Continue in this way for the next two rows.

Step 7
Miyuki Delicas 10 Loom Weaving Grid with Rhinestone Inlay : Step 7

If your thread becomes too short, pass it through the previous rows in the middle of the weaving avoiding the edge. This will block the thread and you can cut it by bringing it out before the edge. Tie a new thread on the golden thread with a double knot, hide the thread end with the same method and then continue weaving.

Step 8
Miyuki Delicas 10 Loom Weaving Grid with Rhinestone Inlay : Step 8

Once you have reached the tip, reduce the tension of the wire slightly by turning the log. Also bring the threads closer to the centre little by little. Thread two less beads each time following the pattern and weave normally, centering the beads and taking the threads from the sides. Iron 2 to 3 times through the beads, tightening a little at a time and bringing the edges together. If you tighten it too much or the thread is too taut, the tip will bulge and the beads will not be aligned.

Finishing for bracelets without a tip: wedge the weaving thread into the beads and cut it off. Tie all the wires 2 by 2 with triple knots then put glue on the knots before sliding the last line of beads into the tips.

Step 9
Miyuki Delicas 10 Loom Weaving Grid with Rhinestone Inlay : Step 9

Continue to decrease the number of beads little by little.

Step 10
Miyuki Delicas 10 Loom Weaving Grid with Rhinestone Inlay : Step 10

We finish with a single bead. As you can see, the threads have been brought together and loosened as you go along.

Step 11
Miyuki Delicas 10 Loom Weaving Grid with Rhinestone Inlay : Step 11

Wedge the weaving thread into the beads of the loom. Do not use the opportunity to bring the diverging bead lines together.

Step 12
Miyuki Delicas 10 Loom Weaving Grid with Rhinestone Inlay : Step 12

Then cut the wire by bringing it out in the center of the bracelet.

Step 13
Miyuki Delicas 10 Loom Weaving Grid with Rhinestone Inlay : Step 13

Untie the gold threads without cutting them. You can cut the warp threads as close to the nail as possible.

Step 14
Miyuki Delicas 10 Loom Weaving Grid with Rhinestone Inlay : Step 14

Tuck and wedge all the weaving threads into the weave through the bead of the tip and cut them. This will give a nice finish and solidify the tip which is the most fragile part. Do this on both sides. We warn you, it's long...

Step 15
Miyuki Delicas 10 Loom Weaving Grid with Rhinestone Inlay : Step 15

Tie the two wires on each side as close to the tip as possible.

Step 16
Miyuki Delicas 10 Loom Weaving Grid with Rhinestone Inlay : Step 16

Cross them and tie a 20 cm piece of wire over them. You're about to start the slipknot. You can watch a video of this knot here: Woven bracelet with sliding knot.

Step 17
Miyuki Delicas 10 Loom Weaving Grid with Rhinestone Inlay : Step 17

This is a macramé overhand knot. Pass the right-hand thread under the 4 threads of the bracelet, the left-hand thread under the right-hand thread, over the 4 threads of the bracelet and through the loop formed by the left-hand thread. Tighten without forcing. Repeat the operation by reversing the right and left and alternate the direction 4 other times.

Step 18
Miyuki Delicas 10 Loom Weaving Grid with Rhinestone Inlay : Step 18

Cut the wire ends a few millimetres from the knot and burn it with a lighter or put a generous dose of glue. Once it is dry, test the bracelet to see where to stop the wire ends. You should be able to thread the bracelet without forcing it. Mark the location of your stop knot with a pencil or marker.

Step 19
Miyuki Delicas 10 Loom Weaving Grid with Rhinestone Inlay : Step 19

Thread 3 gold beads on each thread and then tie the threads together two by two at your mark. The four strands should be the same length. Tighten the knot very tightly then cut the excess thread a few millimetres from the knot. Unwrap the small pieces of thread to make small pompoms. Then add the charms and the mini pompoms with a ring.

Result
Schema  Miyuki Delicas 10 Loom Weaving Grid with Rhinestone Inlay
Tiffanie Perles Co
 Tiffanie Perles Co - Les tutos de Tiffanie
Bonjour, moi c'est Tiffanie. J'étais créatrice et designer produit chez Perles & Co. J'adore tester de nouveaux DIY et vous faire profiter de mes expériences. Vous pouvez toujours consulter les tutoriels que je vous avais concocté sur le site !
Share with my friends
Which material to use ?
Supplies
Jumprings open 5.5x0.8mm fine Gold plated x50
2,20€
Miyuki Delica Duracoat 10/0 DBM1832 - Galvanized Gold x8g
5,40€
Cotton Pompon 7 mm Cream - Fine Gold Plated x1
4,80€
Miyuki Nylon Beading thread B 0.25 mm Semolina  x50 m
3,30€
Miyuki Delica 10/0 DBM2264 - Opaque Turquoise Blue Picasso x8g
3,20€
Miyuki Delica 10/0 DBM0732 - Opaque Dark Cream x8g
2,80€
15x12.5mm 925 Sterling Silver sun charm - Fine Gold Plated x1
2,50€
Subtotal : 44,59€
Tools
Jewel Glue Hasulith 30ml
OUTIL-007
Qty : 1
5441 in stock
2,40€
Kit of 3 pliers in Perles & Co pocket Pink x1
19,00€
Metal Beading Loom extendable and largex1
14,80€
Subtotal : 36,20€
Equivalent product
Miyuki Nylon Beading thread B 0.25 mm Silver x50 m
3,30€
Miyuki Delica Duracoat 10/0 DBM1831 - Galvanized Silver x8g
5,40€
Jumprings open  5x0.7mm Silver tone x50
ACC-102
Qty : 1
147 in stock
1,10€
925 Sterling Silver Pendant 7 mm faceted gemstone / Labradorite x1
2,60€
15x12.5mm 925 Sterling Silver sun charm x1
2,20€
Your questions (14)

You have a question about this tutorial? Ask it to our team and the people who have already tested it. The Perles & Co community is here to help you!

By LUCIE (26/01/2025 11:20:44)
Bonjour, j'ai un souci au moment où je retire le bracelet du métier à tisser pour le fermer, c'est souvent que le bracelet gondole forme des plis. Cependant, je vérifie toujours que les fils soient bien tendu et quand je fais mes nœuds à la fin je ne sers pas trop. Voilà je voulais savoir si vous aviez des astuces pour ça? J'utilise de la rocaille miyuki. Est-ce dû à ceci? Peut-être qu'avec des délicats nous n'avons pas ce problème là. On vous remercie en avance
Translate the question
Please log in to use this feature
Our Tiffanie expert answers you (31/01/2025 11:20:53)
Bonjour, pouvez-vous m'envoyer une photo du tissage en question à [email protected] ? Merci d'avance
Translate the answer
By CHRISTINE (22/01/2025 19:47:10)
Bonjour,
Pouvez-vous nous mettre une vidéo concernant le nœud coulissant en macramé. Le lien qui est dans l'article ne fonctionne pas.
Merci
Translate the question
Please log in to use this feature
Our Tiffanie expert answers you (24/01/2025 10:38:52)
Bonjour, merci pour le signalement, je vais remplacer le lien cassé. Le voici : https://www.perlesandco.com/ressources/ft24401-comment-faire-un-noeud-coulant.html 
Translate the answer
By Alexandra (20/11/2024 16:59:20)
Bonjour, j'ai acheté tout ce qu'il faut pour faire ce bracelet mais en recevant le fil je me suis posée une question : comment le fil de 1.2mm peut passer dans une perle dorée miyuki 10/0 qui a un trou de 0,97mm ? Est ce vraiment le bon fil qui est suggéré en achat pour ce bracelet ?
Merci d'avance pour votre réponse.
Translate the question
Please log in to use this feature
Our Tiffanie J. expert answers you (21/11/2024 08:48:41)
Bonjour, oui ça passe. Le fil de 1,2 mm est un peu plat, donc on peut les faire passer. Ce tutoriel a été commandé des dizaines et des dizaines de fois et personne n'a eu de souci donc ne vous inquiétez pas ;)
Translate the answer
By Julie (25/01/2024 18:00:26)
Bonjour Tiffanie, je vous remercie d abord pour tous vos tutoriels et conseils, ils sont précieux. J'ai décidé de me lancer dans le tiisage avec le métier à tisser et je souhaite savoir si c'est possible de reproduire sur le métier à tisser les boucles d'oreilles qui sont en modèle brick stitch merci de votre réponse
Translate the question
Please log in to use this feature
Our Tiffanie J. expert answers you (01/02/2024 10:12:00)
Bonjour, les grilles de tissage en brick stitch ou peyote ne sont pas compatibles avec le métier à tisser. Il faut entièrement refaire la grille et le design sera différent car les perles ne sont pas placées pareil. De plus, il n'est pas impossible de faire des boucles d'oreilles au métier à tisser mais ce n'est clairement pas l'idée la plus simple. Généralement, on ne fait au métier à tisser que des bracelets ou bandes. Quand les formes sont plus complexes et séloignent d'une bande, prévilégiez le tissage à l'aiguille.
Translate the answer
By Sylvie (14/04/2023 16:15:38)
Bonjour Tiffanie, je vous remercie pour votre réponse rapide. En allant voir sur le site les perles à écraser que vous m'avez conseillées, j'ai vu qu'il y avait des cache noeuds, du coup j'ai une autre question : pour ce bracelet qu'estce qui serait le plus solide et le plus joli d'après vous pour remplacer les noeuds ? Les perles à ecraser avec leur cache perles ou les cache noeuds ? À nouveau un grand merci d'avance pour votre réponse
Translate the question
Please log in to use this feature
Our Tiffanie J. expert answers you (14/04/2023 16:30:01)
Sylvie, je n'ai pas trouvé de cache-noeud adapté au fil utilisé et je ne comprend pas très bien comment vous souhaitez les utiliser : C'est pour simplement cacher le noeud ou pour y attacher un fermoir ? Il existe deux types de cache-noeuds : avec ou sans anneaux. S'il s'agit simplement de cacher le noeud, un cache perle peut remplacer un cache noeud. Vous pouvez donc normalement utiliser le cache-perle cité précédemment.
Translate the answer
Your reviews (5)
Notices subject to control
5/5
Average Grades
Please log in to use this feature
By Sandra (posted on : 10/07/2023 )
Merci perlesandco pour ce Tuto clair et ce magnifique bracelet ! De superbes cadeaux en perspective
Translate the notice
By Blandine (posted on : 11/04/2022 )
Et oui désolée...
Je note 5/5 votre tutoriel qui est très clair ! C'est un réel plaisir !
Translate the notice
By Blandine (posted on : 11/04/2022 )
Merci Perles & Co pour ce tuto. Je l'ai fait en délicas 11/0 et en remplaçant les strass carrés par des cymbal Loutro. C'est joli aussi !
Et c'est mon 1er essai sur métier à tisser... j'adore !
Translate the notice
Answer from customer Tiffanie Perles&Co (11/04/2022 14:26:20)
Bonjour, merci pour votre avis ! C'est super de voir que c'est possible avec les cymbal également. Il semble que vous ayez oublier de donner une note au tutoriel. Du coup, il est affiché 1/5. Pourriez-vous m'indiquer la note que vous souhaitiez mettre ? Merci d'avance :) En tout cas continuez à nous montrer ce que vous réalisez avec les tutoriels Perles and Co, ça nous fait très plaisir de voir ce que nos clientes réalisent ;)
Translate the answer
By Fanny (posted on : 17/02/2022 )
J'aime beaucoup l'originalité de ce tissage avec l'incrustation des strass. Le rendu est sublime avec les fils dorés de chaque côté et les finitions en pointes. Encore un tuto très clair, merci Perles & Co !
Translate the notice
By Fabienne (posted on : 06/05/2025 )
Bonjour, j'ai réalisé le bracelet sans les perles Oxyde de Zirconium. Pas de difficulté particulière pour faire ce tissage. Pour le nœud, ce tuto https://www.perlesandco.com/ressources/ft24401-comment-faire-un-noeud-coulant.html fonctionne très bien.
Translate the notice

Credits

Perles & Co, Internet & E-Commerce company [15/06/2021] Any reproduction, representation, adaptation, in any form whatsoever, even partial, is prohibited, except for reproduction for private use not intended for collective use, representation in the family circle (art. L 122-5 CPI) and online publishing on condition that the source is mentioned and a link is included to the corresponding page of our site www.perlesandco.com.