
Average Grades
Bonjour,
est il possible de télécharger le schéma ?
Merci !
est il possible de télécharger le schéma ?
Merci !
1 Answer
Show answers
Install Perles & Co on your home screen: tap the Share button in Safari, then "Add to Home Screen".
Install Perles & Co on your home screen for quick access and real-time updates.
Enable notifications to track your orders and never miss our highlights.

How to make a circular peyote weave bracelet?
How to make a double bangle bracelet?
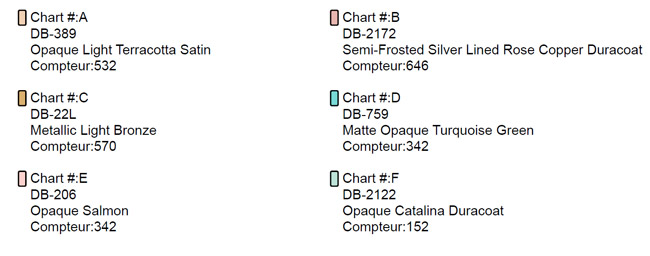
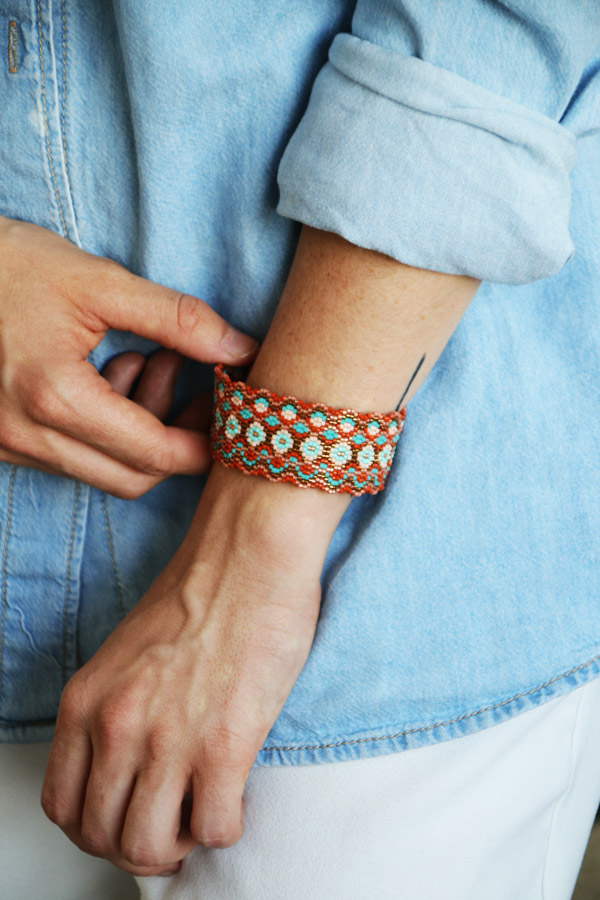
A DIY bracelet in peyote circular weaving is good, a bracelet with the technique of double circular peyote is better and with this color Terracotta we can not do better! Another nice DIY bracelet to make yourself. The weaving technique called Peyote makes it possible to make beaded bracelets without a loom .
You absolutely want this beautiful bracelet but you start in the weaving of pearls? Do not panic, we teach you the basics of pearl weaving with our many fact sheets on the subject. And you've even been given a list of the materials needed to get started in pearl weaving. Before you start, we invite you to look at the practical sheet that explains how to match your wrist circumference and the number of Miyuki delicas beads for a circular peyote bracelet . You know everything, you're ready to start! Find at the end of this tutorial full of other ideas to make weaving DIY bracelets .
We thank Jennaya for this great tutorial!
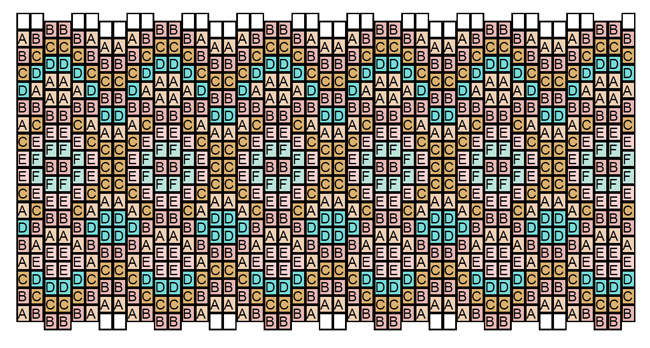
Step 1: Thread the first beads
Start by putting on the first line of pearls. The ideal is to start in the middle, the edges of the bangle are not always very regular. Once you have put the pearls on the first line, put your needle and thread through the first two beads to "close your bracelet".
Step 2: Weave, weave
Continue the weaving in the same way as on a classic circular peyote bangle except that instead of putting on a bead and skipping one, here you have to put two pearls and jump two. The difficulty of this step will be to find the right tension because if you do not tighten enough the bangle, it will be too loose and if on the contrary you tighten too much, it will be too rigid and the beads will not be inserted well among each other.
Step 3: Weave, weave, weave
Continue to weave in the same way as specified in Step 1 to the last line. Do not hesitate to place the beads yourself after each threading if they do not place themselves.
Step 4: Get to the last line
For the last line, put your two beads in the place corresponding to the diagram, then pass the needle and the thread in the following beads so as to leave then where you need to put the next beads and so on until 'at the end of the line.
A little tip for you, to prevent your bracelet from relaxing by wearing it you can inside it add a thin layer of varnish.
Did you like making this pretty woven bracelet? We have prepared a list of tutorials for you to continue:
Do not forget, we love to see your creations so do not hesitate to send us the pictures of your DIY bangle bracelet on our Facebook page or to tag us on Instagram with #Perlesandco!


You have a question about this tutorial? Ask it to our team and the people who have already tested it. The Perles & Co community is here to help you!
Credits
Perles & Co, Internet & E-Commerce company [29/08/2019] Any reproduction, representation, adaptation, in any form whatsoever, even partial, is prohibited, except for reproduction for private use not intended for collective use, representation in the family circle (art. L 122-5 CPI) and online publishing on condition that the source is mentioned and a link is included to the corresponding page of our site www.perlesandco.com.

