Average Grades

Weave the diagram below 2 times in Brick Stitch, starting where the arrow is.
Install Perles & Co on your home screen: tap the Share button in Safari, then "Add to Home Screen".
Install Perles & Co on your home screen for quick access and real-time updates.
Enable notifications to track your orders and never miss our highlights.

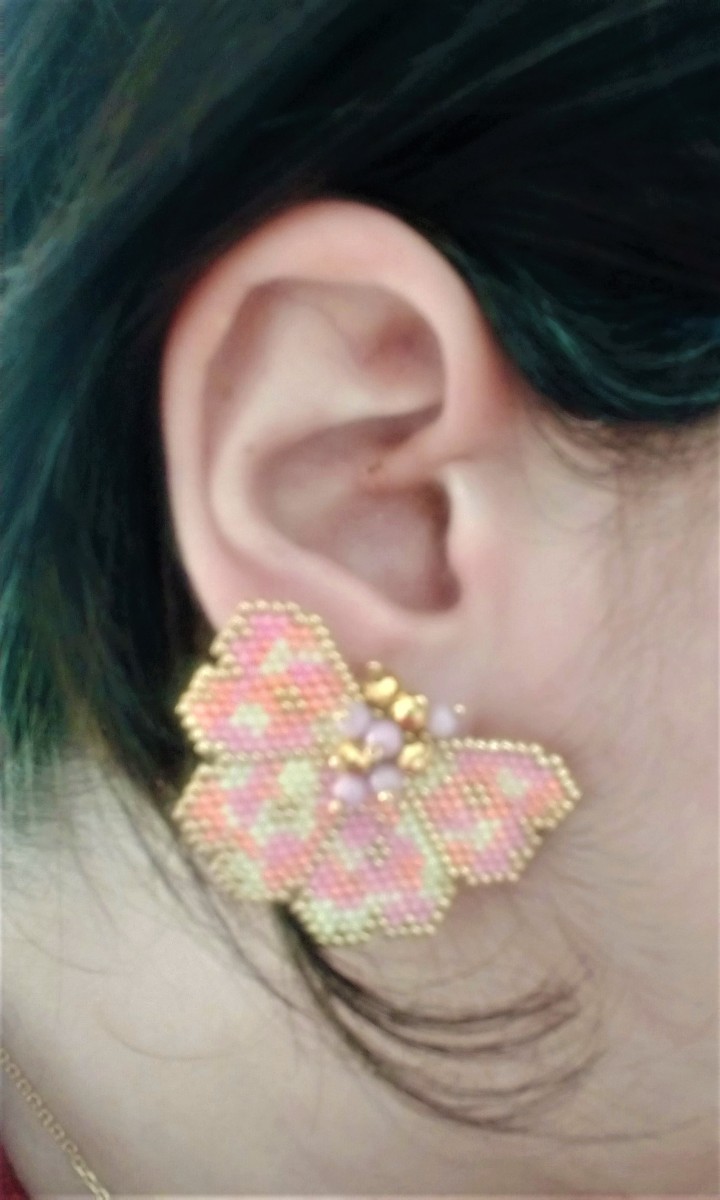
To kick off the fast-approaching summer, we're craving springtime colors and shapes to slip into our jewelry box! This pretty pair of flower ear rings is ideal for the season, and will accompany your everyday outfits as well as more festive outfits. Why not wear them to a wedding, for example? In this tutorial by Jenny, you'll learn how to create these flower earrings using Brick Stitch weaving. This needle-bead weaving technique involves stringing seed beads in rows next to each other. This creation is accessible to people with an intermediate level of weaving and takes around 3h30 to complete.
This tutorial is part of ourPerlement VôtreDIY jewelry collection . It's a special collection, since each of the creations was imagined and created by the winners of our Cré'Academy competition. You'll find five tutorials in pastel colors tinged with pink, peach and yellow. As you can see, these are the ideal creations for the summer ahead!
To weave the petals of your flowers, you'll need 4 references of Miyuki Delica 11/0 beads and one reference of Miyuki Duracoat 15/0 seed beads. To make the pistil of each flower, you'll need round faceted Preciosa beads and Czech glass beads, all to be assembled and glued onto a pair of stud earrings.
These earrings can be customized to suit your choice of bead colors. We have a wide choice of Miyuki beads on our website, so you can reproduce these flowers in the shades of your choice!
If you reproduce this tutorial, don't hesitate to share your jewelry on the networks by tagging our Facebook or Instagrampage. We'd love to see what you come up with!
Weave the diagram below 2 times in Brick Stitch, starting where the arrow is.

Take about 1m of thread. Pass the needle through the gold bead of the weave as shown in the photo, leaving 10cm of thread.

Stitch into the left bead from above as shown in the photo.

Stitch into the left bead from below ( see photo )

prick into the right bead from above ( see photo )

Stitch into the right-hand bead from below (see photo)

threading a peach bead (P) and a seed bead (ROC)

Stitch into the peach bead (P), then into the weave (see photo). Tighten to place the pearl straight on the weave.

Insert the needle into the weave in the 2 diagonal left-hand delicas (see photo).

thread a golden pearl (D) and a rocaille (ROC)

transplant into the (D) then into the weave (see photo)

Stitch into the weave in the 2 diagonal left-hand delicas ( see photo )

thread one (P) and one (ROC)

transplant into the (P) then into the weave (see photo)

prick the needle into the delicate weave (see photo)

transplant into the left delica from below (see photo)

thread one (D) and one (ROC)

transplant into the (D) then into the weave (see photo)

thread one (P) and one (ROC)

prick into the (P) and prick into the delicate weave ( see photo )

stitch in the delicate weave on the left (see photo)

thread one (D) and one (ROC)

Press into (D) and then into weave as shown

prick into the Délica below as shown

Thread one (P) and one (ROC)

Transplant into the (P) and then into the weave (see photo) (delicate below)

prick into the right delica from below ( see photo )

thread one (D) and one (ROC)

Transplant into the (D) then into the weave ( see photo )

prick into the 2 delicas diagonally (see photo)

thread one (P) and one (ROC)

transplant into the (P) then into the weave (see photo)

Pass the threads through the weave to close and consolidate, then cut the threads flush.
OPTIONAL: You can apply a coat of decopatch varnish to the back of each weave to solidify it. If you don't have any, a coat of clear nail varnish will do the trick. Be careful to apply a thin layer.

Once the varnish is dry, glue the ear stud in the same direction as shown in the photo. This way, the earrings can be worn in 2 different directions.


You have a question about this tutorial? Ask it to our team and the people who have already tested it. The Perles & Co community is here to help you!
Credits
Perles & Co, Internet & E-Commerce company [07/06/2024] Any reproduction, representation, adaptation, in any form whatsoever, even partial, is prohibited, except for reproduction for private use not intended for collective use, representation in the family circle (art. L 122-5 CPI) and online publishing on condition that the source is mentioned and a link is included to the corresponding page of our site www.perlesandco.com.