Average Grades
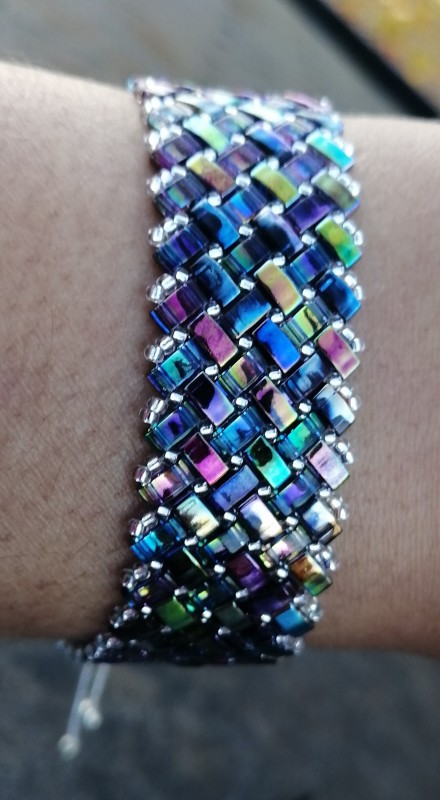
Start by weaving a straight band of about 20 to 22 cm following the technical instructions given in the tutorial Miyuki Half Tila beads and seed beads 3 herringbone bracelet and seed beads Miyuki Half Tila beads and seed beads
Install Perles & Co on your home screen: tap the Share button in Safari, then "Add to Home Screen".
Install Perles & Co on your home screen for quick access and real-time updates.
Enable notifications to track your orders and never miss our highlights.
Many of you are wondering how to make a Miyuki Half Tila pearl weaving tip! Well Mariette Bessac did it!
She unveils in this tutorial all the tricks to make step by step a herringbone necklace with the weaving of Miyuki Half Tila beads and seed beads.
You know it, you can of course adapt the colors of the beads according to your desires! To do this, visit our website to discover or rediscover our wide range of references!
Start by weaving a straight band of about 20 to 22 cm following the technical instructions given in the tutorial Miyuki Half Tila beads and seed beads 3 herringbone bracelet and seed beads Miyuki Half Tila beads and seed beads
At the start of the next row, replace the 2 rockeries by 1 Half Tila and 1 rockery and go into the free hole of the last Half Tila in place.
Continue the row as normal. Thread 1 Rocaille and 1 Half Tila and pass the needle through the next Rocaille and Half Tila.
Repeat the operation a second time.
To finish the row, thread 1 rockery and 1 half tila, then pass the needle through the rockery on the edge.
Turn your weave over.
Thread 2 rocailles then pass the needle through the free hole of the last half tila put in place.
Make the row in the classic way: thread 1 rocaille, 1 half tila and pass the needle through the rocaille and the next half tila.
For the end of the row, thread 1 rockery and 1 half tila, then pass the needle through the rockery on the edge.
Turn over the weave then put 1 half tila and 1 rocaille on the needle and pass the needle through the free hole of the last half tila put in place.
Make the row in the classic way: 1 rocaille, 1 half tila to be inserted in the next half tila. Be careful, for the last bead, thread the needle into the rockery of the edge.
Flip the weave.
Thread 2 rocailles and pass the needle through the free hole of the last half tila put in place.
Thread 2 rocailles and pass the needle through the rocaille and the next half tila.
Thread 2 rocailles and pass the needle through the rocaille and the next half tila. Repeat until the row is completed.
Turn your weave over. Thread 1 half tila and 3 rocailles. Bring them down along the thread so that they are against the weave.
Thread the needle into the free hole of this very last half tila and into the next rock. Tighten well.
Turn the weave over and orient it as shown in the photo.
Thread 1 half tila and 1 rocaille then pass the needle through the half tila and the next rocaille.
Thread 1 half tila and 1 rocaille then pass the needle through the half tila and the next rocaille.
Tip!
At this point, pass your needle through the three seed beads and make a turn in order to place the beads in question against their half tila.
These three beads are the ones that will be in the hollow of the necklace and must be tight.
I pass the thread through the half tila, avoiding the intermediate beads.
Turn the weave over.
Thread 1 half tila and 3 rocailles. Bring them down along the thread so that they are against the weave.
Hold the half tila in place between thumb and forefinger and thread the needle through the free hole in the same half tila and into the next rock. Tighten well
Thread 1 half tila and 1 rocaille then pass the needle through the half tila and the next rocaille.
Thread 1 half tila and 1 rocaille and pass the needle through the half tila and the next rocaille.
Thread 1 half tila and 3 rocailles. Bring them down along the thread so that they are against the weave, then pass the needle through the free hole of this same half tila and through the next rocaille. Tighten well
Thread 1 half tila and 1 rocaille and pass the needle through the next half tila and rocaille.
Thread 1 half tila and 1 rocaille and pass the needle through the next half tila and rocaille.
Repeat steps 17 to 23 in a loop until you have woven a strip of the same length on the other side of the collar.
For the finishing touches and the fixing of the weaving ends, the explanations are given in the video.


You have a question about this tutorial? Ask it to our team and the people who have already tested it. The Perles & Co community is here to help you!
Credits
Perles & Co, Internet & E-Commerce company [01/11/2020] Any reproduction, representation, adaptation, in any form whatsoever, even partial, is prohibited, except for reproduction for private use not intended for collective use, representation in the family circle (art. L 122-5 CPI) and online publishing on condition that the source is mentioned and a link is included to the corresponding page of our site www.perlesandco.com.