Free shipping on orders over 50€ up to 500g
French Online shop for beads and accessories for the creation of DIY jewellery and other creative hobbies

Log-in

DIY peyote weaving bangle bracelet with Miyuki Delicas beads

Made by :EMJY
Published on the :05/08/2018
Time :4h
Level :Intermediate
Prices :13,80€
DIY peyote weaving bangle bracelet with Miyuki Delicas beads

How to make a bangle bracelet

How to make a circular peyote bracelet?

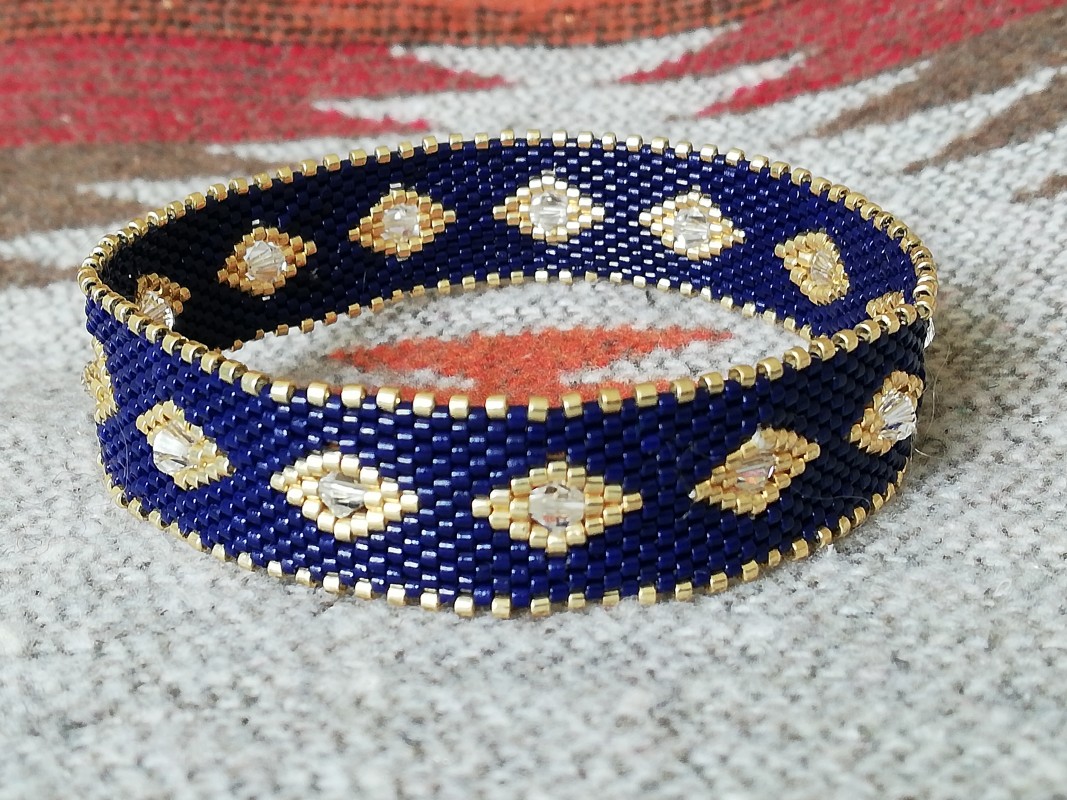
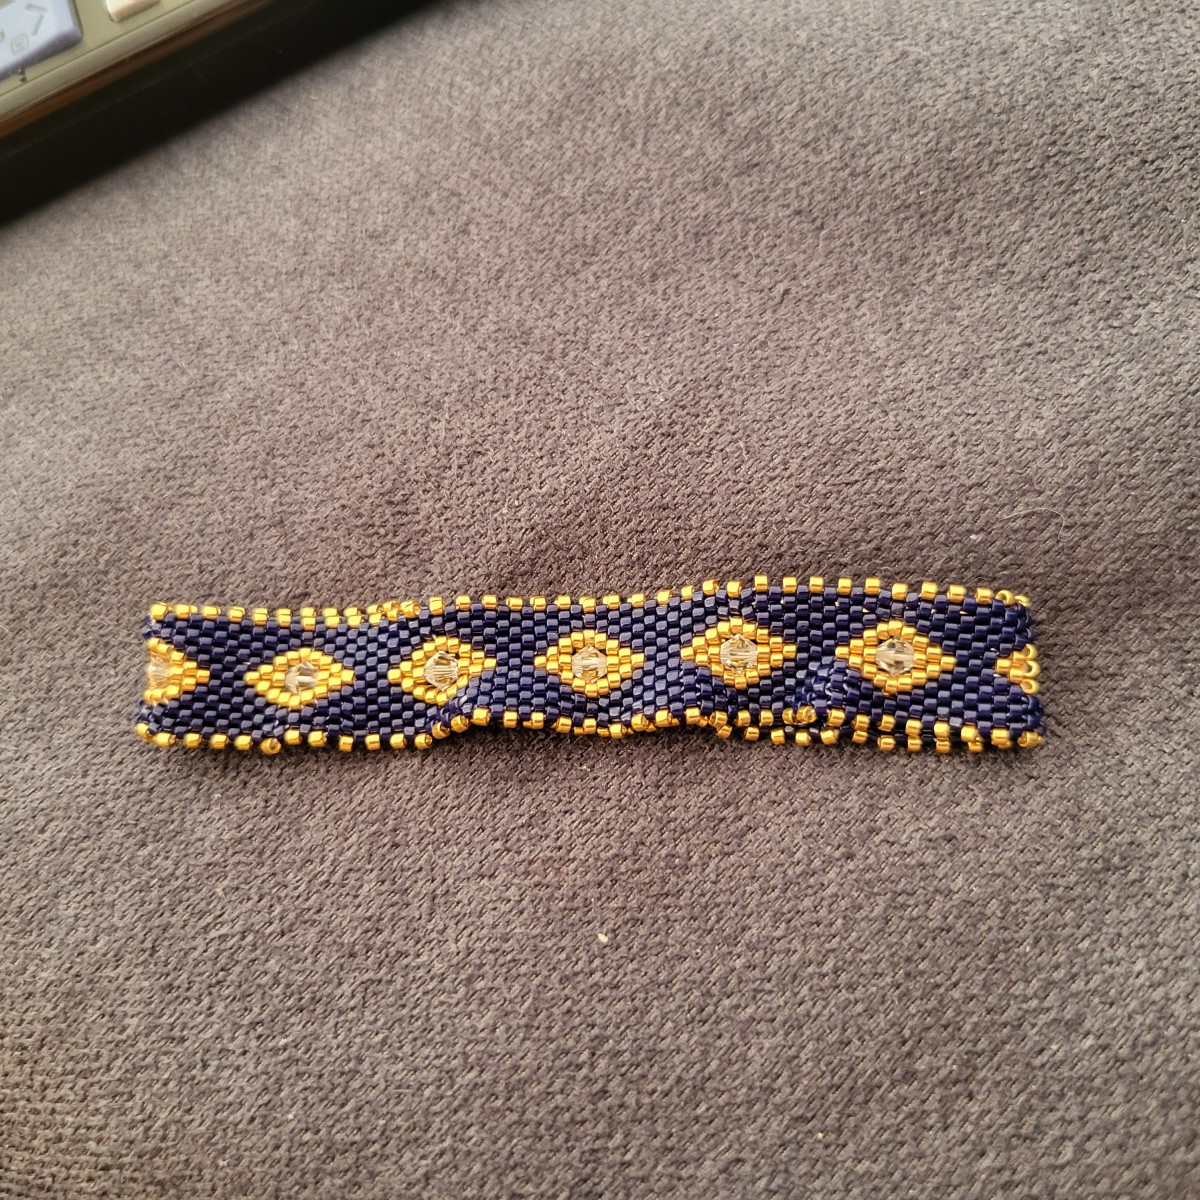
Always on the lookout for forgotten or new weaving techniques, Marjorie aka Emjy suggests we make a DIY woven bracelet using the circular peyote technique. With this tutorial, discover how to make this piece of jewelry woven with Miyuki Delicas glass beads and a few PureCrystal spinning tops.

If you're new to weaving, don't panic, learn the basics in our toolbox section.

Thanks to Marjorie for sharing her tutorial.

We love to see your creations so feel free to send us photos of your DIY bangle bracelet on our Facebook page or tag us on Instagram with #Perlesandco!

Tutorial steps

Step 1
DIY peyote weaving bangle bracelet with Miyuki Delicas beads : Step 1

To measure the length of the bracelet you need, measure your hand at the widest point, where the fingers meet the hand, bending the thumb inwards. The length obtained will give you the length of the thread to be made.

Step 2
DIY peyote weaving bangle bracelet with Miyuki Delicas beads : Step 2

We start this bracelet with the center line containing the bicones, so that they're evenly distributed throughout the bracelet.
You need to thread an even number of beads. Take about 2 meters of thread to start with. Thread the beads in the following order until you reach the required length (here 19cm): 3 gold miyuki, 1 bicone, 3 gold miyuki and 3 colored (you must end your thread with 3 colored).

Step 3
DIY peyote weaving bangle bracelet with Miyuki Delicas beads : Step 3

Thread through the first golden bead to create the ring. The thread should emerge on the opposite side.

Step 4
DIY peyote weaving bangle bracelet with Miyuki Delicas beads : Step 4

Start your row of classic peyote, to place your first bead, skip the first golden bead.

Step 5
DIY peyote weaving bangle bracelet with Miyuki Delicas beads : Step 5

Pass your needle through the following 3 ( 1 golden miyuki, 1 bicone, 1 golden miyuki)

Step 6
DIY peyote weaving bangle bracelet with Miyuki Delicas beads : Step 6

Continue with your classic peyote, then repeat the operation with each bicone.

Step 7
DIY peyote weaving bangle bracelet with Miyuki Delicas beads : Step 7

To complete your first row, thread a blue bead, then pass through the 2 gold beads on your way up to start your new row.

Step 8
DIY peyote weaving bangle bracelet with Miyuki Delicas beads : Step 8

Start this new row by threading 5 golden beads around your spinning top, then pass through the first golden miyuki that comes along.

Step 9
DIY peyote weaving bangle bracelet with Miyuki Delicas beads : Step 9

Continue with classic peyote, then repeat for each bicone. (The first 2 or 3 rows tend to spin, so be careful when placing the beads).

Step 10
DIY peyote weaving bangle bracelet with Miyuki Delicas beads : Step 10

To complete this row, slip on a blue bead, skip the first golden bead and move on to the next 6 to start your new row.

Step 11
DIY peyote weaving bangle bracelet with Miyuki Delicas beads : Step 11

Start this row in classic peyote, arrive at the first bicone, skip the first golden miyuki and move on to the next 5.

Step 12
DIY peyote weaving bangle bracelet with Miyuki Delicas beads : Step 12

Repeat this step all the way around the bracelet.

Step 13
DIY peyote weaving bangle bracelet with Miyuki Delicas beads : Step 13

Finish this row, skipping the first golden miyuki and working your way up through the next 4.

Step 14
DIY peyote weaving bangle bracelet with Miyuki Delicas beads : Step 14

Start the new row as normal, then with each bicone, skip the first golden miyuki and move on to the next 3.

Step 15
DIY peyote weaving bangle bracelet with Miyuki Delicas beads : Step 15

Finish your row by skipping the first golden miyuki, then work your way up through the next two.

Step 16
DIY peyote weaving bangle bracelet with Miyuki Delicas beads : Step 16

Start your new row, and with each bicone, skip the first golden one and go only into the middle one.

Step 17
DIY peyote weaving bangle bracelet with Miyuki Delicas beads : Step 17

Continue the previous step along the entire length.

Step 18
DIY peyote weaving bangle bracelet with Miyuki Delicas beads : Step 18

To finish this row, skip the first gold and then move up the next two rows (here one gold, one blue) to start the new row.

Step 19
DIY peyote weaving bangle bracelet with Miyuki Delicas beads : Step 19

Weave in classic peyote to the desired width, always ending your row by passing through 2 beads on the way up, so that you can start a new row.

Step 20
DIY peyote weaving bangle bracelet with Miyuki Delicas beads : Step 20

Follow the same steps on the other side, and your bangle bracelet (ring without clasp) is finished. If you wish to make it a little stiffer, you can apply a coat of varnish around the inside.

Result
Schema  DIY peyote weaving bangle bracelet with Miyuki Delicas beads
EMJY
Autodidacte passionnée et touche à tout depuis toute petite, j?ai un besoin permanent de m’occuper les mains et l’esprit.. J?aime découvrir de nouvelles techniques, je tisse des perles, fais de la polymère, je couds, je crochète, je tricote, je bricole? mon appétit créatif est insatiable? J?aime également échanger et partager mon savoir avec d?autres personnes débutants ou confirmés. Il était donc évident que cela devienne mon métier, et c?est comme ça que l?entreprise Emjy est née en 2018.
Associated keywords
Share with my friends
Which material to use ?
Supplies
PureCrystal 5328 Crystal Bicones 4mm Crystal x50
3,70€
C-Lon thread D 0.3 mm -  White x 71m
C-LON-027
Qty : 1
262 in stock
2,00€
Miyuki Delica Duracoat 11/0 DB1833 - Galvanized Yellow Gold
4,80€
Miyuki Delica Duracoat 11/0 DB2144 - Opaque Dyed Cobalt x8g
3,30€
Subtotal : 13,80€
Tools
Miyuki Beading needles x6
OAC-162
Qty : 1
6988 in stock
1,50€
Subtotal : 1,50€
Your questions (22)

You have a question about this tutorial? Ask it to our team and the people who have already tested it. The Perles & Co community is here to help you!

By Marie (04/09/2025 18:25:32)
Le tuto est très bien fait mais malheureusement je ne suis pas satisfaite du résultat, mon bracelet gondole, qu'ai je malheureusement fait ? En espérant avoir des conseils pour pouvoir le refaire plus correctement, merci
Translate the question
Please log in to use this feature
Our Lucie expert answers you (09/09/2025 11:30:29)
Bonjour, lorsqu’un bracelet bangle gondole, cela provient généralement de la tension du fil : soit il est trop serré, soit trop lâche. L’important est de maintenir une tension régulière tout au long du tissage, ni trop forte ni trop faible. Merci
Translate the answer
By Marie (01/09/2025 13:38:02)
Bonjour
Le tutoriel est très bien expliqué mais malheureusement au final le bracelet gondole, à quoi est ce du ? Qu'ai je mal fait ? en espérant pouvoir avoir une réponse pour pouvoir m améliorer, merci par avance,
Translate the question
Please log in to use this feature
Our Laurence expert answers you (23/09/2025 11:34:16)
Bonjour,
Il s'agit de la référence ATT-848.
Translate the answer
Answer from customer Marie L. (23/09/2025 22:20:36)
Merci beaucoup pour la référence
Translate the answer
Answer from customer Marie L. (22/09/2025 17:37:23)
Merci beaucoup je vais essayer, serait il possible d avoir la référence du vernis decopatch à utiliser ? Merci par avance
Translate the answer
Our Laurence expert answers you (05/09/2025 09:15:49)
Bonjour,
Ce phénomène est souvent dû à une tension irrégulière du fil. Vous pouvez essayer quelques couches de vernis à l'intérieur du bangle pour le rigidifier légèrement, par exemple le vernis Decopatch.
Translate the answer
By Pat (26/08/2025 23:18:58)
Do you have this pattern in English?
Translate the question
Please log in to use this feature
Our Margaux expert answers you (04/09/2025 11:32:32)
Hello ! The tutorial has now been translated. Thank you. 
Translate the answer
By Catherine (19/07/2025 17:29:32)
Bonjour, Je voudrais savoir comment faire la longueur de 21 cm mais il n y a pas de mesures sur le graphique
Translate the question
Please log in to use this feature
Our Margaux expert answers you (19/08/2025 14:44:08)
Bonjour Catherine, le bracelet du tutoriel fait 19 cm. Chaque motif rajoute environ 1.5 cm. De ce fait, je pense que vous pouvez ajouter un seul motif pour la longueur souhaitée. 
Translate the answer
By Marie (21/03/2025 15:42:39)
Bonjour, la dimension de la main pour la personne pour laquelle je vais faire le bracelet est 19.5/20 cm.
Faut il que je prenne comme le modèle 19 cm car j ai peur que si je rajoute une série, le bracelet soit trop large à la fin ?
Translate the question
Please log in to use this feature
Our Tiffanie expert answers you (25/03/2025 14:19:40)
Bonjour, un motif rajoute 1,5 cm donc je ne pense pas que ce soit trop grand. Mais si vous voulez vérifier, et que vous pouvez le tester sur la personne, enfilez le premier tour de perles et testez directement sur sa main.
Translate the answer
Your reviews (3)
Notices subject to control
5/5
Average Grades
Please log in to use this feature
By Nadine CRESSET (posted on : 09/12/2021 )
Voici ma version plus colorée que l'original : A la place des Delicas 11/0 j'ai utilisé des 10/0 et par conséquent des toupies un peu plus grandes (des 6mm) pour aller avec, et j'ai ajouté une enfilade de Rocailles 15/0 pour combler les trous entre les Delicas des bordures.
Translate the notice
Our Lucie L. expert answers you (21/12/2021 12:27:15)
Bonjour Nadine,

Merci pour le partage de votre création. Cette version colorée fait son effet aussi ! Bravo
Translate the answer
By Marie (posted on : 31/07/2025 )
Le tuto est très bien fait mais malheureusement je ne suis pas satisfaite du résultat, mon bracelet gondole, qu'ai je malheureusement fait ? En espérant avoir des conseils pour pouvoir le refaire plus correctement, merci
Translate the notice
By Cathy6678 (posted on : 15/11/2020 )
Étapes bien détaillées et bien illustrées, faciles à suivre et le résultat est magnifique. Merci beaucoup
Translate the notice

Credits

Perles & Co, Internet & E-Commerce company [05/08/2018] Any reproduction, representation, adaptation, in any form whatsoever, even partial, is prohibited, except for reproduction for private use not intended for collective use, representation in the family circle (art. L 122-5 CPI) and online publishing on condition that the source is mentioned and a link is included to the corresponding page of our site www.perlesandco.com.