Free shipping on orders over 50€ up to 500g
French Online shop for beads and accessories for the creation of DIY jewellery and other creative hobbies

Log-in

DIY Facet balls with self-adhesive mirrors

Made by :Elisa Perles & Co
Published on the :15/11/2024
Time :3h
Level :Easy
Prices :15,90€
DIY Facet balls with self-adhesive mirrors

How to make mirror balls with mirror stickers

Would you like to decorate your festive season yourself? You've come to the right place! This year, we're offering you the chance to make a disco ball ! It's a 100% DIY activity that's not only super-fast, but also right on trend. This creation is made from self-adhesive mirrors will give a retro and quirky decoration to your interior. It's perfect for brightening up your festive evenings! This tutorial is very easy, so why not challenge yourself by creating several faceted balls for your home decor? These pretty DIY disco balls will create a wonderful play of light in your home, both in the evening by projecting the light from your lamps, and in the middle of the day by reflecting the sun's rays. Disco atmosphere and good humor guaranteed day and night!

This tutorial is very simple: all you need are some self-adhesive mirrors and a Styrofoam or plastic ball. Of course, you can adapt the size of the mirror ball by choosing from our range of DIY polystyrene ball sizes. You'll find more ball size options in the product variations section of the equipment list. The large 14 cm ball is made with the large mirrors, and a few small mirrors are placed at the top and bottom to fill the small holes. Two packs of 10x10 mm mirrors are needed to make the large faceted ball, plus a few 5x5 mm mirrors. Similarly, two packs of 5x5 mm mirrors are needed to make the small 60 mm ball, plus a half 60 mm ball. 1 pack is not enough to make the whole ball.

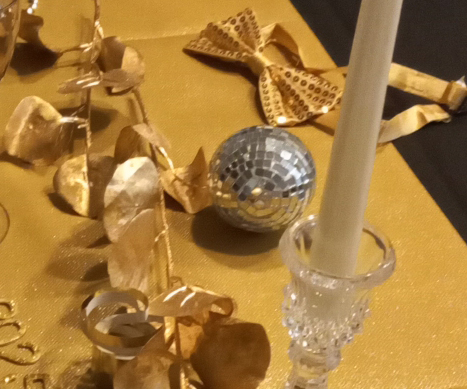
These faceted balls can also be used as decoration when you take photos of your jewelry for social networking or your designer boutique. You can base yourself on our party jewelry collection. In this collection, we used a disco ball and mirrors to give the photos a festive look. Another idea: set your jewelry on a neutral background, facing the sun, and place a small mirror ball next to it, under the sun's rays. This will create luminous reflections all around your jewels. Of course, you can also let yourself be inspired by this retro and quirky universe to take your most beautiful photos with friends or family during this festive and joyful season!

So, are you more of a party team with bling-bling and rhinestone decorations, or more of a party team with sober, cocooning decorations? We'd love to hear what you think!

We love to see your creations, so don't hesitate to send us your photos on ourFacebook pageor tag us onInstagramwith#perlesandco!

Tutorial steps

Step 1

Start by gluing strips of mirror in the middle of the ball. The mirrors are self-adhesive. Simply remove the strip of paper covering the self-adhesive part. The large 10x10 mm self-adhesive mirrors are used for the large ball, and the small mirrors for the small ball.

Step 2

The further up or down the ball you go, the smaller the strips of mirror you'll need. To recut them, the easiest way is to fold a strip of mirrors, folding mirrors against mirrors, and run the blade of a cutter flat across the fold to cut the row (always on the back, not the mirror side).

Step 3

At the top and bottom of the large ball, complete the holes with small 5x5 mm mirrors.

Step 4

If you want to make a half-ball, remember to put vinyl glue on the cut part to prevent little bits of polystyrene from falling off your ball over and over again. Of course, only if you don't glue it to a support.

Result
Schema  DIY Facet balls with self-adhesive mirrors
Elisa Perles & Co
 Elisa Perles & Co - MES TUTOS SUPER FACILES
Hello, Moi c'est Elisa. Je suis Chargée de Webmarketing chez Perles & Co. Sur mon profil, vous retrouverez des bijoux super simples et sympas ! J'ai toujours baigné dans la création de bijoux et les loisirs créatifs grâce à ma maman. Aujourd'hui, j'aime beaucoup créer des bijoux très faciles à réaliser avec toujours une petite touche tendance ! Mes créations sont à la portée de tous, parfaites si vous voulez débuter, notamment dans le montage de bijoux :).
Associated keywords
Projets
Evènements
Couleurs / Effets
Styles
Niveau de réalisation
Share with my friends
Which material to use ?
Supplies
Polystyrene ball 60 mm White x1
ENF-179
Qty : 1
182 in stock
0,60€
Transparent Xmas ball to fill 140mm x1
3,30€
Subtotal : 15,90€
Tools
Precise Cutter with ergonomic handle all supports
6,50€
Subtotal : 6,50€
Equivalent product
Transparent Xmas ball to fill 70mm x1
ATT-418
Qty : 1
51 in stock
1,50€
Polystyrene ball 50 mm White x1
ENF-180
Qty : 1
293 in stock
0,50€
Polystyrene ball for Fofuchas dolls 40 mm White x1
0,46€
Your questions (0)

You have a question about this tutorial? Ask it to our team and the people who have already tested it. The Perles & Co community is here to help you!

Your reviews (1)
Notices subject to control
5/5
Average Grades
Please log in to use this feature
By Emilie (posted on : 06/01/2025 )
Très bon tutoriel, j'ai réalisé plusieurs boules pour ma table du jour de l'an !
Facile à réaliser
Translate the notice
Our Tiffanie expert answers you (07/01/2025 13:17:36)
Merci pour votre commentaire !! Bonne année !!
Translate the answer

Credits

Perles & Co, Internet & E-Commerce company [15/11/2024] Any reproduction, representation, adaptation, in any form whatsoever, even partial, is prohibited, except for reproduction for private use not intended for collective use, representation in the family circle (art. L 122-5 CPI) and online publishing on condition that the source is mentioned and a link is included to the corresponding page of our site www.perlesandco.com.