Free shipping on orders over 50€ up to 500g
French Online shop for beads and accessories for the creation of DIY jewellery and other creative hobbies

Log-in

Necklace with multicolored Miyuki tube beads and rhinestone planet pendant

Made by :Tiffanie Perles Co
Published on the :23/09/2021
Time :8h
Level :Intermediate
Prices :52,97€
Necklace with multicolored Miyuki tube beads and rhinestone planet pendant

How to make a beaded tube?

These tubes can be made with several different techniques. Previously, we presented you how to weave the beads into a tube using the brick stitch technique. This technique is presented by Soria in video in this tutorial: Long necklace and earrings woven in brick stitch tube. But you can also weave the tube in beads flat in Brick Stitch or in Peyote and then sew together the two sides to form a tube. This is what Sev Rine showed you in her flower bracelet tutorial.

Making a cylinder out of seed beads is not complicated since you just have to use one of the two basic weaving techniques to make them. The purpose of the Live of September 24, 2021 is to give you another idea of creation with these cylinder beads and to show you the difference between circular (tubular) Peyote weaving, which allows you to make bangles, and the flat Peyote weaving which can be transformed into a tube.

Indeed, the weaving is not done in the same direction. That makes that these two techniques have different specificities: Tension between the beads, flexibility, appearance of the thread. While the circular weaving Peyote allows to realize pretty bracelets or rings, it happens that the smaller the diameter of the tube, the more the thread is seen between the pearls and the more the tube is flexible and soft. On the other hand, tubes woven in Peyote or Brick Stitch are rather rigid, even very rigid if there are few beads. You must therefore choose the technique best suited to your project.

The Simple Peyote and Brick Stitch techniques are very suitable for tube beads, bracelets, semi-rigid necklaces and rings.

The Circular Tubular Peyote technique will work well with bangle bracelets and rings.

Tutorial steps

Step 1
Necklace with multicolored Miyuki tube beads and rhinestone planet pendant : Step 1

Cut 1.5 m of weaving thread and thread it onto a needle. Thread 2 gold beads, 12 eucalyptus beads and 3 gold beads. Thread in the golden one as shown in the picture. Tighten.

Step 2
Necklace with multicolored Miyuki tube beads and rhinestone planet pendant : Step 2

Thread a eucalyptus bead through the bead as shown in the photo. Tighten the weave.

Step 3
Necklace with multicolored Miyuki tube beads and rhinestone planet pendant : Step 3

Repeat step 2. Each time, you must add a bead and go into the next bead and not the next.

Step 4
Necklace with multicolored Miyuki tube beads and rhinestone planet pendant : Step 4

Finish with a golden bead and pass through the very first golden bead strung.

Step 5
Necklace with multicolored Miyuki tube beads and rhinestone planet pendant : Step 5

Thread a new gold bead and pass through the one you added in the previous step in the other direction.

Step 6
Necklace with multicolored Miyuki tube beads and rhinestone planet pendant : Step 6

Now that the base of the Peyote is created, you just have to fill each space with a new pearl.

Step 7
Necklace with multicolored Miyuki tube beads and rhinestone planet pendant : Step 7

Once you have 8 beads on each row, pass the needle through the gold bead on the other side from the outside of the weave.

Step 8
Necklace with multicolored Miyuki tube beads and rhinestone planet pendant : Step 8

If you then tighten the thread, the weave will start to form a tube. The beads on each side will interlock with each other. Go through the beads that are sticking out to join them together.

Step 9
Necklace with multicolored Miyuki tube beads and rhinestone planet pendant : Step 9

You can go through the beads one by one or try to go through two at a time.

Step 10
Necklace with multicolored Miyuki tube beads and rhinestone planet pendant : Step 10

Here is how it looks. Don't forget to join the 2 gold beads at the bottom. Then pass the thread through the weave following diagonal beads to catch it in the beads. Then cut the excess thread. Do the same with the other end of the thread.

Step 11
Necklace with multicolored Miyuki tube beads and rhinestone planet pendant : Step 11

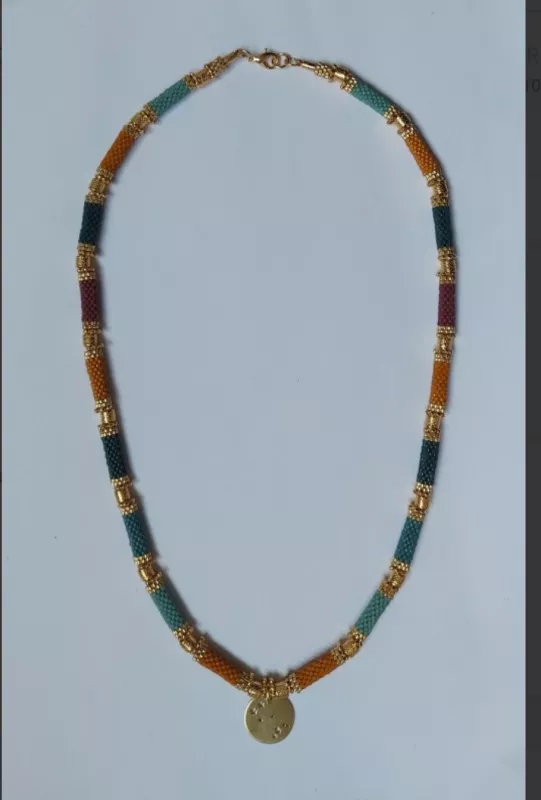
You need to weave 2 Sea foam tubes, 2 Eucalyptus tubes, 2 Evergreen tubes, 2 Plum Berry tubes and 6 Hawthorne tubes.

Step 12
Necklace with multicolored Miyuki tube beads and rhinestone planet pendant : Step 12

Put some jewellery glue in the gold tube and slide the cord through. It doesn't matter if the glue sticks out a little on the cord. You need a good amount to make sure it sticks. Leave it aside for 2 hours.

Step 13
Necklace with multicolored Miyuki tube beads and rhinestone planet pendant : Step 13

Make another weave with 4 beads high and 6 beads wide. Block the beginning thread in the weave and cut it. Keep only the longer of the two threads.

Step 14
Necklace with multicolored Miyuki tube beads and rhinestone planet pendant : Step 14

Close the weave directly on the cord by tightening very strongly. This step will prevent the other beads from slipping out of the cord. Add a little glue between the end cap and the weave, bringing the weave closer to the end cap. This will further strengthen the attachment.

Step 15
Necklace with multicolored Miyuki tube beads and rhinestone planet pendant : Step 15

Thread the following beads onto the cord. Between each tube, there is 1 flower washer, 1 golden tube and 1 flower washer. In the centre, the pendant is also framed by the same sequence of flower rings and gold tubes. Finish with the gold bead attachment shown in step 14 to 15. Cut the cord at 5 mm and glue the end to the cord and the golden pearl tube.

Step 16
Necklace with multicolored Miyuki tube beads and rhinestone planet pendant : Step 16

Wait 2 hours for the glue to dry, then add the clasp and the ring closed with an open ring on each side.

Result
Schema  Necklace with multicolored Miyuki tube beads and rhinestone planet pendant
Tiffanie Perles Co
 Tiffanie Perles Co - Les tutos de Tiffanie
Bonjour, moi c'est Tiffanie. J'étais créatrice et designer produit chez Perles & Co. J'adore tester de nouveaux DIY et vous faire profiter de mes expériences. Vous pouvez toujours consulter les tutoriels que je vous avais concocté sur le site !
Share with my friends
Which material to use ?
Please note that the quantities of the suggested equivalents are not necessarily exact. You can adjust them in your basket.
Supplies
Miyuki Delica 11/0 DB0374 - Mat Opaque Sea Foam Luster
4,80€
Miyuki Delica Duracoat 11/0 DB1832 - Galvanized Gold
4,80€
Plastic hollow cord 2 mm white Opaque x 1m
0,60€
Miyuki Delica 11/0 DB2106 - Duracoat Opaque Hawthorne
3,30€
Miyuki Delica Duracoat 11/0 DB2131 - Opaque Eucalyptus x8g
3,30€
6X0.7mm Open Jump Rings - European-made -fine Gold plated x50
2,60€
Gold filled closed jumprings 7x1mm  x4
GLD-476
Qty : 1
68 in stock
6,40€
Miyuki Delica Duracoat 11/0 DB2355 - Opaque Dyed Plum Berry x8g
3,70€
Miyuki Delica Duracoat 11/0 DB2358 - Opaque Dyed Evergreen x8g
3,70€
12mm Spring Clasp - Fine Gold plated x1
CLS-043
Qty : 1
136 in stock
1,60€
6.5x7 mm Flower shape round beads - Fine Gold Plated x5
7,73€ 6,97€
5x4mm Worked Tube Beads - Fine Gold Plated x5
4,80€
Subtotal : 50,07€
Tools
Jewel Glue Hasulith 30ml
OUTIL-007
Qty : 1
5443 in stock
2,40€
Miyuki Beading needles x6
OAC-162
Qty : 1
6915 in stock
1,50€
Kit of 3 pliers in Perles & Co pocket Pink x1
19,00€
Miyuki Nylon Beading thread B 0.25 mm Semolina  x50 m
3,30€
Subtotal : 26,20€
Please note that the quantities of the suggested equivalents are not necessarily exact. You can adjust them in your basket.
Equivalent product
Miyuki Delica Duracoat 11/0 DB1831 - Galvanized Silver
3,60€
Jumprings Closed 7x1 mm Fine silver plating x25
1,60€
Suggested reference for this article:
7x1mm Closed rings - Silver Tone x25
1,90€
12mm Spring Clasp - fine silver plating x1
1,40€
6.5x7 mm Flower shape round beads - Antique silver tone x5
6,97€ 6,30€
5x4mm Worked Tube Beads - Antique Silver Tone x5
4,42€
Your questions (4)

You have a question about this tutorial? Ask it to our team and the people who have already tested it. The Perles & Co community is here to help you!

By Oroz (13/09/2023 16:08:39)
Hola, ¿cómo se llaman las piezas que componen un pendiente tubular tras haber realizado el tubo peyote? Las piezas que "cierran" el tubo, tanto la de la base como la de la cabeza. Gracias.
Translate the question
Please log in to use this feature
Our Lucie T. expert answers you (18/09/2023 16:49:29)
Gracias por tu pregunta
Te vamos a contactar por correo electrónico ya que necesitamos más informaciones
Gracias
Translate the answer
By Florence (22/08/2022 15:43:07)
Bonjour, quelle longueur de fil nylon dois-je laisser de chaque côté de mon aiguille pour faire un tube ? Autrement dit sur les 1m50 de fil ou dois-je commencer mon tube ? Merci pour la réponse.
Translate the question
Please log in to use this feature
Our Tiffanie J. expert answers you (22/08/2022 16:26:37)
Bonjour, il vous faut juste laisser 15 à 20 cm de bout de fil pour pouvoir le coincer dans le tissage et le couper à la fin.
Translate the answer
By Brahy (11/10/2021 17:48:11)
Caroline
Translate the question
Please log in to use this feature
Answer from customer Tiffanie J. (12/10/2021 13:07:43)
Bonjour, je suis désolée je ne vois pas votre question.
Translate the answer
By Emmanuelle (11/10/2021 15:42:37)
Bonjour, A raison de 8 perles par rang, je ne comprends pas comment on peut fermer le tube. Est-ce que quelque chose m'a échappé ? Merci de votre réponse. Emmanuelle
Translate the question
Please log in to use this feature
Answer from customer Emmanuelle P. (13/10/2021 15:39:53)
Merci Tiffanie pour votre réponse. Je recommence.
Translate the answer
Answer from customer Tiffanie J. (12/10/2021 12:58:19)
Bonjour Emmanuelle, je suis désolée je ne comprends pas la question. Oui il y a 8 perles de large et 16 perles en hauteur. J'en parle dans ce facebook live si jamais cela peut vous aider : https://fb.watch/8B8PimZHWm/
Translate the answer
Your reviews (4)
Notices subject to control
5/5
Average Grades
Please log in to use this feature
By BAHLOUL Véronique (posted on : 24/07/2022 )
Très bonnes explications
Merci ?
Translate the notice
By Annick (posted on : 16/01/2022 )
Merci beaucoup
Je l?ai réalisé 3 fois je réfléchis pour le faire en 2 tons
Translate the notice
Our Lucie L. expert answers you (20/01/2022 11:33:14)
Bonjour Annick,

Merci pour votre avis et le partage de votre création ! Bonne création pour les autres à venir ;)
Translate the answer
By Marie-Josée (posted on : 21/12/2021 )
Collier superbe,je vais me lancer
Translate the notice
Our Lucie L. expert answers you (21/12/2021 12:35:24)
Merci Marie-Josée pour votre avis ! N'hésitez pas nous à montrer le résultat de votre création une fois terminée ;)
Translate the answer
By annael (posted on : 27/10/2021 )
Je l'ai fait, j'ai du rajouter des tubes en delicas pour ma taille, il est facile a faire et est très beau, merci pour ce tuto
Translate the notice
Answer from customer Tiffanie Perles&Co (28/10/2021 09:11:28)
Merci pour votre avis Annael !
Translate the answer

Credits

Perles & Co, Internet & E-Commerce company [23/09/2021] Any reproduction, representation, adaptation, in any form whatsoever, even partial, is prohibited, except for reproduction for private use not intended for collective use, representation in the family circle (art. L 122-5 CPI) and online publishing on condition that the source is mentioned and a link is included to the corresponding page of our site www.perlesandco.com.