
Average Grades

How to make Koi Carp with Miyuki beads?
How to make koi carp in Miyuki beads ?
Pearl weaving is a relaxing activity for many people (in some cases it would be the other way around!). A string of pearl weave grids exist with different patterns, whether intended to be worn as jewelry or brooches or to serve as decoration. We offer here a grating of pearls weaving of Carpes Koi. You can wear them in earrings, brooch or saltire. You choose !
The technique used is the weaving of needle beads called "Brick Stitch" or "brick point". This is a technique that does not require a loom. You just need Miyuki delicas beads 11/0 or 15/0 if you want a more detailed result, weaving and a thin needle size 12 or 13.
You do not know Brick Stitch weaving? Here is a list of tutorials to train you and help you understand the principle:
- How to make Brick Stitch weaving?
- How to start a Brick Stitch weave?
- How to make a weaving in brick stitch with increase and reduction?
If you like Asian-inspired jewelry here is also a list of tutorials that will have a good chance to please you:
- Raku and gingko polymer earrings
- PureCrystal cabochon earrings Scarlet Lotus
- DIY Lotus Flower Beads Miyuki Delicas
We also offer a variation of fish in red with black spots.
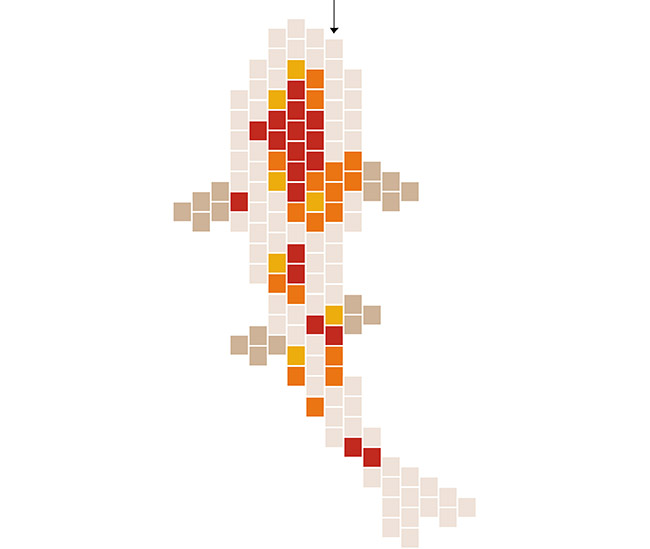

Here are some brief indications to guide you on the weaving of these fish pearls but this tutorial does not teach you the technique. Follow the links that we indicate above to discover it.
- Start by weaving the row of beads indicated by the arrow. This is the longest row. Keep a piece of wire 15 cm.
- Then continue weaving the tail of the fish before turning back by weaving the second row towards the center of the fish.
- Then finish weaving the right side of the fish with its fins.
- Move in the weave to weave the middle row of fish and then the left side.
- Wedge the thread into the weave and cut it. Thread the end of the thread on the needle and place yourself in the highest bead of the head of the fish. Pass the needle through a closed ring and back into the bead through the other side of the hole. Make a second round in the ring and in the bead before also stuck the thread in the weave and cut it.
- Attach the ear hook to the ring and go for the second earring!
We like to see what you do with our tutorials so do not hesitate to take a picture with this necklace and post it on instagram with #perlesandco or in our Facebook group of super customers Perles and Co!

Schema

Result


Associated keywords
Tutorial note (0)
0/5
Be the first to write a review!
To go further



Which material to use ?
Supplies
Questions (0)
You have a question about this tutorial? Ask it to our team and the people who have already tested it. The Perles & Co community is here to help you!
Reviews (0)
Reviews are moderated before publication.
Credits
Perles & Co, Internet & E-Commerce company [29/10/2019] Any reproduction, representation, adaptation, in any form whatsoever, even partial, is prohibited, except for reproduction for private use not intended for collective use, representation in the family circle (art. L 122-5 CPI) and online publishing on condition that the source is mentioned and a link is included to the corresponding page of our site www.perlesandco.com.