Average Grades
Free shipping on orders over 50€ up to 500g
French Online shop for beads and accessories for the creation of DIY jewellery and other creative hobbiesLog-in
0
Shopping cart
Shopping cart
Install Perles & Co on your home screen: tap the Share button in Safari, then "Add to Home Screen".
Install Perles & Co on your home screen for quick access and real-time updates.
Enable notifications to track your orders and never miss our highlights.

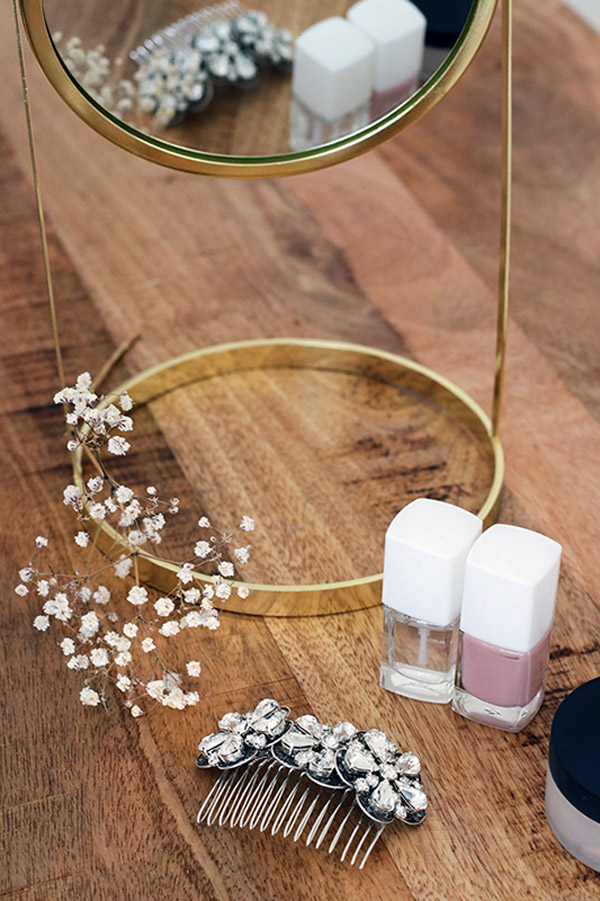
How to make a DIY comb for your wedding?
How to make a hair jewelry?
Is D-Day fast approaching? Whether you are the bride or invited to this big event, we offer you a nice DIY comb to put in your hair to beautify your hairstyle and your wedding attire. A legend even says that having something handmade would bring happiness (well, that's the excuse we found at Perles & Co to be able to create lots of new products every day). We thank the superb Hafida of the Instagram account Le Temps d'une Walima who made this tutorial for us at the top and thanks to whom you will be able to be the most beautiful of brides.
Not want or already married? This comb is made for you if you want a bohemian chic style for the summer, with a long linen dress and sandals or even barefoot, in short you have the image ...
For even more ideas for this important day, visit her Instagram account on which she offers lots of jewelry for the best day of your life. Find at the end of this tutorial full of other DIY jewelry ideas for wedding , but also DIY decoration ideas for a wedding .
Step 1: Start creating your comb
Before starting, cut about 20cm of wire beforehand so that you can fix the prints firmly to the hair comb.
Then start by making a knot on the prints with the wire to fix them to the comb. For that pass the wire between the central spaces of the flower while taking care to let exceed the first end.

Step 2: Hang the first flower
Take the remaining end and interweave it at the end of the start then twist the whole. Leave a length of wire to attach the stamp to the comb with the latter by surrounding it on the comb.
Step 3: Make as many flowers as you want
Repeat step 2 as many times as you want flowers: here Hafida has chosen to position 3 flowers.
Remember that the prints must be firmly attached to the comb.

Step 4: Position the crystals
Now position the crystals on the settings thanks to the stall which allows the claws to be folded down
Step 5: Glue the crystals
Continue by gluing the seams following the pattern on the prints by applying glue to the contact points of the prints.

Step 6: Let it dry
Let dry 24 hours On a flat surface, your comb is finished!
We let you find lots of new ideas for a wedding:
Our DIY wedding jewelry ideas:
Our DIY wedding decoration ideas:
Did you get married this summer or is your big day coming soon? In any case, we want to see all the creations you have made! Find us on our social networks: on our Facebook page and on our Instagram page .


You have a question about this tutorial? Ask it to our team and the people who have already tested it. The Perles & Co community is here to help you!
Credits
Perles & Co, Internet & E-Commerce company [27/08/2019] Any reproduction, representation, adaptation, in any form whatsoever, even partial, is prohibited, except for reproduction for private use not intended for collective use, representation in the family circle (art. L 122-5 CPI) and online publishing on condition that the source is mentioned and a link is included to the corresponding page of our site www.perlesandco.com.
