Average Grades
Free shipping on orders over 50€ up to 500g
French Online shop for beads and accessories for the creation of DIY jewellery and other creative hobbiesLog-in
0
Shopping cart
Shopping cart


Step 1
Print out your fox template and cut out each triangular part.

Step 2
Roll out each color of clay using either a rolling pin or a pastry machine. Make sure they have the same thickness. Place your paper triangles on the corresponding clay, then cut out each piece of clay.

Step 3
Remove a strip of clay from the white rectangle you're going to reserve. Build your fox head by placing the snout part first on the white plate. Use the reserved strip of clay to make thin strips of about 1mm. Place these strips between each part of the head.

Step 4
In the same way, place strips all around the fox. Place some baking paper over your work and, using a card, erase the clay joints by making small circles.

Step 5
Take a strip of blue clay, roll it under your index finger to refine it, then cut 2 small similar parts to form the eyes and a small ball to form the tip of the snout. Place these elements in place, then smooth again with baking paper. You can trim the edges of your creation with your blade if your lines are slightly distorted. Bake at 120 degrees for 30 minutes.
Step 6
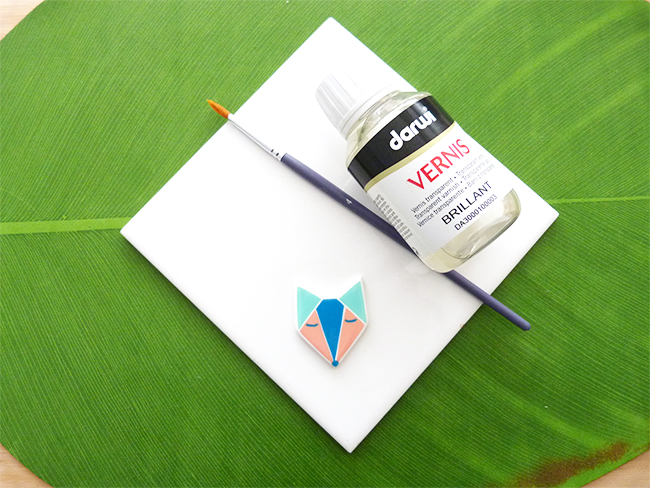
Apply a thick coat of varnish , leave to dry for 30 minutes before turning over your piece.

Step 7
Glue your brooch to the back of your fox, and wait a few hours before wearing it.
For even more creative ideas, we invite you to visit our "Tutorials" tab at the top left. We love to see your creations and how you made them, so share your DIY world with us via Facebook, or on Instagram thanks to the hashtag #Perles&Co!


You have a question about this tutorial? Ask it to our team and the people who have already tested it. The Perles & Co community is here to help you!
Credits
Perles & Co, Internet & E-Commerce company [30/07/2017] Any reproduction, representation, adaptation, in any form whatsoever, even partial, is prohibited, except for reproduction for private use not intended for collective use, representation in the family circle (art. L 122-5 CPI) and online publishing on condition that the source is mentioned and a link is included to the corresponding page of our site www.perlesandco.com.
