Free shipping on orders over 50€ up to 500g
French Online shop for beads and accessories for the creation of DIY jewellery and other creative hobbies

Log-in

DIY Starry Sky Brooch with Lapis Lazuli Beads

Made by :Tiffanie Perles Co
Published on the :23/10/2019
Time :0 minutes
Level :Easy
Prices :24,62€

How to make a star and moon brooch?

How to make a star and moon pin?

Astral theme, starry sky and esoteric jewelry are the trend fall / winter 2019/2020. What to add a little magic and mysticism to his daily life! Big star earrings with little astro pendants , multiple ideas exist and stars are more than present! We have decided to offer you this little tutorial diy easy to make a brooch with pendants moon and star. Wear on a blazer jacket or a plain sweater. A touch of dream to counter the mood sullen cold days.

  1. Thread a Lapis Lazuli bead on a round head nail. Cut the nail 0.8 mm from the bead. Bend the nail 90 ° then form a loop with a round plier. Open the ring on the other side and add the golden star pendant.
  2. Repeat with another Lapis Lazuli bead and a moon pendant. Extend it with a piece of 13 mm chain. The ends of the chain will be connected with a rings on one side and the nail on the other.
  3. Put three Lapis Lazuli beads on ball head nails, cut the nail 0.8 mm from the bead and form curls. Place an 8mm string on one of them and put a ring on the other side.
  4. Thread on the brooch two crimp pearls, the charm with the star, two crimp pearls, the charm with the moon, a Lapis Lazuli charm, two crushed pearls, the Lapis Lazuli charm with the chain, two crushed pearls, the latest Lapis Lazuli charm and one last crushed pearl.
  5. Flatten the beads to crush ends to hold everything in place on the spit.

gold star and moon pin and lapis lazuli

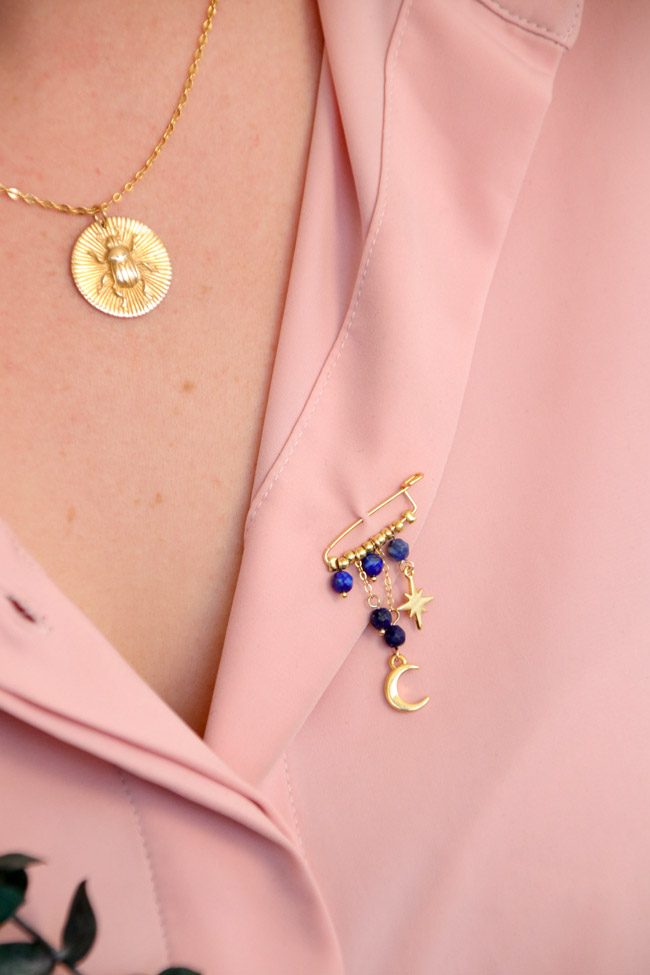
Find the gold-plated scarab pendant from the picture above here!

We like to see what you do with our tutorials so do not hesitate to take a picture with this necklace and post it on instagram with #perlesandco or in our Facebook group of super customers Perles and Co!

Result
Schema  DIY Starry Sky Brooch with Lapis Lazuli Beads
Tiffanie Perles Co
 Tiffanie Perles Co - Les tutos de Tiffanie
Bonjour, moi c'est Tiffanie. J'étais créatrice et designer produit chez Perles & Co. J'adore tester de nouveaux DIY et vous faire profiter de mes expériences. Vous pouvez toujours consulter les tutoriels que je vous avais concocté sur le site !
Associated keywords
Share with my friends
Which material to use ?
Please note that the quantities of the suggested equivalents are not necessarily exact. You can adjust them in your basket.
Supplies
Beads Faceted round beads  4 mm Lapis Lazuli x20
3,80€
Thin Oval Mesh convict Chain 1.3  mm fine Gold plated x1m
5,60€
3x0.6mm Open Jump Rings - European-made -fine Gold plated x50
1,40€
Eye Pin 25x0,7 mm - European made - fine Gold plated X25
2,00€
Crimp beads 2.5 mm - European-made - fine Gold plated x50
5,60€
Eye pins 25x0.70 mm - Fine Gold Plated x 25
2,70€
Suggested reference for this article:
Eye pins 51x0.70 mm - Fine Gold plated x 25
3,00€
Subtotal : 24,40€
Your questions (2)

You have a question about this tutorial? Ask it to our team and the people who have already tested it. The Perles & Co community is here to help you!

By Estelle (14/09/2021 17:05:09)
J'essais de faire ma première boucle avec ma pince ronde mais ce n'est pas top.. Est-ce parce que je n'étais pas bien à 90° ou est-ce simplement un coup de main a prendre?
Translate the question
Please log in to use this feature
Our Lucie L. expert answers you (30/12/2021 10:24:54)
Bonjour Estelle,
Il en effet important de plier la tige à 90° avant de former la boucle avec votre pince. Cependant, il s'agit aussi d'un coup de main à prendre avant de former une boucle parfaite, il faut donc un peu d'entrainement. Bonne création ;)
Translate the answer
By Estelle (14/09/2021 17:02:59)
J'essais de faire ma première boucle avec ma pince ronde mais ce n'est pas top..
Translate the question
Please log in to use this feature
Answer from customer Tiffanie J. (14/09/2021 17:06:54)
Bonjour, cela demande un peu d'entraînement. Pensez bien à plier le clou à 90° puis à faire la boucle en saisissant le bout du clou avec le bout de la pince puis à tourner dans le sens inverse de la pliure du clou.
Translate the answer
Your reviews (0)
Notices subject to control
Please log in to use this feature

Credits

Perles & Co, Internet & E-Commerce company [23/10/2019] Any reproduction, representation, adaptation, in any form whatsoever, even partial, is prohibited, except for reproduction for private use not intended for collective use, representation in the family circle (art. L 122-5 CPI) and online publishing on condition that the source is mentioned and a link is included to the corresponding page of our site www.perlesandco.com.